Download
1 / 24
240 likes | 411 Views
Introduction to our On-Line Self Service Center. at. WWW.CILINC.COM. Self Service Center Features. View up to the minute Job status at your convenience any time from anywhere there is an internet connection.

E N D
Introduction to our On-Line Self Service Center at WWW.CILINC.COM
Self Service Center Features • View up to the minute Job status at your convenience any time from anywhere there is an internet connection • Print out “Open Order Reports” that detail all your jobs currently at CIL and letting you know when they are scheduled to ship • Check to see which jobs are being shipped to your facility without having to make a phone call. • Use the Parts list to view what parts we have in our system, what process they receive, and what will be noted on your Cert • Have the ability to create new parts , enter or modify orders and track their progress.
SecurityFeatures • Accounts are password protected which can be changed by the customer only. Forgotten passwords can be sent only to the email address that you have specified during account setup • Users can only see data pertaining to the account they logged into. Ex. Customer A can NOT see Customer B’s data. • A dedicated server on site at CIL is used not a second party hosting service • Our Server is behind a NAT enabled firewall, all unused TCP ports are Stealth not just closed, so Hackers don’t know we exist! • Our extensive Backup program not only ensures recovery but minimal down time through the use of RAID, Redundant Servers, Near line and Off site Backups
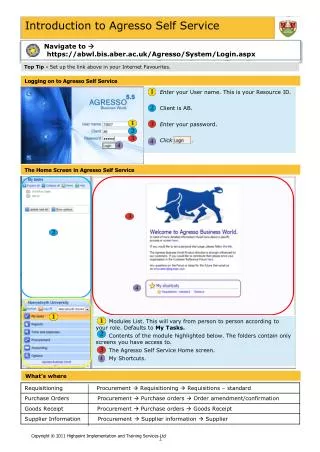
To Start: log on to http://www.cilinc.com then in the top left click on the Self Service Center Link
Enter your Username and password at the login window then click submit Once logged in use the menu links in the table to perform desired functions.
Under Customer Info you can view how you are listed in our database. By clicking edit you can change contact names, phone and Fax numbers, and email addresses By using the links across the top of the window or the Quick Jump Menu you can navigate to any area of the Self Service Center.
Parts List: Lists all parts currently in the CIL database. They can be viewed as pictured below or individually by clicking on the view link to the left of each part
The advanced search feature can be used on any screen to create very detailed or very vague searches, to help you find what your looking for The Search below shows only parts made of Aluminum, to be Chemical Conversion coated class 3, destined for Boeing and whose part # starts with 01
Open Orders Shows All Jobs still active at CIL, by clicking Status you can view up to the minute details on the status of your order.
You can also print out an Open Orders Report, or use the Export feature to place the data in an excel spreadsheet or Word Document.
Jobs Shipped today: Shows all jobs that have been shipped to your company today Jobs Shipped By Date: can show jobs shipped on a particular day or range of dates
Looking to the future . . . What you have been shown so far is just a sample of the services we can provide. In the future you will be able to enter your own parts into our system assisting in the Contract Review process, uploading blue prints, photo’s etc.CIL has created our own production software as well as this interface that we will be providing you. Because we are not bound by limitations of the software package, we will be looking to you for your valuable input on what you would like to seeWe look forward to working with you, to help us develop a tool that will prove to be beneficial to all of us.
GettingStarted Let’s create a new order! • After logging in, click on enter order from the Table
First type in your PO # Then Date received and Due Dates You can click on the calendar Icon to bring up the calendar tool to select your Due Date.
Continue completing your order. Certs needed. Prints included. Notes: for any Information you want us to know about this Job.. Check off Import , look over your work and then click Save. Once you get the message stating << Record Saved >> Click on the Back to list link.
You will return to the order entry window, you new order will be at the top of the list. Now Lets add some Line Items (usually parts) by clicking the Line items link.
After clicking line items it will let you know there were “No Records Found. This is because this is a new order. Next Click the Add Line Items Link This will bring you to the New Items screen
Enter your Line Items:Line Item #Part # (NOTE: your part must already exist in our system if it is a New parts see instructions for New Parts.)Qty:Lot/Job#: use to record any lot, job, or serial numbers.Priority: Select 1 0f 3 possible choices Standard, Rush, 24 Hour (NOTE 24 hour is a premium service subject to additional charges)Department: Select 1 0f 3 possible choices : Anodize for all anodize types and conversion coatings, Paint for paint jobs, Electroplating for any type of plating, passivate, or Alkaline clean for Non aluminum.Notes: This is where you can add any special process requirements.When complete click Save.
After Clicking Save you will see this screen stating the record was added. If you have no more items to add click back to list.If you have more items to add just repeat the steps from the previous slide.
After you have entered all of your line items and click back to list you will return to the enter orders screen. Your order and order items will be displayed.If you would like to make changes to your line items just click edit.To verify that your part is in our system, and is correct click on part quick view. Don’t Forget you can use the quick jump menu to switch to any screen quickly.
Clicking Part quick view in enter orders will show you exactly how your part is entered in our system, how it will be processed, and what will be printed on your Certification.. If there is a field that is not displaying all the information because it does not fit just click on the More link to see it all in a separate window.
Once you have verified that your part info and order info is correct click the back button to return to your order page. Your order is complete and in our system awaiting to be processed ! Now click on picking ticket to print out the picking ticket for this order. Send the picking ticket with your parts to CIL. Print an extra copy for you own records if you wish.