Download

1 / 28
280 likes | 285 Views
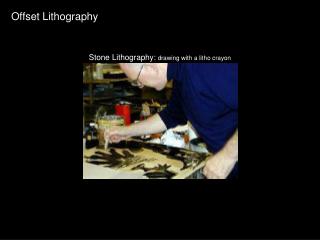
Laboratory Demo: Photo-Lithography. - Place the wafer in a tin plate. - To make sure that the wafer is completely dry, place the tin plate containing the wafer into the dehydration oven for 30 minutes to "Pre-Bake" it.

E N D
- To make sure that the wafer is completely dry, place the tin plate containing the wafer into the dehydration oven for 30 minutes to "Pre-Bake" it.
- Using teflon tweezers, place the wafer on the wafer chuck in the center of the Photoresist Spinner.
- Using a Nitrogen Gun, blow the wafer surface to remove any dust particles.
- Using an eye dropper, flood the wafer surface with primer to facilitate resist adhesion to substrate.
- Press the spin button which will cause the wafer to spin at ~ 5000 rpm. Centrifugal force will cause excess primer to move away from the center until all wafer is primed and ready to accept resist. Then release spin button.
- No photos could be taken while resist is applied since it is sensitive to light. Actually all lighting in the clean room is covered by yellow filters.
- Give the resist a soft-bake in an oven at temperatures between 90 and 120 °C to semi-harden the resist. Meanwhile setup the mask aligner.
- For each layer there is a separate mask (patterned glass).
- Place the mask in the wafer holder so that the emulsion side of the mask is facing downward toward the wafer.
- Tighten the two knobs to secure the wafer holder in place.
- Bring the resist-covered wafer back from the soft-bake oven.
- Carefully place the wafer on the wafer chuck of the aligner.
- Carefully slide the wafer chuck into the aligner so that the wafer is positioned under the mask.
- Slowly raise the lever so that the wafer comes into contact with the mask Then press the button marked “Separation” that will cause the wafer ~ 0.5 mm away from the mask without being scratched..
- Adjust the microscope knobs as well as knobs (three) that allow you to move the wafer in horizontal and vertical directions.
- Press expose button. A very bright light will come on inside the aligner. The exposure time is set according to the type of resist (~10 s)
- The type of developer solution used is determined by the type of resist chosen.
- Carefully place the wafer into a chemically resistant carrier.
- Immerse the wafer in the developer for the recommended time ( ~ 30 s).
- Immediately after plunge the wafer into the beaker filled with water to stop the development process.
- Use nitrogen gun to thoroughly dry the wafer, front and back.
- Inspect the wafer under the microscope to see if the patterns are clear and well defined.
- If everything is OK , place the wafer in the hard-bake oven which should be preheated to the required temperature (120 - 140 °C).