Download
1 / 153
1.57k likes | 1.75k Views
Isometric Drawing. Sacramento City College EDT 310. Drawing Types. Pictorial Drawing types: Perspective Orthographic Isometric Oblique Pictorial - like a picture. Pictorial Drawing. Pictorial drawing is part of graphic language. Used in Engineering Architecture Science

E N D
Isometric Drawing Sacramento City College EDT 310 EDT 310 - Isometric Drawing
Drawing Types • Pictorial Drawing types: • Perspective • Orthographic • Isometric • Oblique • Pictorial - like a picture EDT 310 - Isometric Drawing
Pictorial Drawing • Pictorial drawing is • part of graphic language. • Used in • Engineering • Architecture • Science • Electronics • Technical illustration, and • Other professions. EDT 310 - Isometric Drawing
Pictorial Drawing • Examples of pictorial drawing use: • Architects • Use pictorial drawing to show what a finished building will look like. • Ad agencies • Use pictorial drawing to display new products. EDT 310 - Isometric Drawing
Pictorial Drawing EDT 310 - Isometric Drawing
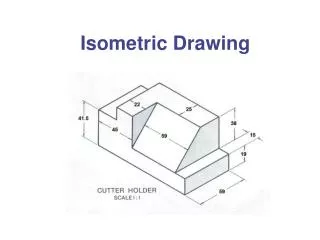
Pictorial Drawing • Pictorial drawing is often used in exploded drawings on production and assembly drawings. • Refer to Figure 12-1 EDT 310 - Isometric Drawing
Pictorial Drawing • Views are made to illustrate the operation of machines, and equipment. • Pictorial sketches are used to help convey ideas that are hard to describe in words. EDT 310 - Isometric Drawing
Pictorial Drawing EDT 310 - Isometric Drawing
Pictorial Drawing • Pictorial drawing can be • Perspective Views • Show object as it actually looks to the eye. • Isometric Views • Easier to draw than perspective. • Do not look as good as perspective. • Oblique Views • Easier to draw than perspective. • Do not look as good as perspective. EDT 310 - Isometric Drawing
Isometric Drawing EDT 310 - Isometric Drawing
Isometric Drawing • Pictorial drawings, in general, are made to show how something looks. • Since hidden lines are “not part of the picture” they are normally left out and are not drawn in isometric drawings. EDT 310 - Isometric Drawing
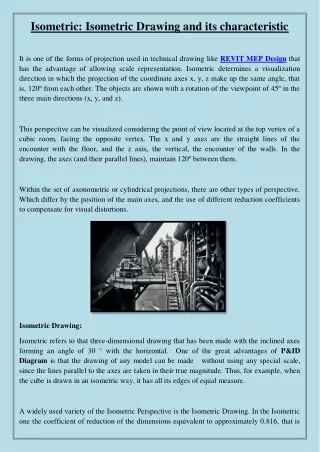
Isometric Drawing • Isometric drawing is • Similar to isometric sketching except that it is created using instruments. EDT 310 - Isometric Drawing
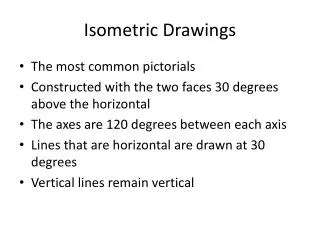
Isometric Drawing • Objects are aligned with three isometric axes at 120o angles to each other. • Refer to Figure 12.4. EDT 310 - Isometric Drawing
Figure 12-3 EDT 310 - Isometric Drawing
Figure 12-3 EDT 310 - Isometric Drawing
Isometric Drawing • X, Y and Z axes • Can be positioned in several arrangements • Must remain at 120 degrees to each other. EDT 310 - Isometric Drawing
Isometric Drawing • Vertical Orientation - Regular Position • First position - the axes meet at the upper front corner of the object • Second position - the axes meet at the lower front corner of the object. EDT 310 - Isometric Drawing
Figure 12-4 EDT 310 - Isometric Drawing
Figure 12-4 EDT 310 - Isometric Drawing
Isometric Drawing • Horizontal Orientation - Regular Position • First position - the axes meet at the left front corner of the object • Second position - the axes meet at the right front corner of the object. EDT 310 - Isometric Drawing
Figure 12-4 EDT 310 - Isometric Drawing
Figure 12-4 EDT 310 - Isometric Drawing
Isometric Lines EDT 310 - Isometric Drawing
Isometric Lines • Any line parallel to one of the isometric axes is called an isometric line. EDT 310 - Isometric Drawing
Non-isometric Lines EDT 310 - Isometric Drawing
Non-isometric Lines • Lines that are not parallel to one of the axes are called non-isometric lines. EDT 310 - Isometric Drawing
Non-isometric Lines • Measurements can be made only on isometric lines. • Non-isometric lines do not show in their true length so they cannot be measured. EDT 310 - Isometric Drawing
Non-isometric Lines EDT 310 - Isometric Drawing
Non-isometric Lines EDT 310 - Isometric Drawing
Drawing Non-Isometric Lines • To draw non-isometric lines: • Locate the end points first. • Use the Box Method. • Refer to Figure 12-6. EDT 310 - Isometric Drawing
Drawing Non-Isometric Lines EDT 310 - Isometric Drawing
Drawing Angles • Follow the procedure shown in Figure 12-7 • Construct angle parts AO, AB, OB • Transfer AO and AB to the isometric cube • Lay off AO on the base of the cube • Draw AB parallel to the vertical axis • Finally, connect points O and B to complete the isometric angle EDT 310 - Isometric Drawing
Drawing Angles EDT 310 - Isometric Drawing
Isometric Circles EDT 310 - Isometric Drawing
Isometric Circles • In isometric drawings, circles appear as ellipses. EDT 310 - Isometric Drawing
Drawing Isometric Circles • Use the four centered approximation method to draw the ellipse. • Refer to Figure 12-9. EDT 310 - Isometric Drawing
Drawing Isometric Circles • First, draw an isometric square, with the sides equal to the diameter of the circle EDT 310 - Isometric Drawing
Drawing Isometric Circles • Use a 30o 60o triangle to locate points A, B, C, D and points 1, 2, 3, 4 EDT 310 - Isometric Drawing
Drawing Isometric Circles • Use A and B as centers, and radius = A2, draw the arcs EDT 310 - Isometric Drawing
Drawing Isometric Circles • Use C and C as centers, radius = C4, draw arcs to complete the ellipse EDT 310 - Isometric Drawing
Isometric Cylinder • To draw an isometric cylinder • Use Figure 12-9 to construct the top ellipse. • Drop centers at a distance equal to the height of the cylinder. • Draw three arcs using the same radii as the ellipse at the top. • Notice that the radii for the arcs at the bottom match those at the top. EDT 310 - Isometric Drawing
Isometric Cylinder EDT 310 - Isometric Drawing
Isometric Quarter Rounds • To draw quarter rounds • Refer to Figure 12-12. • Follow procedure for quarters of circles. • In each case measure the radii along the tangent lines from the corner. • Then draw the perpendiculars to locate the centers for the isometric arcs. • Figure 12-13 shows how to draw outside and inside corner arcs. EDT 310 - Isometric Drawing
Isometric Quarter Rounds EDT 310 - Isometric Drawing
Isometric Templates EDT 310 - Isometric Drawing
Isometric Templates • Isometric templates come in a variety of forms • 15o, 30o, 45o, 50o, 60o • They are convenient and can save you time. EDT 310 - Isometric Drawing
Creating an Isometric Drawing EDT 310 - Isometric Drawing
Creating an Isometric Drawing • Filler Block Example • Refer to Figure 12-17. EDT 310 - Isometric Drawing