Download
1 / 17
210 likes | 384 Views
Introduction to GUI. Java offers a great number of pre-defined classes to support the development of graphical user interfaces These are broken down into roughly 3 categories containers – JFrames, JPanels, JApplets GUI objects – buttons, input and output boxes, etc

E N D
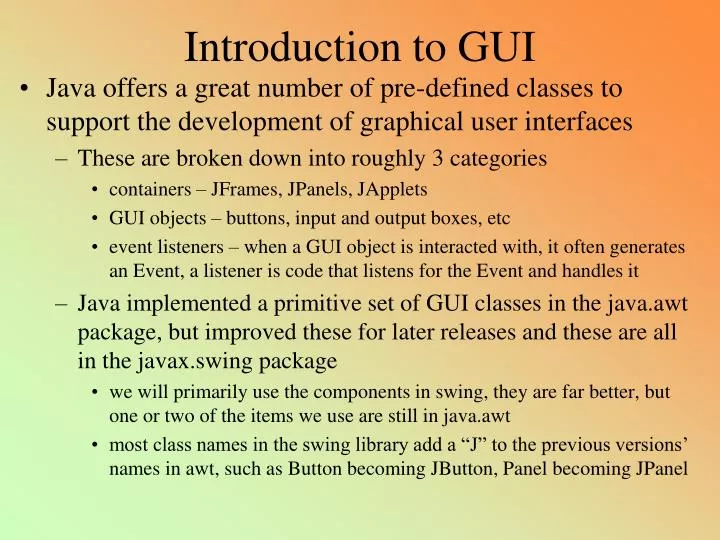
Introduction to GUI • Java offers a great number of pre-defined classes to support the development of graphical user interfaces • These are broken down into roughly 3 categories • containers – JFrames, JPanels, JApplets • GUI objects – buttons, input and output boxes, etc • event listeners – when a GUI object is interacted with, it often generates an Event, a listener is code that listens for the Event and handles it • Java implemented a primitive set of GUI classes in the java.awt package, but improved these for later releases and these are all in the javax.swing package • we will primarily use the components in swing, they are far better, but one or two of the items we use are still in java.awt • most class names in the swing library add a “J” to the previous versions’ names in awt, such as Button becoming JButton, Panel becoming JPanel
Types of GUI Components • JFrame – a container, you place items inside the Frame • JApplet – a container used to run code in web browsers • JPanel – an intermediate container which cannot be viewed by itself, but can be placed inside a frame or applet • LayoutManager – an object that configures the components in a JPanel • types: FlowLayout, GridLayout and BorderLayout • JButton – click to generate an Event to be handled • JLabel – to output Strings • JTextField – to input Strings (or other data) • JTextArea – to input or output multi-lined text • JCheckBox – boxes that can be clicked on and off • JRadioButton – collection of buttons, only one can be selected at a time • JComboBox – type of menu, click on the box and a menu or list appears • JMenu – same as combo box but appears in the title bar • JSlider – to offer a range of values • JSpinner – click in the up or down arrow to increase/decrease the value
Creating a GUI import javax.swing.*; // needed for the GUI items import java.awt.*; // needed for LayoutManager public class Template extends JFrame { private static final int X_SIZE = 520, Y_SIZE = 520; public static void main(String[] args) { JFrame frame = new JFrame("GUI Example1"); frame.setSize(X_SIZE, Y_SIZE); GuiPanel panel = new GuiPanel(); frame.getContentPane().add(panel); frame.pack(); frame.setVisible(true); frame.setDefaultCloseOperation(JFrame.EXIT_ON_CLOSE); } private static class GuiPanel extends JPanel { public GuiPanel() { } } } Here’s where most of our code will go
Example • Here, we see the code to create some JButtons and a JLabel, and position them within the JFrame using JPanels JButton button1 = new JButton("Button 1"); JButton button2 = new JButton("Button 2"); JButton button3 = new JButton("Button 3"); JPanel panel1 = new JPanel( ); panel1.add(button1); panel1.add(button2); panel1.add(button3); JLabel output = new JLabel(“ ”); JPanel panel2 = new JPanel(new GridLayout(2, 1)); panel2.add(panel1); panel2.add(output); add(panel2); What happens when you click on one of the JButtons? Nothing. Why not? Two panels, one consists of 3 buttons, one consists of a panel in row 1 and the JLabel in row 2 – the JLabel will get be used later in these notes
Layouts • There are 3 main layouts that we will use • FlowLayout – JPanels will default to this form if we don’t specify otherwise • items are inserted in the same row until there is no room, then the next items go into the next row, etc (the previous slide used this default mode) • GridLayout – allows you to specify how many items per row by indicating a row and column number • in general, you specify GridLayout(x, y) for x rows and y columns • items are added to the first row until there is 1 item in each column, then it goes onto the next row, so it is similar to FlowLayout • BorderLayout – gives you five regions, NORTH, SOUTH, EAST, WEST and CENTER • when adding an item to the container, specify which of the five regions you want it placed into • the layout manager will space items out evenly so that each item takes up the same amount of space – this can lead to lopsided looking GUIs, so you will want to create JPanels and insert them into other JPanels – see the example on the next slide
Another Example • The first set of code is sloppy, the second set makes the GUI look better JButton button1 = new JButton("Button 1 has a long title doesn't it?"); JButton button2 = new JButton("2"); JButton button3 = new JButton("3"); JButton button4 = new JButton("4"); JPanel panel = new JPanel(new GridLayout(2, 2)); panel.add(button1); panel.add(button2); panel.add(button3); panel.add(button4); add(panel); … set up the 4 JButtons as before JPanel panel1 = new JPanel( ); JPanel panel2 = new JPanel( ); JPanel panel3 = new JPanel(new GridLayout(2, 1)); panel1.add(button1); panel2.add(button2); panel2.add(button3); panel2.add(button4); panel3.add(panel1); panel3.add(panel2); add(panel3);
Reacting to the JButtons • To this point, we have only set up the GUI, if you click on any JButton, nothing happens • why not? • Clicking on a JButton generates an ActionEvent • but without an ActionListener, your program ignores that event • We must then implement an ActionListener, how? • you must import java.awt.event.*; for the Event classes • next, add “implements ActionListener” to the class header • this says that a listener will be made available in this class • now, we must describe who will handle the event so add button1.addActionListener(this); (and similarly for button2 and any other JButton) – this means this class • finally, to implement the ActionListener you must include a method called actionPerformed in your class • this method is called every time one of the JButtons is clicked, so whatever you want to have happen will be implemented in this method
Example Continued public class Template implements ActionListener { private static JLabel output; public Template( ) { JButton button1 = new JButton("Button 1"); JButton button2 = new JButton("Button 2"); JButton button3 = new JButton("Button 3"); JPanel panel1 = new JPanel( ); button1.addActionListener(this); button2.addActionListener(this); button3.addActionListener(this); panel1.add(button1); panel1.add(button2); panel1.add(button3); output = new JLabel(" "); JPanel panel2 = new JPanel(new GridLayout(2, 1)); panel2.add(panel1); panel2.add(output); add(panel2); } • We enhance our previous example of 3 buttons by having the GUI output into the JLabel a message indicating which button was clicked All three buttons will have the same handler, written in this class public void actionPerformed(ActionEvent e) { String message = "You clicked on " + e.getActionCommand( ); output.setText(message); } } // ends Template inner class NOTE: main method omitted for space purposes
Some Comments • We moved the declaration of the JLabel output to be placed before our constructor function • this allows the variable output to be known throughout the class, so it can be referenced in both the constructor (to add it to the JFrame) and in actionPerformed • why didn’t we do this with any other GUI components? • actionPerformed is passed an event, the event contains the name of the JButton pressed, we use this information in our output, we get this String using getActionCommand( ) • we can change a label’s String by using setText(…) • The word this is used in Java to say that the needed code will be implemented here, in this class • there are many alternative ways to specify where an event listener will be placed, we will stick with this approach because its easiest
JTextField for Input • The JLabel allows you to output text • for instance, we might create a calculator program where the JButtons are the various digits and mathematical operators and the JLabel will display the total so far • The JTextField allows the user to enter text • and then we can input whatever was typed in by using the getText( ) method • like JOptionPane, any text input is a String, so we might need to use Integer.parseInt to convert it to an int value • The JTextField can also have a String placed into it to be displayed at times when the user is not entering information into it, but this is optional • use setText(text goes here); • In the next example, we will use the JTextField for input
Temperature Conversion Example private static JTextField input; private static JLabel output; public Temperature( ) { JLabel label1 = new JLabel("Enter temperature: "); input = new JTextField("", 3); JButton ctof = new JButton("Celcius to Fahrenheit"); JButton ftoc = new JButton("Fahrenheit to Celcius"); output = new JLabel(" "); JPanel panel1 = new JPanel(); panel1.add(label1); panel1.add(input); JPanel panel2 = new JPanel(); panel2.add(output); JPanel panel3 = new JPanel(); panel3.add(ctof); panel3.add(ftoc); JPanel total = new JPanel(new BorderLayout()); total.add(panel1, BorderLayout.NORTH); total.add(panel2, BorderLayout.CENTER); total.add(panel3, BorderLayout.SOUTH); add(total); ctof.addActionListener(this); ftoc.addActionListener(this); } main method omitted, but is much like the previous main, but with the word Temperature used in place of Template Used for input
Rest of the Code The DecimalFormat class is in the package java.text.*; so we need to add import java.text.*; at the top of our program public void actionPerformed(ActionEvent e) { String message = ""; DecimalFormat df = new DecimalFormat("0.#"); int temp1 = Integer.parseInt(input.getText()); input.setText(""); // reset input field if(e.getActionCommand().equals("Celcius to Fahrenheit")) message = "" + temp1 + "C becomes " + df.format(9.0/5*temp1+32) + "F"; else message = "" + temp1 + "F becomes " + df.format(5.0/9*(temp1-32)) + "C"; output.setText(message); } Unlike our previous example with 1 button, we now have 2. Since this actionPerformed method is called whether ctof or ftoc is clicked, we need to know which one was clicked to know which set of code to run
Developing a GUI • Here, we go step-by-step in developing a GUI • Let’s create a “change counter” • there will be a button for each type of change (penny, nickel, dime, quarter, half dollar, silver dollar) • there will be a clear button to remove the current amount • there will be a label to output the computed amount so far • when the user clicks on a button, it will take that amount and add it to the total and update the total, or if the clear button is clicked on, it will change the total to 0 • We first set up the GUI itself • 7 buttons and a label, lets organize them so that we have 2 rows of the 3 “change” buttons, and 1 row of the clear button and label • we will use 3 JPanels • one will organize the 6 change buttons in a 2x3 grid • one will organize the clear button and label in one row • one will contain the other two panels
Code – Part 1 import javax.swing.*; // needed for the Jgui items import java.awt.*; // needed for LayoutManager import java.awt.event.*; // needed for ActionListener import java.text.*; // needed for DecimalFormat public class ChangeCounter extends JFrame implements ActionListener { public static void main(String[] args) { ChangeCounter frame = new ChangeCounter( ); frame.setTitle(“Change Counting Program"); frame.pack( ); frame.setVisible(true); frame.setDefaultCloseOperation(JFrame.EXIT_ON_CLOSE); } private static JLabel output; // the output label private static double amount; // the current amount entered
Code – Part 2 public ChangeCounter( ) { JButton penny = new JButton("$.01"); // … same for the other 5 “change” buttons JButton clear = new JButton("Clear"); penny.addActionListener(this); // … same for the other 5 “change” buttons clear.addActionListener(this); output = new JLabel("$ 0.00"); JPanel panel1 = new JPanel(new GridLayout(2, 3)); panel1.add(penny); // … same for the other 5 “change” buttons JPanel panel2 = new JPanel( ); // uses FlowLayout panel2.add(clear); panel2.add(output); JPanel panel3 = new JPanel(new BorderLayout( )); panel3.add(panel1, BorderLayout.NORTH); panel3.add(panel2, BorderLayout.SOUTH); add(panel3); }
Code: Part 3 public void actionPerformed(ActionEvent e) { DecimalFormat df = new DecimalFormat("0.00"); String button = e.getActionCommand(); if(button.equals("Clear")) amount = 0.00; else if(button.equals("$.01")) amount += 0.01; else if(button.equals("$.05")) amount += 0.05; else if(button.equals("$.10")) amount += 0.10; else if(button.equals("$.25")) amount += 0.25; else if(button.equals("$.50")) amount += 0.50; else if(button.equals("$1.00")) amount += 1; output.setText("$ " + df.format(amount)); } The DecimalFormat class allows us to specify how double values will be output, here we use a dollar and cents format Because this method and the constructor both reference output and amount, we must declare them as class variables
More on JLabels and JButtons • Aside from Strings, you can insert pictures into JLabels and JButtons • JLabel label1 = new JLabel(image); • JButton button1 = new JButton(image); • image must be an ImageIcon which you can create by specifying the image’s location on disk (such as ImageIcon image = new ImageIcon(“flag.gif”); ) • You can include both text and image in a JButton or JLabel • by specifying both a String and then an ImageIcon • JLabel label2 = new JLabel(“Left”, new ImageIcon(“leftarrow.gif”)); • You can change the item in the JButton or JLabel • using setText( ) or setIcon( ) as in label1.setText(“…”); • You can also alter what appears in the JButton • based on whether the mouse is pointing at it (called Rollover) or if the button is currently being pressed • JButton button2 = new JButton(icon1); • button2.setPressedIcon(icon2); • button2.setRolloverIcon(icon3);