Download
1 / 4
50 likes | 67 Views
Our implementation methodology combined with project management discipline along with field-tested best practices and user friendly tools, enable deployment, migration configuration and upgrade of Microsoft Dynamics solutions. It is designed to help drive our customersu2019 productivity by providing with a consistent approach and standard of tools and templates. This helps ensure that our customersu2019 projects are completed efficiently, driving business value right away, while helping them experience reduced risk to their business and high levels of satisfaction.

E N D
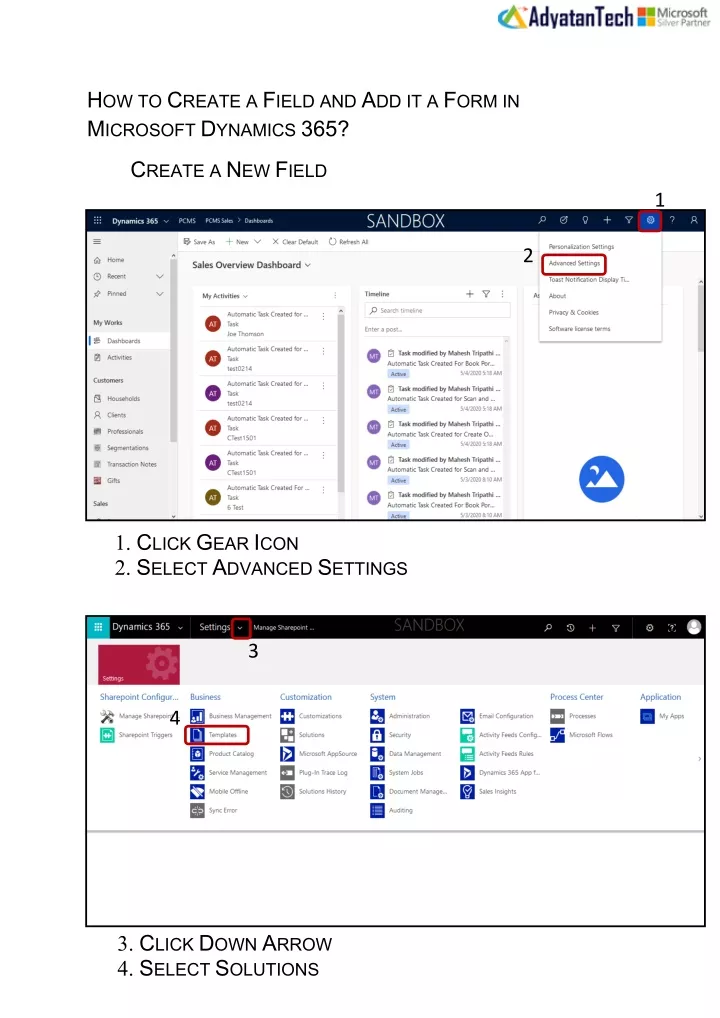
HOW TO CREATE A FIELD AND ADD IT A FORM IN MICROSOFT DYNAMICS 365? CREATE A NEW FIELD 1 2 1. CLICK GEAR ICON 2. SELECT ADVANCED SETTINGS 3 4 3. CLICK DOWN ARROW 4. SELECT SOLUTIONS
5 5.SELECT YOUR SOLUTION 2 1 EXPAND ENTITIES,EXPAND CLIENT 1. SELECT FIELDS 2. CLICK NEW
CREATE A NEW FIELD -ADD THE FIELD ON A FORM 6 3 4 5 3. PROVIDE DISPLAY NAME 4. SELECT IF THE FIELD IS MANDATORY OR OPTIONAL 5. SELECT THE DATA TYPE 6. CLICK SAVE AND CLOSE 1 2 1. SELECT FORMS UNDER CLIENT 2. OPEN THE REQUIRED FORM
ADD THE FIELD ON A FORM 3 3. SELECT THE FIELD TO BE ADDED FROM THE LIST OF FIELDS 5 6 4 4. DRAG THE FIELD AND PLACE IT OVER THE REQUIRED POSITION 5. CLICK SAVE 6. CLICK PUBLISH