Download
1 / 11
110 likes | 232 Views
How to Create a PowerPoint Presentation. Act360 Media Actden.com. Using PowerPoint vocabulary Here are some terms that are useful to know. Slide: An individual screen in a slide show.

E N D
How to Create a PowerPoint Presentation Act360 Media Actden.com
Using PowerPoint vocabularyHere are some terms that are useful to know. • Slide: An individual screen in a slide show. • Presentation File: The file you save to disk that contains all the slides, speaker's notes, handouts, etc. that make up your presentation. • Object: Any element that appears on a PowerPoint slide, such as clip art, text, drawings, charts, sounds, and video clips. You can refer to a clip art object, a text object, a title object, a drawing object, etc.
Using PowerPoint vocabularyHere are some terms that are useful to know. • Slide Show: A series of slides displayed in sequence. A slide show can be controlled manually or automatically. • Transition: A special effect used to introduce a slide during a slide show. For example, you can fade in from black, or dissolve from one slide to another.
How do people use you to make those presentations anyway? • It's no big scoop. It's just one step at a time. You start with creating slides. • When you first start me up I give you three options for creating your presentations: creating blank slides, using a template, and a little thing I like to call the Auto content Wizard. Ooh, I just love magic tricks! • So are you guys ready to make a presentation?
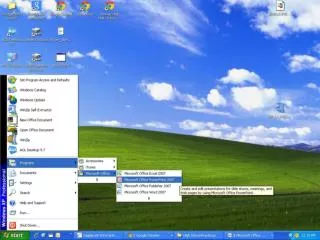
Creating a slide from scratch • 1. Open the PowerPoint program. The PowerPoint dialog box appears. • 2. In the PowerPoint dialog box, click the Blank Presentation option button. The New Slide dialog box appears. It asks you to choose an Auto Layout format. • 3. Click the Title Slide layout. It's the first in the list. The name Title Slide appears in the preview box. • 4. Click OK. A Title Slide appears, ready for you to work with.
Okay, now we have a Title Slide. But something's missing. Any guesses? • I know. The title! • Let me show you how to add text to those blank slides. Adding text to a slide The Title Slide layout contains text boxes for a title and a subtitle. Try typing text into these boxes. • 1. Click in the Title text box. A thick gray border appears around the text box indicating that it is selected. • 2. Type a title. • 3. Click the Subtitle text box and type a subtitle. Congratulations! You've just created your first slide.
Adding another slide • 1. Click the New Slide button on the toolbar. • 2. The Auto Layout dialog box will appear. Choose a layout for your next slide. • Okay, so now we have multiple slides for our presentation. But how do we move from slide to slide? • It's as easy as the click of a button. Literally. Just click and you've moved to a new slide.
Adding a shape • PowerPoint lets you add a variety of shapes to the slides of your presentation. • Try adding a star shape to your slide, using the AutoShape tool on the drawing toolbar. • 1. Click the AutoShapes button, point to Stars and Banners, and then click the 5-point star shape. The pointer will change into a cross. • 2. Click anywhere on the slide. A star of will be inserted.
Moving a shape • Let's try moving the star to another part of the slide. • 1. Place the pointer on the star. The pointer turns into a four-headed arrow. • 2. Click and hold down the mouse button, then drag the star to the new location. 3. When the star is positioned where you want it, release the mouse button.
Adding clip art • You can add clip art to any slide using the Insert Clip Art button on the Toolbar. • Try adding a cartoon image to your slide. • 1. On the Standard Toolbar, click the Insert Clip Art button. • 2. The Microsoft Clip gallery dialog box appears. • 3. Click the Clip Art tab. • 4. In the Categories list, click Cartoons. PowerPoint displays clip art from the Cartoons category. • 5. Click an image to select it. • 6. Click the Insert button. The cartoon image is inserted on your slide.
Resizing clip art • Like shapes, it's easy to change the size of a clip art image. Here's how: • 1. Click the cartoon image to select it. • 2. Place the pointer on a resizing handle. The pointer will change into a two-headed arrow. • 3. While holding down the mouse button, drag your mouse outwards. This will enlarge the image. If you drag your mouse inwards, you will reduce the size of the image. • 4. When the image is the size you want, release the mouse button.