Download
1 / 9
90 likes | 189 Views
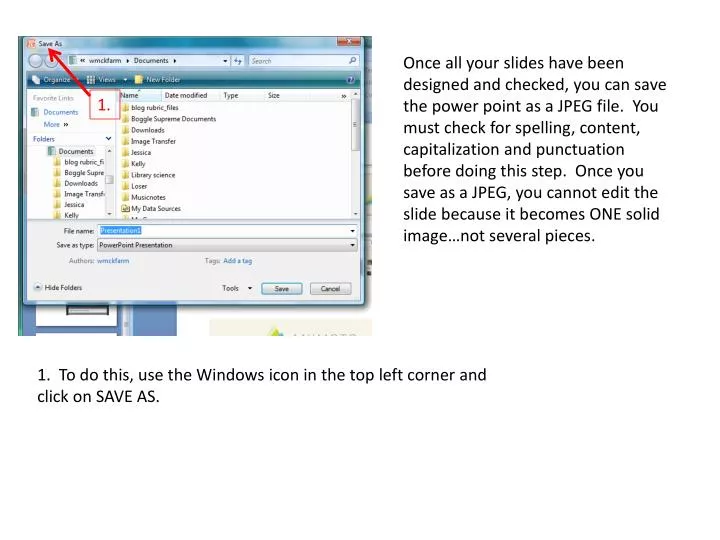
Once all your slides have been designed and checked, you can save the power point as a JPEG file. You must check for spelling, content, capitalization and punctuation before doing this step. Once you save as a JPEG, you cannot edit the slide because it becomes ONE solid image…not several pieces.

E N D
Once all your slides have been designed and checked, you can save the power point as a JPEG file. You must check for spelling, content, capitalization and punctuation before doing this step. Once you save as a JPEG, you cannot edit the slide because it becomes ONE solid image…not several pieces. 1. 1. To do this, use the Windows icon in the top left corner and click on SAVE AS.
Give your project a File Name. Then open up the drop down menu where it says SAVE AS TYPE. 2. 3. Highlight the option that says JPEG FILE INTERCHANGE FORMAT 3.
4. Power point will ask you if you want to save every slide. Click EVERY SLIDE and SAVE. Your power point is now ready to import into animoto.com Open up the internet browser and type in the link for http://animoto.com
5. 5. Click the blue LOG IN link to use the username and password that your teacher will assign to you. 6. Type in the username and number given to you. Make sure to include the “@gmail.com” portion. Then carefully type in your password. Do not use capital letters anywhere. 6.
7. Once you log in, Animoto will ask you to CREATE. You can either click the blue CREATE button or the green CREATE ONE. 7. 8. Now you can browse the themes that Animoto supplies to make your video awesome. Click on any theme that is FREE and sample it. Click CREATE VIDEO if it fits with the topic you are assigned.
9. 9. Once you select the theme, you are ready to import your power point slides that you saved as JPEG’s. Click the ADD PICS & VID link. 10. The next screen will allow you to browse for your file/pictures. Click UPLOAD PICTURES AND VIDEO. Browse for the right location of pictures. Highlight the slides you would like and click OPEN. 10.
11. 11. Animoto automatically loads the photos for you in a row. You can click and drag them to change their position in the video 12. If you hover over the pic, you can bring up a CAPTION option that will allow you to insert a line of text on the slide. 12.
14. 13. 13. Another way to add text is to click the ADD TEXT link. This will give you two lines of text. Animoto also supplies free music. You can find the link to change the music above your pictures. Click the link with the musical notes. Click on the FULL MUSIC LIBRARY to access and sample a variety of music. Choose something that fits your topic. 14.
15. 15. When you have loaded pictures, text, and music, you are ready to SAVE. 16. Title your video with your name and PRODUCE it. The link to the video will load into your teacher’s email account in google automatically. 16.