Download
1 / 20
200 likes | 286 Views
In this interactive workshop with Megan Harris, discover the power of storytelling utilizing digital storyboards. Understand how stories can cut through information overload, making ideas more relatable and memorable. Learn how to create compelling narratives that captivate audiences emotionally. Explore the benefits of storyboards in clarifying ideas and engaging viewers through visual storytelling techniques. Gain insights into crafting impactful stories, focusing on details, emotions, and making meaningful connections. Step by step, learn to outline, focus, write, and draw your story, highlighting the importance of testing timing with music integration for a cohesive narrative experience.

E N D
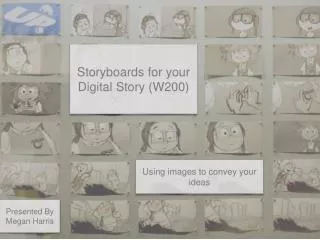
Storyboards for your Digital Story (W200) Using images to convey your ideas Presented By Megan Harris
The Power of Storytelling If asked what you did two weeks ago Thursday, or asked to remember any story you’ve heard in the past two weeks, which would be easier to recall?
The Power of Storytelling If asked what you did two weeks ago Thursday, or asked to remember any story you’ve heard in the past two weeks, which would be easier to recall? Why?
The Power of Storytelling • We are drowning in information: Good stories cut through that noise.
The Power of Storytelling • We are drowning in information: Good stories cut through that noise. • Stories feel “real” compared to abstract concepts, statistics, or logical arguments.
The Power of Storytelling • We are drowning in information: Good stories cut through that noise. • Stories feel “real” compared to abstract concepts, statistics, or logical arguments. • Stories can capture people on an emotional level, creating a deeper or more intimate bond.
The Power of Storytelling • We are drowning in information: Good stories cut through that noise. • Stories feel “real” compared to abstract concepts, statistics, or logical arguments. • Stories can capture people on an emotional level, creating a deeper or more intimate bond. • Stories are memorable. People can forget facts, but tend to remember stories.
Why Utilize Storyboards? • An example is better than an explanation • People can see your story in “action” • Can help clarify misconceptions or misunderstandings about your idea or story
The Basic “rules” of a Story • Be interested in the story you’re telling • Bring the story alive: • Body language, volume of voice, facial expression • Be careful with the details: • Too much or too little can distract or detract from your message • Don’t be afraid to show your feelings • If you’re passionate about your idea, show it and it’ll attract others • Make eye contact • “Don’t look at the board” You hold a person’s attention if you look at them. • Have fun! • If you don’t, why should we?
Creating Storyboards Step 1: Create an outline Knowing where your storyboard is going ahead of time will help to keep organized as you move along. Having an idea written out and developing a general action outline are good first steps for planning and making decisions outside of the template. It is easier to change things at this stage than replacing or erasing several cells later.
Creating Storyboards Step 2: Know your focus Does your storyboard focus on a specific person? A theme? A place? Know what your focus is, this will become a major visual as you draw/describe your storyboards. If your focus is on a specific person or group of people, what do they look like? How do you set them apart from other individuals in your story boards to show where the focus of that cell is?
Creating Storyboards Step 3: Write out the story (Option 1) Once you have the idea, it is not uncommon to want to just jump into sketching out the storyboard and trying to keep things on topic. If you’re good at that sort of thing, go you! If not, write out the (brief) story first. Read it out loud and make sure it makes sense. This is a continuation of the outline. Here is where you will want more detail. By writing out the story you want to convey entirely beforehand, you can more easily see where to break it up for the storyboard.
Creating Storyboards Step 3: Draw the images (Option 2) If you’re more visually inclined, starting with images might be the better option for you. In your head, you might know exactly how the scenes are supposed to play out. Box out some lines on a piece of scratch paper and just doodle out ideas. Working on them now outside of your template will save you cleaning up if you realize you missed a step somewhere. Once you’re comfortable with how either the story or the images look, you can start transferring them over to the storyboard template.
Creating Storyboards Step 4: Start filling in the template Once you’ve decided where the breaks are for each cell of your storyboard, you want to start filling these in and aligning the different media together. Have music you want to use specifically? Listen to it while you work. If you hear a section that you want to use, make note of the time stamp and jot down where you want this to align in your storyboard. If music is a major part of your storyboard, be aware of possible long breaks between talking, action and where they should align with the music. Be careful with music that has lyrics that they do not prove contrary to your message, or distract from the voice overs.
Creating Storyboards Step 5: Test out the timing Start playing the music you want to include as you read through your storyboards. Are there major hiccups with the timing, or does everything work out as planned? Were there any surprises (happy or otherwise) that you will need to adjust for? Once your timing is finished and works, you can finalize your storyboard.
Creating Storyboards Step 6: Finalize the storyboard Getting to this step is easiest with lots of pre-planning before you put pen to template. If all has worked well, all you’ll need for this last step is to make sure your images are clear and solid (no too-light-to-see lines!), and your writing is legible and clear.
Tools You don’t have to be an artist to do storyboards. Yeah this looks cool… But that doesn’t mean that you have to be able to draw like that to convey a good story.
Tools The important part of creating a storyboard is understanding that it is supposed to be a tool to help YOU. Be confident in what you make, and remember your focus. Every person has their own style to everything they do, and we each put a piece of ourselves into what we create. Your message is what is most important!
Find Your Style Even if your style is stick figures, make them the most bitchin’, kick-ass stick figures anyone’s ever seen. So long as your storyboards convey the message that you want, they can be made out of googled images cut and pasted together. The story is the important part of the storyboard.