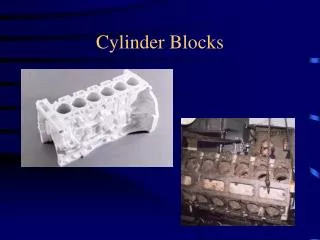
Cylinder Blocks
261 likes | 513 Views
Cylinder Blocks. Materials. Cast iron Economical More stable than aluminum May use sleeves Aluminum Light weight Uses sleeves. Cylinder Block Features. Cylinders – May be cast in or pressed in sleeves Dry sleeves – no coolant contacts the pressed in liner

Cylinder Blocks
E N D
Presentation Transcript
Materials • Cast iron • Economical • More stable than aluminum • May use sleeves • Aluminum • Light weight • Uses sleeves
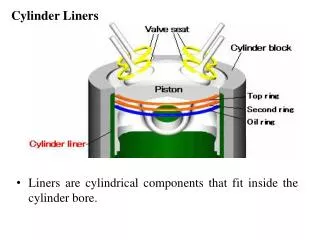
Cylinder Block Features • Cylinders – May be cast in or pressed in sleeves • Dry sleeves – no coolant contacts the pressed in liner • Wet Sleeves – Coolant runs directly on the outside of the sleeve (some form of seal needed) example: Cadillac 4.1L
Cylinder Block Features • Main web – the area that supports the crankshaft • Skirted blocks • Non-Skirted Blocks • Deck • Water jacket • Mounting flanges
Disassembly and Cleaning • Mark all main caps for position and direction • Lubricate machined surfaces after cleaning to prevent rust • Remove and save all plugs (note locations) • Before assembly, wash with hot soapy water
Inspection and Measurement • Visually check entire block for cracks, excess casting flash, or damaged bolt holes • Use additional crack detection methods • Magnaflux • Zyglo (dye penetrant) • X-Ray • Sono
Inspection and Measurement • Measure cylinder bores – correct problems by boring and/or honing • Size • Taper • Out-of-round • Surface finish • Scoring • Scratches • Washboarding (use a rigid hone to detect)
Boring and Honing • Boring enlarges the cylinder to a specific diameter to correct cylinder wear problems • Honing imparts the correct surface finish to the cylinder wall to ensure proper ring break-in, sealing, and wear • Torque plates should be used when honing cylinders • “Hot Honing” is beginning to be used to simulate the distortion caused by engine heat
Cross Hatch Angle • The correct angle for cross hatch lines to intersect is approximately 30 degrees.
Cross Hatch Angle • Too flat a cross hatch angle can hold excess oil which causes thicker oil films which the piston rings will ride up on or hydroplane. Excessive oil consumption will result.
Cross Hatch Angle • Too steep an angle promotes oil migration down the cylinder resulting in a thin oil film which can cause ring and cylinder scuffing.
Inspection and Measurement • Measure main bearing bores • Saddle alignment • Size • Taper • Out-of-round • Bore finish • Correct any problems by align honing or align boring • This will move the crank and cam centerlines closer together and may cause timing chain to be loose
Inspection and Measurement • Check camshaft bore alignment- correct by installing semi-finished bearings and align boring • Precision straightedge • Inspect the old bearings • Deck surface – Correct problems by machining ( this will affect compression ratio and valve to piston clearance) • Warpage • Parallel to crank centerline
Performance Modifications • De-bur block • Polish and paint lifter valley (only for high rpm use) • Restrict oil drainback from lifter valley to camshaft • Install drainback screens • Sono cylinder walls for maximum possible overbore • Install splayed main caps