Diffusion and Semi-Permeable Membranes Training
This presentation helps understand diffusion and membranes using experiments with dialysis tubing and seed jars. Introduces key concepts and hands-on activities to reinforce learning.

Diffusion and Semi-Permeable Membranes Training
E N D
Presentation Transcript
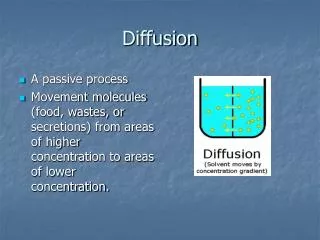
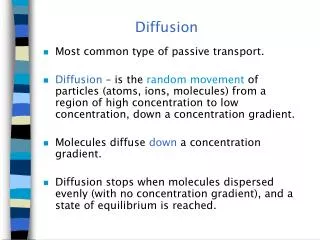
Diffusion Vanderbilt Student Volunteers for Science Fall 2015 Training Presentation
Important • Please use this resource to reinforce your understanding of the lesson! Make sure you have read and understand the entire lesson prior to picking up the kit! • We recommend that you work through the kit with your team prior to going into the classroom. • This presentation does not contain the entire lesson—only selected experiments that may be difficult to visualize and/or understand.
Set-Up • While one VSVS instructor explains diffusion and semi-permeable membranes, and has the students do Part 1 with the seeds in the jars, the other VSVS members need to do the set-up tasks: • Prepare enough dialysis tubing set-ups for the number of pairs of students in the classroom. • Take 32 1-oz cups and pour a little water in the bottom of each cup. Save for Section II. • Put 17 (or as many pairs in the class) dialysis tubes into 6oz cups and JUST cover with water. Place on a plate and set aside. • Write the following vocabulary words on the board: • diffusion, osmosis, dialysis tubing, glucose, starch, iodine, semi-permeable membrane
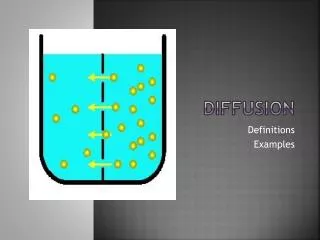
I. Introduction • Discuss the motion of molecules using examples such as the smell of cooking from a distance or the smell of perfume in the air when someone wearing perfume walks by. • This happens because molecules are in constant motion and gas molecules (perfume, aroma of cooking) mix (diffuse) with the air in the vicinity. • Organize the students into groups of 4(no more than eight groups, but groups should NOT BE LESS than 4) - If you have an odd number, add to a group of four. The modeling of a semi-permeable membrane using the bean jars is done by groups of 4. The experiment using dialysis tubing is done in pairs.
I. Introduction (cont.)A. Modeling semi-permeable membranes • Ask students, What is a semi-permeable membrane? • A semi-permeable membrane is a membrane in a cell that allows materials to pass into and out of a cell. • The openings in the membrane are large enough to allow some substances to move in and out of the cell, but are small enough to keep some substances from leaving or entering the cell. • Give each pair one of the 16 oz. clear plastic containers with lids that contains a wire screen in the middle with rye seeds on one side and bean seeds on the other side. • Rye and bean seeds are used to represent molecules of two different sizes. The wire grid screen represents a semi-permeable membrane (such as a cell membrane in plants or animals). The holes represent the pores or openings in the membrane. • Ask students to explain what happened.
º • X X • º • • X • X º º • • X º X • • º º X Introduction (cont.)B. Dialysis Tubing and Relative Sizes of Molecules • Show students the paper models of the three molecules, and tell them the names of the molecules. Do not discuss anything about these molecules except to tell them that the solutions they are using today contain these molecules. • Show the students the cups with the dialysis tubing, BUT DO NOT PASS THEM OUT YET. • Hold up a dialysis tube with glucose and starch so that the class can see it. Have the students observe that there are no fluids leaking out of the tubing. • Tell the students that the dialysis tubing is similar to a cell wall, and that the students are going to discover which of the three molecules are small enough the pass through the tubing. • Tell students to look at the diagram on the observation sheet and point out that the dialysis tubing contains starch and glucose molecules. • Starch molecules are represented by large X’s and glucose molecules are represented by small open circles. • Iodine molecules, small dots, are shown outside the dialysis tubing because they will be added to the outer solution during the experiment. THIS SHOULD BE S AND G AND I
IIa. Testing for glucose • Tell students not to touch the glucose test strips with their fingers – use tweezers. • Dip the end of one test strip into the water cup. • Place this strip in the rectangle on the paper (beside the 1 oz container). • Test the glucose solution with another glucose test strip, following the same procedure. Wait a few minutes before checking the results. • Check the color of the strips. • YELLOW indicates NO GLUCOSE • Shades of GREEN indicate the presence of GLUCOSE. The darker the shade of green, the more glucose is present. • Tell ALL students to record the color of the test strip on their observation sheets. • One test strip should be yellow indicating the absence of glucose and one should be green indicating the presence of glucose
IIb. Testing for starch • Distribute a 1-oz cup of water, a 1-oz container of starch suspension and a bottle of iodine to each pair. • Tell students to place the 1-oz cup of water and the 1-oz starch container on the appropriate circles on the Observation Sheet. • They should shake the 1-oz starch container and then remove the cap. • Tell students to add one squirt of iodine to both the 1 oz cup containing water and the 1-oz container of starch. • Tell students to check for a color change and record the color, if any, on their observation sheet. • A dark purple/black color indicates the presence of starch in the starch container. • The water cup should be a light orange/yellow or amber color which indicates the presence of iodine only.
III. Diffusion of glucose B. Predicting Which Molecules will Diffuse • Discuss the relative sizes of the molecules, pointing out that the results of today’s activities will be dependent upon the different sizes of iodine, glucose, and starch molecules. Show the students the paper models of the three molecules again and have the students refer back to their seed containers. • Point out that starch is a "polymer” molecule made up of hundreds of glucose molecules joined together. The larger bean seeds represent the starch molecules and cannot pass through the semi-permeable membrane. • The small rye seeds represent small molecules, such as water, iodine, or glucose that can pass through a porous membrane both ways. • Ask the students if they can predict which way the different molecules will move. • The iodine is a small molecule and can move from outside the tubing to inside it. • The starch is a large molecule and cannot get outside the tubing. • The glucose is small and can move from inside the tubing to the outside. • Tell students that the molecules of substances have been diffusing in the experiments set up earlier in the lesson and it is time to check on these experiments and investigate what has been happening. • Caution students to wait for instructions before they disturb the experiments.
IIIc. Testing for Diffusion of Glucose • STUDENTS MUST NOT DISTURB THE CUP AND THE DIALYSIS TUBING. • Give each PAIR a plate holding a 6oz cup containing the dialysis tubing and water. • Tell students the diffusion of glucose takes time. If the tubing has been in the water for about 10 minutes, tell students to use tweezers to hold and dip a clean glucose test strip into the water close to the dialysis tubing (it may even touch the tubing) and place the test strip on the appropriate rectangle of the Observation Sheet. • While students are waiting for the results of this test, ask them what the results of the glucose test strip will tell them. • If the test strip remains yellow, then no glucose was able to pass through the dialysis tubing. • If the test strip turns green, then glucose was able to pass through the dialysis tubing.
IIIc. Testing for Glucose Diffusion contd. • Ask students to check the glucose test strip, compare the glucose test strip with the Glucose Results Color Chart, and record the value from the Glucose Results Color Chart on their observation sheet. • The pad on the glucose test strip should turn green within 1 minute, indicating the presence of glucose in the water. This shows that glucose molecules have passed through the dialysis tubing. If it did not turn green, test again after several minutes have passed. • Ask students to look at the plastic container of seeds. Ask them if this were a model of the glucose experiment, which seeds represent the glucose molecules. • The small seeds are the glucose molecules because they could travel through the dialysis tubing. • Ask students to refer to the diagram on the Observation Sheet and use arrows to show the direction glucose molecules have moved.
IIId. Starch diffusion IMPORTANT - Do this part ONLY after a positive test for glucose has been obtained. • Tell students to remove the lid of the iodine container and add all the remaining iodine to the water in the cup. The solution should be a light orange/yellow or amber color. • If a positive test occurs when the iodine is added to the water around the dialysis tubing, the tubing has a leak. • If this happens, empty their cup, rinse with water, and place a new dialysis tubing in the cup and add iodine again. (Use the extra bottle of iodine that was provided.) If all else fails, have them observe the results of another group. • Ask students to observe the solution inside the dialysis tubing and the water surrounding it for a few minutes. • If they observe a color change, they should record it on their observation sheet. • Students should observe a purple/black color inside the dialysis tubing.
IIId. Starch diffusion (cont.) • The purple/black color indicates that iodine molecules have passed into the dialysis tubing and reacted with the starch inside the tubing. Since the outside solution is not purple/black, starch molecules have not passed out through the dialysis tubing. • Ask students to look at the container of seeds. Ask them which seeds represent the iodine molecules and which represent the starch molecules. • The large seeds are the starch molecules because they could not get out of the dialysis tubing • The small seeds are the iodine molecules because they could travel through the dialysis tubing. • Ask students to refer to the diagram on the Observation Sheet and use arrows to show the direction iodine molecules have moved.
G I2 S G S S S G DIALYSIS TUBING TESTS Glucose test after 10 minutes (outside tubing). Glucose reading (color of strip) ______________________ Starch Test (inside tubing) after 5 minutes. Color of solution inside dialysis tubing _______________________ Color of Water Surrounding Dialysis Tubing _______________________ ______________________ water I2 I2 strip tested with water
IV. Review and clean-up • Summarize the glucose and starch dialysis results for the whole class. Refer to diagram on Observation Sheet during review. • Glucose gave a positive test in the water surrounding the dialysis tubing. Therefore, glucose molecules traveled through the dialysis tubing. • The water solution of iodine around the starch dialysis tubing was the color of iodine, not the purple color for the iodine-starch test. Therefore, starch molecules did not travel through the dialysis tubing. However, there is a purple-black color inside the tubing. Therefore, iodine molecules traveled into the dialysis tubing. • Show the molecule models of iodine, glucose, and starch to the students again to emphasize the relationship between molecular size and the ability to diffuse through a semi-permeable membrane like dialysis tubing. • Collect all dialysis tubing in a large ziploc bag - pour contents of water 1-oz cups down the drain. Return used 1-oz containers of glucose and starch and all solution containers to the VSVS lab for re-use.