iSee Player Tutorial
Learn to use the iSee player as a free viewer for STELLA models with the Forest Biomass Accumulation Model. This tutorial covers getting started, running the model, modifying input values, and interpreting graphs and tables. Explore tabs, equations, and user controls for a comprehensive understanding of the model's functionality.

iSee Player Tutorial
E N D
Presentation Transcript
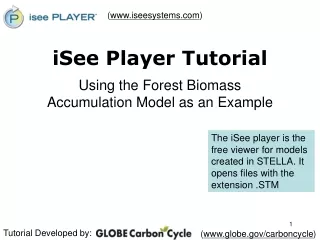
(www.iseesystems.com) iSee Player Tutorial Using the Forest Biomass Accumulation Model as an Example The iSee player is the free viewer for models created in STELLA. It opens files with the extension .STM Tutorial Developed by: (www.globe.gov/carboncycle)
Table of Contents Getting Started (slides 3-5) Familiarizing yourself with the iSee Player (slides 6-14) Running the Model (slides 15-20) Graphs and Tables (slides 21-31) Modifying Default Input Values (slides 32-35)
Installing the isee player There are several ways to install the isee player, it should not matter which method you choose. Download the isee player from the isee systems website. www.iseesystems.com 2. Install from the GLOBE cd. 3. Run directly from the GLOBE cd.
Accessing and opening models • Download the Stella carbon models from GLOBE website or access them from the GLOBE cd. • Open the isee player from your hard drive or the GLOBE cd. • To open a model go to: Fileopen, then you can select one of the carbon models. *The rest of this tutorial uses the 1-box biomass model (Biomass_Accumulation.STM) as an example. To follow along directly open the 1-box model now.
Tabs: Interface The iSee player has 4 permanent tabs located on the left side of the STELLA window. The Interface page you see when you open the model is considered the home page (referred to as Home).
From here you can access the model’s story, which helps explain the science behind the model. To open the story, click the top button (Read about what this model does and how it works). • Press any key to move forward through the story and the backspace key to move backward one page at a time.
This is the first page of the Biomass Model Story. To return to the Home page before the story is complete, click the arrow in the upper left hand corner of the screen, above the tabs. Click the arrow now and return to the Home page.
The other purpose of the Interface tab is to run the model with user inputs and view outputs which are the results of running the model under a given set of conditions. To access this page press the button titled, Run the Model.
User controls Results We will return to this page after looking at the other tabs.
Double Click WoodBiomass Equation pop-up Tabs: Map and Model In the iSee player the Map and Model tabs have the same function. They show a conceptual diagram or map of the model boxes and flows, and how they are connected. If you double click on a box or flow, the equation opens in a pop-up window. Click on the WoodBiomass box. Also try clicking on a flow, such as WoodGrowth.
Tabs: Equation To see an outline of all the equations in the model, open the fourth tab, called Equation. Return to the Home page by pressing the Interface tab.
Explore the model tabs on your own. To learn more about the science behind this model, read the whole story before exploring the model further. This will help you understand what the model is doing and what all the numbers mean. If you choose to focus on the science later, proceed to the next section where you can learn more about how to run a Stella model in the isee player.
From the Home page in the Interface tab, the last page of the model story or the Map or Model tabs click the Run the Model button. This will bring you back to the page where you can make choices about model input values.
Input controls Results Model controls On this page there are 3 major components, controls to run the model, controls to change model input values, and the graphs and tables to view model data for each year that the model runs. In this section we will focus on running the model. To run the model with the default values, click the Run button, shown above the graphs.
Default User Settings Results Results consist of a graph of 5 variables and a table of values.
The graph and the data table show that the model ran for 500 years. If you would like to change the length of time the model runs, select Run from the iSee top menu bar and scroll down to Run Specs.
Other user run controls are at the bottom left of the iSee Player window. Zoom In/Out Play, fast-forward, and stop. Restore defaults Play speed loop continuously Practice a few runs. Change the run time, fast-forward and restore default conditions. When you are confident move on to Graphs and Tables.
Y-axis vertical scale Many variables are shown on one graph and they often have different number ranges. The color of the Y-axis value matches the color of the variable. Example: Variable 1, WoodBiomass, shown in blue, has a number range of 0-80000 g/m2. Some variables have the same number range. In this case variables 2, 3 and 4 have a black line next to them, which tells us their values on the y-axis are shown in black.
Viewing the exact values of variables Click on the graph and drag the dotted line slowly across the graph. The values of individual variables will appear under their name at the top of the graph (highlighted in blue) and the x-axis value, year, will appear at the bottom of the graph.
View pages of individual graphs To scroll through the pages click where it says Page in the lower left hand corner of the graph. Click the triangle until you have viewed each of the available graphs.
Compare two graphs side by side Both the right and left hand graphs are identical and can be paged separately so the pattern of two variables can be compared.
Modifying graphs You can add a new graph page, remove a graph, select a new type of graph, reset the range of values on the axes and more. Right mouse click or Control click (Mac) in the center of the graph you would like to change. Select Open. You will see the Define Graph pop-up box to make your changes.
Add a new graph Scroll the page keys until a new graph page appears. To add a variable to the graph, select from the left box and press the central arrow. Repeat until you have added all desired variables. Add a title, and check any of the graphing options.
Set the y-axis scale In the Selected variables box (white box on the right hand side), select the variable for which you want to set a new scale. Click the arrow to the right until it is a double arrow with a line on both sides. Now you will be able to set a new scale. You will always be able to come back to this screen to reset any of the graphing options.
Modifying the table You can add, remove, change or sum columns. Similar to changing the graph, right mouse click or Control click (Mac) on the table. The Define Table pop-up box will appear and changes can be made.
Copying and printing graphs and tables To print any of the graphs individually click on the printer at the bottom of the graph screen. To print several graphs on one page right click or Control click (Mac) select copy on each graph and paste them into another file, such as a Word document. To copy the entire table click on years in the upper left hand corner, hold down the shift key then select the additional columns. Right click or Control click (Mac) select copy and then paste the values into a Word or Excel file. It is not recommended that you print the entire table. (For a 300 year run, the table will be 8 pages long.) To print only several rows of data, click on the first year you want data for, press shift to select the additional rows and then copy and paste them to a separate file.
You can now take some time to investigate the graphs and tables or move on to Changing Variables and practice both sections together when you are finished with the tutorial.
Changing the values of Model Inputs User Input Controls
User Inputs: Changing constants or coefficients in your model using dials and sliders Mouse click on the black dot and drag it to the new value, or type a new value in the box. To restore the default value, click on “U”. The slider also works by mouse click and drag, or by typing a value in the box. In this case, it is necessary to set both sliders if the defaults are not to be used.
Two additional ways to change variables are not shown in this model. These are switches and input tables. Switches can only turn a variable on or off, making it active or inactive as the model runs. Input tables are much more flexible. You can change an input value by directly typing a new number. If the value is much too large or small, the model will ask you to select a new value. *For examples of these types of variable inputs view the more advanced carbon models.
Now you have completed the isee player tutorial. Open the model of your choice and read through the story to get started. HAVE FUN!