Download
1 / 6
60 likes | 213 Views
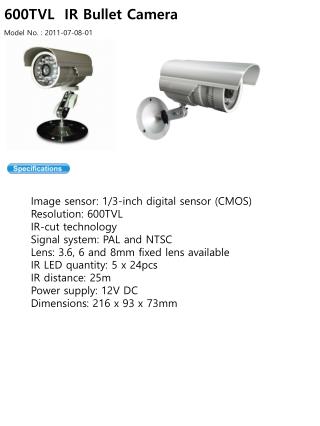
OSD MANUAL FOR 600TVL CAMERA. ■ LENS You can select the connected lens type. •DC : Select Auto Iris Lens •Manual : Select Manual Lens. ■ EXPOSURE You can control the iris.

E N D
■ LENS You can select the connected lens type. •DC : Select Auto Iris Lens •Manual : Select Manual Lens ■ EXPOSURE You can control the iris. •SHUTTER : Select either AUTO or MANUAL shutter within the range 1/60 to 1/100,000 sec. •BRIGHTNESS : Adjusts the video Brightness from 0 to 255. •AGC : The higher the gain level, the brighter the screen, but the higher the noise. (Level : HIGH, MIDDLE, LOW, OFF) •D-WDR : Digital Wide Dynamic Range illuminates darker areas of an image while retaining the same light level for brighter areas to even out the overall brightness of images with high contrast between bright and dark areas. (Level : 1~35) •RETURN : Select this to save the settings and to return to the SETUP Menu.
■ White Balance Use the White Balance function to adjust the screen color temperature. •ATW1 : Select this when the color temperature is between 2,300˚K and 9,500˚K. •ATW2 : Select this when the color temperature is between 2,000˚K and 11,000˚K. •AWC -> SET : To find the optimal luminance level for the current environment, point the camera towards a sheet of white paper and press the Function Setup switch. If the environment changes, readjust it. *White Balance may not work properly under the following conditions. In this case select the AWC mode. 1.When the color temperature of the environment surrounding the subject is out of the control range (e.g. clear sky or sunset). 2.When the ambient illumination of the subject is dim. 3.If the camera is directed towards a fluorescent light or is installed in a place where illumination changes dramatically, the White Balance operation may become unstable. •MANUAL : Select this to fine-tune White Balance manually. Set White Balance first by using the ATW or AWC mode. After that switch to MANUAL mode, fine-tune the White Balance and then press the SET button. ■ BACK LIGHT It delivers a distinctive subject and background at the same time, even when the subject is in backlight. •BLC : (Back Light Compensation) Enables a user to select a desired area on a picture and view that area more clearly. *AREA SEL : Select one of two zone *AREA STATE : Select on/off the function *GAIN : Adjust sensitivity level of this function (Level : 0~255) *HEIGHT / WIDTH : Adjust the height & width of the area to be enhanced *LEFT/RIGHT/TOP/BOTTOM : Adjust the area to be enhanced •HLC : (High Light Compensation) If the scene contains extremely bright light areas such as; from car headlight, the light can mask out much of the on-screen detail. *HLC Adjustable Level : 0~255 *Because there can be a difference in the effectiveness of HLC according to the amount of light area in the screen, optimize the installation angle for the best HLC performance. *When dark, the HLC is only activated when a bright light exceeding a specific size. In NIGHT ONLY mode. *The HLC is not activated in day light or when bright light is not present at night. in NIGHT ONLY mode.
■ DAY/NIGHT •AUTO : The mode is switched to ’Color‘ in a normal environment, but switches to ’B/W‘ mode when ambient illumination is low. To set up the switching time for AUTO mode, press the SET button. *DAY <->NIGHT LEVEL : Adjust the illumination threshold about changing Day<->Night mode(Level : 0~255). *DAY <->NIGHT DELAY : Adjust the delay time about changing Color<->B/W mode(Level : 1~30sec). •COLOR : The picture is always displayed in color. •B/W : The picture is always displayed in black and white. You can turn on or off the burst signal on B/W mode. *BURST : Select the chrome burst signal. *IR SMART : Not Available in this camera. *IR LEVEL : Not Available in this camera. •EXT : Not Available in this camera. Available in this camera. ■ DPC •Dead CCD Pixel Correction : When it activated, searching for defective pixels and compensating them and returning to main menu when ready. ■ SPECIAL ▶CAM TITLE If you enter a title, the title will appear on the monitor. 1.Use the 4 direction buttons to move to a desired letter and select the letter by pressing the SET button. 2.Repeat this to enter multiple letters. You can enter up to 15 letters. 3.Enter a title, move the cursor to ‘POS’ and press the SET button. The entered title appears on the screen. 4.Select the position to display the title on the screen by using the 4 direction buttons and press the SET button. 5.When the position is determined, select ‘END’ and press the SET button to return to the SPECIAL menu.
▶MOTION DET This product has a feature that allows you to observe movement of objects in 4 different areas on the screen, and the words 'MOTION' appear on the screen when movement is detected. You can monitor activity more efficient. *AREA SEL : Select one of 4 zones *AREA STATE : Select on/off the function *HEIGHT / WIDTH : Adjust the height & width of the area to be enhanced (Level : 0~15) *LEFT/RIGHT/TOP/BOTTOM : Adjust the area to be enhanced (Level : 0~15) *DEGREE : Adjust sensitivity level of this function *VIEW : Select highlighting the defection location of the movement on the screen. ▶PRIVACY Mask 8 different areas you want to hide on the screen. •AREA SEL : Select one of 8 zones •AREA STATE : Select on/off the function •HEIGHT / WIDTH : Adjust the height & width of the area to be enhanced (Level : 0~15) •LEFT/RIGHT/TOP/BOTTOM : Adjust the area to be enhanced (Level : 0~15) •COLOR : Change color of the selected zone.
▶PARK LINE Not Available in this camera. ▶IMAGE ADJ •LENS SHAD. : LSC(Lens Shade Compensation) compensates the brightness in the top, bottom, right and left of the image from the center of screen. •2DNR : Select the Digital Noise Reduction. •MIRROR : Select to flip the picture horizontally on the screen. •FONT COLOR : Adjust the font’s color of OSD Menu and ID&TITLE •CONTRAST : Adjust the contrast of the displayed picture (Level : 0~255) •SHARPNESS : Adjust the contrast of the displayed picture (Level : 0~16) •DISPLAY : Change the settings value of video appropriate to your monitor. *CRT : Please select this menu item when using a CRT monitor. You can change the PED level and color gain in the sub menus. *LCD : Please select this menu item when using an LCD monitor. You can change the gamma, PED level and color gain in the sub menus. *USER : Please use this menu item when using a monitor other than standard ones. You can change the PED level and color gain in the sub menus. •NEG.IMAGE : Select the negative displayed picture. ▶COMM ADJ. : Not Available in this camera. ▶LANGUAGE : Select OSD language of English and Chinese. ▶VERSION : Display current firmware version.