
Processing
E N D
Presentation Transcript
Processing • Install Processing • Learn how to edit, run, save, export, post programs • Understand overall structure of programs • Learn basic types, operators, loops • Learn basic printing and graphics • Have some fun You do NOT have to use processing, but you have to produce interactive applets that run off a web browser and post links to them along with clear and commented source code in a programming language that the TA understands.
Download • Go to http://processing.org/ • Download the latest version
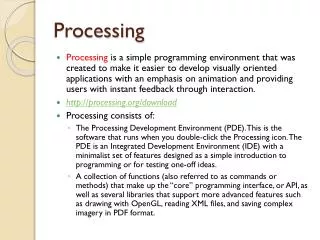
Run processing Export into Java Applet save stop run Type your program here Print here
Write and run program 3) Default graphics window opens 2) Press run 1) Type in your program 4) Print appears here. Mostly for debugging.
Fonts • If your program uses fonts to draw text in the graphics window, you must make sure that you have the font files in your data folder. • You can either copy the font from another folder or • Make it by Tools > Create font …
Preferences Save As Save it • Choose default folder where programs should be saved • Save your program as P1 • It creates a FOLDER P1 and saves your program as P1.pde • To see it: Show Sketch Folder
Data files • If your program reads data from files, you must include these files in a data folder in the folder where your applet is. • When the applet is created (export), it does not copy the content of your data folder into the applet folder. You must do that!
Try an example program Mouse2D
Architecture of a graphic system • Your application communicates to the graphic hardware through an API (Application Programming Interface). • The language you use may include the API commands (for example Processing) or you may select a particular API (OpenGL). • Some graphic commands change the state of the graphics pipeline • Drawing mode (color, thickness), transformation stacks, (push, rotate), image to be used as texture. • Other graphic commands send geometric primitives • Points, line segments, triangles, rectangles, disks, polygons, curves • You may select to use the graphics hardware (OpenGL) if you have it or a pure software (P3D) option • Slightly inconsistent behavior, but OpenGL is faster and has perspective correction for texture mapping
Structure of a graphic program • Setup: • Executed once at initalization • Loads images, fonts. Sets up data structures. Loads models. • Draw: • Executed all the time to refresh screen • Call here your rendering functions • Can poll the mouse location/motion and which key is down • For dragging, rubber-banding, adjusting parameters • Interrupts (mousePressed, keyReleased…) • Executed for each mouse/key action (press, move, release) • Use to activate graphic selection (mouse click), menu choices, reading new model from file, capturing a picture of the window…
Example of a simple setup and draw // Mouse 2D THIS IS A COMMENT void setup() // EXECUTED AT INITIALIZATION { // BEGIN OF SETUP size(200, 200); // SIZE OF GRAPHIC WINDOW IN PIXELS noStroke(); // DON’T DRAW LINES (OR RECTANGLE BORDERS) rectMode(CENTER); // FIRST 2 PARAM OF rect SPECIFY CENTER } // END OF SETUP void draw() // EXECUTED CONTINUOUSLY TO REFRESH WINDOW { background(255); // ERASES SCREEN AND PAINTS A WHITE BACKGROUND fill(255,0,0); // FILL COLOR IS NOW RED (RGB MODE BY DEFAULT) rect(mouseX, height/2, mouseY/2+10, mouseY/2+10); // DRAW RECTANGLE // PARAMETERS COMPUTED FROM MOUSE POSITION AND WINDOW SIZE fill(0,100,0, 80); // FILL COLOR = TRANSPARENT DARK GREEN rect(width-mouseX, height/2, ((height-mouseY)/2)+10, ((height-mouseY)/2)+10); }
Check commands on reference page • Browse reference page • Or • Highlight a command • Check its description
Try changing the program changed window size draw borders black background fill solid green reduce y (which goes down) for the center of circle Draw circle
Make a header in the file • Course name • Project number and title • Your name • Date created
Save and export • Save As “MyMouse2D” • Creates a MyMouse2D folder • Saves your program in it as MyMouse2D.pde • Export • Creates an applet folder in the MyMouse2D folder • Go there and click on index.html • It will open a web page • With your applet running • Click in the window to activate it
Edit the index.html web page • Open it in some html editor • Dreamweaver • Taco HTML Edit • Change title • Insert (as shown in the next slide) • Course name • Project number and title • Your name (with link to home page), • Email link • Date submitted
data folder *IMPORTANT* In the folder of your applet, create a folder called data Copy there: - The data files that your program reads - The font files your program uses for writing in the window Tools > Create Font…. will create the font you want in the data folder of your sketch You must copy it to the data folder of your applet
Make your PPP • Create your Personal Project Page, with • Course title • your picture • First then last name (linked to your home page), • Email • Add an entry for new your project • Project number <linked to the applet’s index.html> • Title • Completion date • Name of partner(s) if team project • Email the TA with • course number and project number (for example “CS4450-P1”), in the subject line • Your name (and the names of other team members) • Which email you want to be contacted at • The URL of your PPP
Check these most useful commands • http://processing.org/reference • setup, draw, size, width, height, mouseX, mouseY • boolean, true, false, Logical Operators • if, else, Relational Operators • int, for • print, println • Boolean(), byte, binary(), unbinary(), String(), char, charAt() • color, rect • text, PFont, loadFont
Sample applets I post most of my demo applets at: http://www.gvu.gatech.edu/~jarek/demos/ Feel free to use any part of them in your assignments, to alter it, or to ignore it But be warned: I have a very unusual coding style, which is designed to make me more effective: - I use very short variable and method names - I cram a function into a single line if possible - I avoid unnecessary overhead (class structures that are not helping, spacial cases that lead to negligible savings).