Download
1 / 17
170 likes | 275 Views
This guide outlines the steps to set up spatial components within an existing ArcMap project file for soil survey analysis. It includes instructions for opening ArcToolbox and adding the Digital Soil Survey toolbox. Detailed steps for adding spatial data, creating point layers, and managing geospatial coordinates across UTM zones are provided. Additionally, the process of filtering and labeling data within the Pedon PC Analysis form is explained, along with joining soil polygon layers for enhanced analysis.

E N D
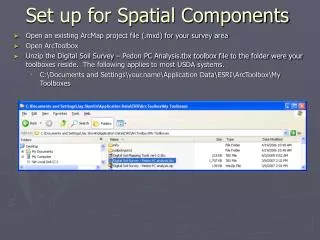
Set up for Spatial Components • Open an existing ArcMap project file (.mxd) for your survey area • Open ArcToolbox • Unzip the Digital Soil Survey – Pedon PC Analysis.tbx toolbox file to the folder were your toolboxes reside. The following applies to most USDA systems. • C:\Documents and Settings\your.name\Application Data\ESRI\ArcToolbox\My Toolboxes
Set up for Spatial Components • Click on the ArcToolbox button to open ArcToolbox • Right click the ArcToolbox folder and select Add Toolbox… • Browse to the Digital Soil Survey – Pedon PC Analysis toolbox in the folder where your toolboxes reside.
Set up for Spatial Components • Click the Add Data button and add the tTempAnalyzeSpatial table from the spatial_link.mdb file on your system • The default location for the Spatial Link database (spatial_link.mdb file) should be: C:\pedon\spatial_link.mdb • It could be located anywhere, but it is recommended that it be stored at the above path
Set up for Spatial Components • Open up the Setup Toolset and open the 1_Setup for Point Display model by double clicking on it • This model will create an XY displayed point layer of the tTempAnalyzeSpatial table called tTempAnalyzeSpatial Events layer • If you are displaying points across more than one UTM zone, then display the points using a geographic coordinate system and the settings shown • Keep in mind that you need to have the lat/long data populated in the site table in order for the records to be displayed • There is a model in the setup toolset that was developed to derive the lat/long data from the UTM data to assist in getting this data populated for display of points across multiple zones • You may also use utmeastings (X field) and utmnorthings (Y field) for your UTM zone, if you are displaying all of your points within one UTM zone
Set up for Spatial Components • Notice that the tTempAnalyzeSpatial Events layer was added to your project • Now open the Pedon PC – click on Forms and then Analyze Point Data to open the Analysis form
Set up for Spatial Components • Click on the Spatial Refresh button – this will enable the refresh of tTempAnalyzeSpatial with the currently filtered records each time the filter button is clicked • Now click on the Remove Filter button to show all of the records (and to show all your points in ArcMap through the tTempAnalyzeSpatial Events layer)
Set up for Spatial Components • Now go back over to your ArcMap project and click the Refresh button
Set up for Spatial Components • Now go back to the Analysis form in the Pedon PC and make a selection from values in the list of soil name as sampled • Notice that the value select goes up into the filter box • Click the filter button again to limit to the selection
Set up for Spatial Components • Now go back over to your ArcMap project and click the Refresh button • Notice that display of points tracks the records that are currently filtered in the Analysis form
Set up for Spatial Components • To label the points to reflect the currently selected field • Right click the tTempAnalyzeSpatial Events layer and go to Properties and then click on the labels tab. • Select Field1 as the Label Field and click OK • Labels will track the currently selected field in the Analysis form • Field1 is a generic field that is passed to the tTempAnalyzeSpatial table from the currently selected field on the Analysis form each time the filter button is pressed
Set up for Spatial Components • Click the Add Data button and add the polygon_selected_PPC table from the spatial_link.mdb file on your system • The recommended location for the Spatial Link database (spatial_link.mdb file) is: C:\pedon\spatial_link.mdb • If you cannot place it at the above location, you can browse to it on your system. Now for the polygon side of things……
Set up for Spatial Components • The Legend Builder form can be linked to the soil polygons layer through the polygon_selected_PPC table • By joining the Legend Builder form with the soil polygon layer you can take advantage of the powerful selection process built into the form • Before we get into setting up the join from this table to the soil polygon layer – we need to create some reference layers from your existing soil polygon layer • soil_a • soil_a_selected • These layers exist only in the ArcMap project, not in the geodatabase and are named with a standard convention that is referenced by the models in the Digital Soil Survey – Pedon PC Analysis toolbox
Set up for Spatial Components • To create the soil_a and soil_a_selected layers within your ArcMap project • Check to make sure that your soil polygon layer has been added to your project • Right click and copy the soil polygons layer and paste it to the Layers • Rename the layer as soil_a • Repeat the same steps and copy the soil polygons layer to your project layers again, only this time name the layer soil_a_selected
Set up for Spatial Components • Creating the join between the polygon_selected_PPC table and the soil_a_selected layer • Right click the soil_a_selected layer and go to Joins and Relates and then go to Join…. • Select the OBJECTID field from your soil_a_selected, select the polygon_selected_PPC table as the table to join to the layer, and then choose the OBJECTID field as the join field. Click Ok. • Right click the soil_a_selected layer and go to Properties and then click on the Definition Query tab • Enter the following statement as shown below: polygon_selected_PPC.OBJECTID is not null
Set up for Spatial Components • The definition query will restrict the display of only the polygons participating in the join between the polygon_selected_PPC table and the soil_a_selected polygon layer • In order to use the spatial linkage between the Legend Builder form and ArcMap we need to intersect the documentation points with the soil_a polygon mapunit symbols in which they occur • The form joins the point documentation with the polygon mapunit symbols through an intersect table which is generated from ArcMap • To create this intersect table we will make a selection of points and run a model from the Pedon PC Analysis toolbox called Polygon-Point Intersect • The Workspace Legend form depends on their being a MUSYM field and a Shape_Acres field in your soil polygon layer. If these fields aren’t present in your soil polygon layer. Add them by calculating fields or simply renaming the corresponding fields in your soil polygon layer.
Set up for Spatial Components • Set your selectable layer to the tTempAnalyzeSpatial Events layer • Make a selection of the points for the whole survey area • Open the Polygon-Point Intersect model by double clicking on it • No parameters are required if you have a soil_a layer and your spatial_link.mdb file is in the following location on your system: C:\pedon\spatial_link.mdb Click Ok • If for some reason you cannot meet these requirements on your system then use the parametered version of the same model from the toolset called Parametered versions of models • The model will take a minute or two to run and will export an intersect table to the Spatial Link database
Set up for Spatial Components • You now have the spatial components set up for the display of point data through the tTempAnalyzeSpatial Events layer and the Analysis form and for the display of polygons through the Legend Builder form. • Nothing will be displayed spatially from the Legend Builder form until you have imported the polygon-point intersect table into the Pedon PC and have built the data for the form. • For further instruction on the set up and building of the data for the Legend Builder form refer to the Pedon_PC_Workspace_Legend power point. • For further instruction on the features in the Analysis form refer to the Pedon_PC_Analysis_Form power point.