Download

1 / 33
340 likes | 541 Views
Documenting the Crime Scene. Getting Started. Record Information. Who? What? Where? When? How? Why?. Field Notes. Investigative notes are a permanent written record of the facts of a case to be used in further investigation, in writing reports, and in prosecuting the case.

E N D
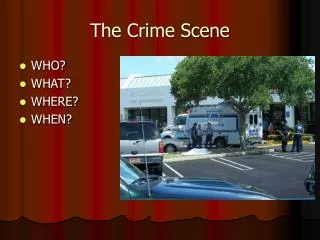
Documenting the Crime Scene Getting Started
Record Information • Who? • What? • Where? • When? • How? • Why?
Field Notes • Investigative notes are a permanent written record of the facts of a case to be used in further investigation, in writing reports, and in prosecuting the case. • Detailed notes can make or break a conviction.
How to Take Notes • Don’t include words such as: a, and, and the • Use standard abbreviations such as mph, DWI, and Ave
Advantages of Photographs • They can be taken immediately • They accurately represent the crime scene and evidence • They create interest and increase attention to testimony
Disadvantages of Photographs • They are not selective • They do not show actual distances • They may be distorted and damaged by mechanical errors in shooting or processing
Common Photographic Equipment • 35mm • Digital camera • Instant print camera • Fingerprint camera • Video equipment
Advantages of Digital Cameras • Elimination of time and expense involved in developing photographic film • Quickly adaptable as e-mail attachments • Easily incorporated into written reports • Record information about each photograph • Consistency
What to Photograph • Long-range pictures of the locality • Medium-range pictures of the immediate crime scene and objects of evidence within the area or room • Close-range pictures of specific evidence
Photogrammetry • Refers to the 3-D measurements of the real world directly from photographs for use in courts • Can accurately locate and measure any object appearing in two or more photographs • Can automatically orient photographs taken from awkward angles • Can correct camera misalignment
Types of Investigative Photography • Surveillance Photography • Aerial Photography • Night Photography • Laboratory Photography • Mug Shots • Lineup Photographs
Types of Laboratory Photography • Microphotography- takes pictures through a microscope • Macrophotography- enlarges a subject • Laser-beam photography- reveals evidence indiscernible to the naked eye • Ultraviolet-light photography- uses the low end of the color spectrum to make visible impressions of bruises and injuries long after their actual occurrence
What to Photograph • Take sufficient photographs to reconstruct the scene. Such as: • The Entrance Point • The Crime Commission Area • The Exit Point
Admissibility of Photographs in Court Photographs must be: • Material • Relevant • Competent • Accurate • Free of Distortion • Non-inflammatory
Crime Scene Sketches • Accurately portray the physical facts • Relate to the sequence of events at the scene • Establish the precise location and relationship of objects at the scene • Help create a mental picture of the scene • Permanent record of the scene • Usually admissible in court
Crime Scene Sketches • Sketch all serious crime and crash scenes after photographs are taken and before anything is moved. Assists in: • Interviewing and Interrogating people • Preparing the investigative report • Presenting the case in court
Materials: Drawing Kit Triangular scale rule Templates Indelible Ink Drafting Table T-square Drafting Paper Colors Uses: Tools for drawing Accurate Scaling Curves/odd shapes Permanent Finishing Ease of drawing Accurate lines Absorbs color better Area comparison Materials for Making Scale Drawings
Steps in sketching the scene • 1. Observe and plan • 2. Measure and outline the area • 3. Plot objects and evidence within the outline • 4. Make notes • 5. Identify the legend and the scale • 6. Reassess the sketch • 7. File the sketch
Step One: Observe and Plan • Observe the scene as many times as needed until you can recall facts and placement. • Plan in advance how you will process the scene to avoid damaging evidence.
Step Two: Measure and outline the Area • All measurements must be accurate. • Do not move items while measuring. • Do not measure moveable items. • Measure wall to wall. • Determine the scale by taking the longest measurement at the scene and dividing it by the longest measurement of the paper used for sketching. • Ex: If you paper is 10in and the room is 100ft long, the scale would be 1 inch equals 10ft
Step Two: Measure and outline the Area • Measure the doors and windows. (record the measurements and determine if they open in or out.) • Sketch the location of physical objects of the room. • Place items of evidence and objects in the sketch at the same time. • Use numbers to designate items and letters to designate evidence.
Step Two: Measure and outline the Area • Use exact measurements to show location of evidence in a room and in relation to all other objects. • Measure and re-measure before you leave the scene.
Step Three: Plotting Objects and Evidence • Rectangle-coordinate method- uses two adjacent walls at which fixed points from which distances are measured. (Restricted to squared or rectangular areas) • Baseline method-establishes a straight line from one fixed point to another. • Triangulation method-uses straight-line measures from two fixed objects to the evidence to create a triangle with the evidence in the angle formed by the two straight lines.
Step Three: Plotting Objects and Evidence • Compass Point Method-uses a protractor to measure the angle formed by two lines. • Cross-Projection Method-presents doors and walls as if they are one surface. Objects of evidence can be measured to show their relationship on a single plane.
Step Four: Taking Notes • Take notes to document items such as: Temperature, lighting conditions, colors, and people present.
Prepare a legend containing: Case number Type of Crime Name of Victim Location Date Time Investigator Anyone Assisting Scale of Sketch Direction of North Name of the Person Making the Sketch Step Five: Identify the Scene
Step Six: Reassess the Sketch BEFORE YOU LEAVE THE SCENE • Make sure nothing has been overlooked • Compare the scene with the sketch • Are all measurements included? • Have all notations been made? • Have you missed anything?
Step Seven: File the Sketch • Submit the Sketch to the case file The admissibility of the sketch is so if it accurately portrays a crime scene.