Understanding Text Rollover Effects in Web Design
Text rollover is a web design technique that enhances user interactivity by changing the appearance of text links when hovered over with a mouse cursor. This effect typically utilizes CSS commands to alter color, text decoration, font size, or style, allowing for a dynamic and engaging user experience. Previously dominated by image-based navigation, many sites are now shifting back to utilizing text-based navigation systems due to the simplicity and effectiveness of rollover effects. Understanding how to implement these effects can improve web accessibility and aesthetics.

Understanding Text Rollover Effects in Web Design
E N D
Presentation Transcript
Rollover Rollover refers to a button created by a web developer or web designer, found within a web page, used to provide interactivity between the user and the page itself. The term rollover in this regard originates from the visual process of "rolling the mouse cursor over the button" causing the button to react (usually visually, by replacing the button's source image with another image), and sometimes resulting in a change in the web page itself. The part of the term 'roll' is probably referring to older mice which had a mechanical assembly consisting of a hard rubber ball housed in the base of the mouse (which rolls) contrary to the modern optical mouse, which has no 'rolling' parts. The term mouseover is probably more appropriate considering current technology.
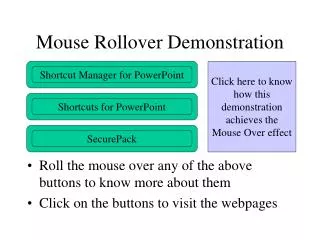
Types of rollover • Image • Text • Buttons
Text Rollover It is called Text-Based Navigation
Text-Based Navigation That means offering clickable text rather than active images. It seemed that, at one time, almost every site had gone to an image-based navigation system because of the neat image-flip rollovers that are so easy to construct.However, I think the tide may be turning back to using text navigation
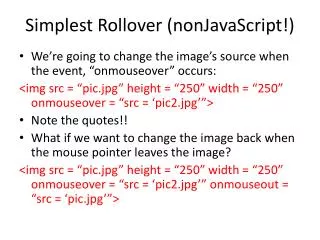
Text Rollover • The effect is achieved by setting up to four CSS commands either as inline STYLE attributes within the A HREF tag or, more commonly, as a style block between the HEAD tags.
Text Rollover • This is four commands in css <STYLE TYPE="text/css">a:link { color: blue; text-decoration: none }a:active { color: red; text-decoration: none }a:visited { color: blue; text-decoration: none }a:hover { color: green; text-decoration: underline }</STYLE>
Text Rollover • Here are the basic concepts in HTML: • a:link affects all unvisited anchor tags • a:active affects anchor tags when being clicked • a:visited affects anchor tags representing visited links • a:hover affects anchor tags when the mouse is on top of them. • color: sets the color • text-decoration: sets underline (among other things) • underline if you want one • none if you don't
Multiple Color Groups Before One Scheme Another Scheme After mouse rollover One Scheme Another Scheme
Multiple Color Groups • I set up the two different color schemes by setting up a class system on the page. Here's the rollover code: • <STYLE TYPE="text/css">a.dog:link { color: blue; text-decoration: none }a.dog:active { color: red; text-decoration: none }a.dog:visited { color: blue; text-decoration: none }a.dog:hover { color: green; text-decoration: underline }a.tree:link { color: green; text-decoration: none }a.tree:active { color: yellow; text-decoration: none }a.tree:visited { color: red; text-decoration: none }a.tree:hover { color: orange; text-decoration: underline }</STYLE> • Notice how I have the two sections separated, one listed as dog and the other as tree. That sets up two classes. I can now call on those classes using the CLASS attribute in the anchor tag. Like so: • <a href="zonk.html" class="tree">One Scheme</a><a href="zonk.html" class="dog">Another Scheme</a>
Highlight It Before One Scheme After mouse rollover One Scheme
Highlight It • Here's the text that created it. Note that the new coding is in bold. • <STYLE TYPE="text/css">a:link { color: green; text-decoration: none }a:active { color: yellow; text-decoration: none }a:visited { color: green; text-decoration: none }a:hover { color: green; text-decoration: underline; background: #F9EDED }</STYLE>
Font Change Before One Scheme After mouse rollover One Scheme
Font Change • The code that actually created the effect is in bold. • <STYLE TYPE="text/css">a.link { color: green; text-decoration: none }a.active { color: yellow; text-decoration: none }a:visited { color: green; text-decoration: none }a.hover { color: orange; text-decoration: underline; font-family : Verdana, Arial, Helvetica, sans-serif; }</STYLE>
Change the size Before One Scheme After mouse rollover One Scheme
Change the size • <STYLE TYPE="text/css">a.link { color: green; text-decoration: none }a.active { color: yellow; text-decoration: none }a:visited { color: green; text-decoration: none }a.hover { color: orange; text-decoration: underline; font-size:40pt }</STYLE>
Make it Bold Before One Scheme After mouse rollover One Scheme
Make it Bold • <STYLE TYPE="text/css">a.link { color: green; text-decoration: none }a.active { color: yellow; text-decoration: none }a:visited { color: green; text-decoration: none }a.hover { color: orange; text-decoration: underline; font-weight: bold}</STYLE>
Make it Italic Before One Scheme After mouse rollover One Scheme
Make it Italic • <STYLE TYPE="text/css">a.italic:link { color: green; text-decoration: none }a.italic:active { color: yellow; text-decoration: none }a:italic:visited { color: green; text-decoration: none }a.italic:hover { color: orange; text-decoration: underline; font-style: italic}</STYLE>