Download
1 / 78
780 likes | 798 Views
Get ready for the Microsoft exam 70-698 with this comprehensive course on installing and configuring Windows 10 infrastructure. Learn the necessary skills and knowledge to pass the exam and advance your career as an IT professional.

E N D
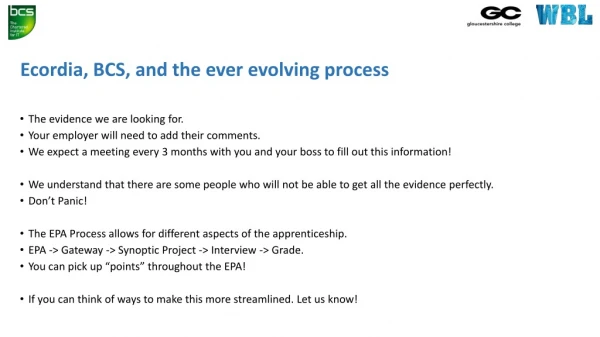
Ecordia, BCS, and the ever evolving process • The evidence we are looking for. • Your employer will need to add their comments. • We expect a meeting every 3 months with you and your boss to fill out this information! • We understand that there are some people who will not be able to get all the evidence perfectly. • Don’t Panic! • The EPA Process allows for different aspects of the apprenticeship. • EPA -> Gateway -> Synoptic Project -> Interview -> Grade. • You can pick up “points” throughout the EPA! • If you can think of ways to make this more streamlined. Let us know!
Introduction to Installing and Configuring Windows 10 Infrastructure Technician
Aim • All apprentices must pass Microsoft exam 70-698 • We have allocated 9 days of college to prepare you for this exam • Achieve a pass grade ideally before the 7th of May 2019 • Exam dumps will be your friend!
Exam 70-698 • Approximately 3 days in college for each section
Resources • Superglos • Initial assessment test • Essential facts reference document • PowerShell commands document • Practical examples • TestOut Client Pro (for 70-698) • TechNet (technet.microsoft.com) • Exam dumps • Feedback from exam success
Example feedback – know these: • Windows Deployment Services, • Assesment and Deployment kit, • Application Compability Toolkit. • User state migration tools and answer files • The differences between performance monitor and resource monitor, and when to use them. • bcdboot.exe • bcdedit.exe • bootcfg.exe • bootsect.exe • drvload.exe • pnputil.exe
Exams • 1 online exam lasting 2 hours • Closed book, no mobiles, calculators, smartwatches allowed • Access to desktop denied during the exam • Variable number of questions • Pass mark 700/1000 (questions are weighted)
Costs • £113 • Exams are taken at: • System Force IT LimitedUnits C1 & C2 Brearley Place,Baird Road, Waterwells Business Park,QuedgeleyGloucesterGL2 2GB
Initial assessment test • 20 questions • No time limit • On www.superglos.co.uk/appWiki
Implement Windows Day 1 • 30-35% • Next 5 slides • Client Pro sections indicated on each slide for sections we need this!
Prepare for Installation (7.1, 11.7) • Prepare for installation requirements • Determine hardware requirements and compatibility • Choose between an upgrade and a clean installation • Determine appropriate editions according to device type • Determine requirements for particular features, such as Hyper-V, Cortana, Miracast, Virtual Smart Cards and Secure Boot • Determine and create appropriate installation media • Configure upgrade readiness
Install Windows (7.6, 7.9) • Perform clean installations • Upgrade using installation media • Configure native boot scenarios • Identify valid upgrade paths • Migrate from previous versions of Windows • Install to virtual hard disk (VHD) • Boot from VHD • Install on bootable USB • Install additional Windows features • Configure Windows for additional regional and language support
Perform clean installations • To prepare for a clean installation. • If a version of windows is already present, we need to. • Perform a backup • Or consider creating a system image • Secure your Windows installation media and product key. • Make sure that you have the installation disks and product keys for any applications you want to install on a new system. • Configure the BIOS/UEFI configuration to boot form the installation media. • After the setup program boots, the windows installer copies an installation image file onto the system disk. This is a scaled down version of the windows operating system called Windows PE.
Installing a Multiboot System • You can create dual boot systems by installing Windows onto a different disk partition, hard drive or VHD file on a system with an existing operating system already installed. • Windows must be installed on a NTFS partition. • When installing different version of windows on the same system. Install the oldest version first and the newest version last. This ensures the newest boot loader is installed last. • Programs and drivers must be installed separately on each operating system. • To specify which installation to boot form on a dual boot system, use BCDEdit to modify the boot configuration data BCD boot entry. • Run CMD as Admin and have a look. (BCDEdit)
VHD • A VHD (virtual hard drive) lets you install windows directly to it just like a standard HDD. However, a VHD emulates a physical HDD and is just actually a file on a physical HDD • They are bootable! • This can be useful as the OS, applications, and any use data stored on the VHD is saved in the VHD file. • Lets you create expandable storage • You can set up Multiboot systems without having to partition your HDD.
VHD • Install Windows 10 and set up a VHD • VHD as follows: a. Right-click Start and select Disk Management. • Select Action > Create VHD. • In the Location field, enter the location. • In the Virtual hard disk size field, enter the size. • Under Virtual hard disk format, select the format. • Under Virtual hard disk type, select the type. • Select OK.
VHD • Initialize a disk as follows: • In Disk Management, right-click Disk 4 and select Initialize Disk. • Make sure Disk 4 is marked. • Make sure MBR is selected. • Select OK.
VHD • Create a simple volume as follows: • In Disk Management, right-click unallocated space on Disk 4 and select New Simple Volume. • Select Next. • Verify the volume size; then select Next. • Assign the drive letter; then select Next. • In the Volume label field, enter the volume name; then select Next. • Select Finish
Configure devices and device drivers(2.1, 2.2, 2.3, 8.1) • Install, update, disable and roll back drivers • Resolve driver issues • Configure driver settings, including signed and unsigned drivers • Manage driver packages • Download and import driver packages • Use the Deployment Imaging Servicing and Management (DISM) tool to add packages
Import the VM from the server • In My PC, right click and map a network drive. • The address is \\wblserver\iso • Copy the Activate VM to your local HDD. • Go to Hyper V when the VM has copied over and import the VM as a COPY!
Configure Windows • Configure the user environment by performing the following: • Configure the Start menu to provide users with the tools they need to do their job. To do this, launch the Settings app and navigate to Personalization > Start. Here you can customize settings, such as: • Show more tiles • Show suggestions on Start • Show most-used apps • Show recently added apps • Use full screen • Show recently opened items in jump lists • Show folders on Start
Perform post installation configuration • Configure and customise Start Menu, desktop, taskbar and notification settings according to device type • Configure accessibility options • Configure Cortana • Configure Microsoft Edge • Configure Internet Explorer • Configure client Hyper-V • Configure power settings
Implement Windows in an enterprise environment (1.4, 4.5, 8.2, 8.4) • Provision with Configuration Designer tool • Implement Active Directory-based activation • Implement volume activation using a Key Management Service (KMS) • Query and configure activation states using the command line • Configure Active Directory including Group Policies • Configure and optimise user account control (UAC)
Implementing Windows 10 • A client wants you to set up a windows machine for them. • What are your next steps? • Apprentice must ask client what is required.
Client Needs • Client requires a laptop with windows 10 for home use. • Mainly uses a Web browser and email. • Uses Office frequently. • Needs to be secure. • They would like to be able to access work resources if required via remote desktop
Configure and support core services Day 2 • 30-35% • Next 5 slides • Client Pro sections indicated on each slide • Test on implementing windows • Test out 1.2 7.4 7.5 9.7 • Afternoon • Setting up user accounts – Practical on VM to create new local accounts • 5.2.5 to 5.2.9
Test • 10 Questions on the superglos. • There will be a PRIZE!
User accounts • Set up a VM with Windows 10 Pro. Configure the user accounts as followed. Create a new local user account • Associated Microsoft online account: None (create a local user account only) • Username: Natasha • Password: p@ssw0rd • Password hint: Strong password
Configure networking In The VM • Configure and support IPv4 and IPv6 network settings • Configure name resolution; • Configure network locations – Public, Private • Configure Windows Firewall – and with advanced security – Set the Firewall to block all outbound traffic • Configure network discovery • Configure Wi-Fi settings • Configure Wi-Fi direct • Configure VPN: app triggered VPN, traffic filters and lockdown VPN – Use windows VPN • Configure IPSec • Configure Direct Access
Configure networking DHCP • DHCP is an automatic method for assigning IPv4 address and other TCP/IPv4 configuration parameters to hosts. Client computers contact a DHCP server to receive IPv4 configuration information. DHCP can perform the following tasks: • Automatic host configuration on small, medium, or large networks • Automatic delivery of additional configuration parameters such as default gateway and DNS server addresses • By default, all Windows computers try to use DHCP for IPv4 configuration information. • The source=dhcp option can be used with the netsh command to configure the network interface to retrieve an IP address from a DHCP server.
Configure networking Static • IPv4 configuration values can be manually assigned to a host. This is called static addressing. • When you configure a static IPv4 address, you must also configure the subnet mask and default gateway. • DHCP and APIPA are disabled when a static IPv4 address is configured. • Even if you use DHCP for other addressing parameters, DNS server addresses can be manually assigned. • Use static addressing: • If your network does not have a DHCP server, or if you want to eliminate DHCP traffic from your network. • For specific hosts that must have the same address all of the time (such as servers). • For non-DHCP hosts (hosts that cannot accept an IPv4 address using DHCP). • The static option can be used with the netsh command to manually configure the network interface IP address.
Configure networking APIPA • APIPA is an automatic configuration method in which hosts automatically select their own IPv4 address within a specific range. • Windows computers will use APIPA if a DHCP server cannot be contacted. • Hosts select an IPv4 address in the 169.254.0.1–169.254.255.255 range with a mask of 255.255.0.0. After choosing the address, the host verifies that no other host on the network is using the selected address. • APIPA sets only the IPv4 address and mask. Because it does not assign a default gateway, APIPA only supports communications within the same subnet; it cannot be used if communication with other subnets is required. • If network infrastructure devices (such as servers and routers) use static IP address assignments, they are not affected by a DHCP outage. As a result, workstations that switch to APIPA during the outage will not be able to communicate with these devices.
Configure storage (2.5, 2.7, 2.8) • Configure disks, volumes and file system options using Disk Management and PowerShell • Create and configure VHDs • Configure removable devices • Create and configure storage spaces • Troubleshoot storage and removable device issues
Partition and volume management • We will answer the following • Volume resizing is only support on which volumes? • What is the only way to convert a drive from NTFS to FAT32? • Which tasks do you perform to remove a disk from a functioning computer? • Which DiskPart command initializes the selected hard disk and configures it to use the specified partitioning format? • What happens if you use "initialize-disk_number" without parameters?
Installing a new disk • After installing a new disk you must perform the following either in Disk management, DiskPart command line or Powershell. • Initialize the disk • Specify one of the following partition formats • MBR (Master Boot Record) • GUID Partition Table • Partition the disk and create volumes • Format each volume with one of the following • NTFS • Fat32 • exFat • Assign a Drive letter to each volume
Disk Types • Basic • A basic disk is a physical disk type that can be accessed by all operating systems. • Uses MBR-like partition • Limit of 4 partitions with only one as an extended with a maximum of 26 logical drives • The active partition is the one whose operating system will boot. A system can only have one Active partition at a time • Can only have one simple volume • The active partition must be represented by the drive letter C:
Disk Types • Dynamic • A dynamic disk is a physical disk that use a Logical Disk Manager (LDM) database to store the volume types, sizes, locations, drive letters, and configurations. The LDM information is copied to other dynamic disks providing redundancy. • Dynamic disks support • Simple volumes use a single disk • Spanned volumes use disk space from multiple hard disks – total size is the total size of all the space on the allocated HDD's. • Stripped (Radi 0) • Mirrored (Raid 1) • Striped with parity (Raid 5)
Partitioning and formatting storage • Windows supports FAT32, exFAT, and NTFS file systems. • After a volume is formatted with FAT or FAT32, you can use the Convert command0line utility to convert the system to NTFS without reformatting and losing data. • The only way to convert a drive from NTFS to FAT32 is to reformat the hard drive. All data will be lost unless backed up
Resizing • You can resize a volume by either expanding it or shrinking it. • A volume can be extended using only contiguous free space on the same disk. • A volume cannot be decreased to a size smaller than the amount of data on the volume. • Volume resizing is supported only for simple and spanned volumes • Some reasons as to why we would resize • The volume is running out of space and you have free space available on the disk or on other disks in the system • To create a dual boot system but only have on HDD in the system.
DiskPart • "list disk" • Lists all disks installed in the system. • "select disk disk_number" • Specifies which disk in the system you want to manage. • "online disk" • (Optional) Brings the selected disk online if it is currently offline. • "Clean" • (Optional) Removes all existing partitions and volumes from the selected hard disk drive. This operation cannot be undone. All of the data on the disk will be deleted. Before you run this command, back up anything on the disk that you want to keep. • "convert mbr" "convert gpt" • Initializes the selected hard disk and configures it to use the specified partitioning format (MBR or GPT). The convert command can also be used to convert a basic disk to a dynamic disk (or vice versa). • "create partition primary size=size" • Creates a new partition on the selected disk. Use the size=size option with this command to specify a size (in MB) for the partition. If this option is omitted, then all of the unallocated space on the selected disk will be assigned to the new partition. • "list part" • Lists all partitions on the specified disk. • "select part partition=number" • Selects a specific partition on the selected disk.
DiskPart • "format" • Formats the selected partition with a file system. Use the following options with this command: • fs=file_system specifies the file system the partition should be formatted with. You can specify FAT, FAT32, exFAT, NTFS, ReFS, or UDF. • label="label" assigns the specified label to the new volume. • quick performs a quick format. • compress compresses the new volume. • "assign letter drive_letter" • Assigns a drive letter to the selected partition. • "list volume" • Lists all volumes on all hard disks in the system. • "add disk=disk_number" • Adds a mirror to an existing simple volume using the specified disk. • "extend" • Adds space to an existing volume. Use the following options with this command: • size=size specifies the amount of space (in MB) to add to the selected volume. • disk=disk_number specifies which disk to extend the volume to. • "expand" • Increases the maximum size of a virtual disk
PowerShell volume management • "Get-Disk" • Lists all disks installed in the system. This cmdlet is used to identify the number assigned to the disk that you want to manage. • "Clear-Disk disk_number – RemoveData" • (Optional) Removes all existing partitions and volumes from the specified hard disk drive. This operation cannot be undone. All of the data on the disk will be deleted. Before you run this command, back up anything on the disk that you want to keep. • "Initialize-Disk disk_number" • Initializes the specified disk. If no parameters are included with this command, it will configure the disk to use the GPT partition format. If you wish to use the MBR partition format, use the -PartitionStyle MBR option with this command. • "New-Partition" • Creates a new partition on the disk. Use the following options with this cmdlet: • -DiskNumberdisk_number specifies the disk to create the partition on. • -UseMaximumSize specifies that the partition use all of the unallocated space on the drive. • -Size size specifies a custom size for the partition. Specify a value in bytes, KB, MB, GB, or TB. • -AssignDriveLetter assigns the next available drive letter to the new partition. • "Get-Partition -DiskNumberdisk_number" • Lists all partitions on the specified disk.
PowerShell volume management • "Format-Volume" • Formats a partition with a file system. Use the following options with this cmdlet: • -DriveLetterdrive_letter specifies which partition to format. • -FileSystemfile_system specifies the file system the partition should be formatted with. You can specify NTFS, ReFS, exFAT, FAT32, or FAT. • -FileSystemLabel "label" assigns the specified label to the new volume. • "Get-Volume -DriveLetterdrive_letter" • Lists all volumes on the specified disk. • "Set-Volume -DriveLetterdrive_letter - NewFileSystemLabel "label" • Assigns a label to a volume.
Configure data access and usage(2.9, 2.11, 6.1, 6.2, 6.3, 6.5) • Configure file and printer sharing and HomeGroup connections • Configure folder shares, public folders and OneDrive • Configure file system permissions • Configure OneDrive usage, including files on demand • Troubleshoot data access and usage
Configure remote management (10.7, 10.8) • Choose the appropriate remote management tools • Configure remote management settings • Modify settings remotely using the Microsoft Management Console (MMC) or PowerShell • Configure Remote Assistance, including Easy Connect • Configure Remote Desktop • Configure remote PowerShell