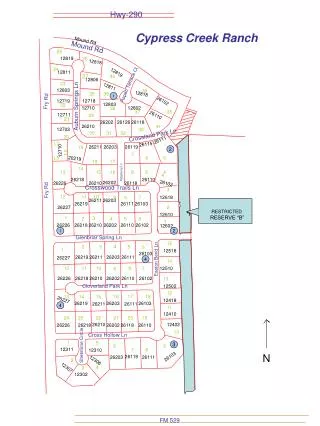
Download
1 / 13
130 likes | 442 Views
CONSTRUCTING A CIRCULAR MOUND ARRANGEMENT. Written by: Holli Bowman & David Lynn Hall County Board of Education April 2003 Modified by Georgia Agriculture Education Curriculum Office September 2005.

E N D
CONSTRUCTING A CIRCULAR MOUND ARRANGEMENT Written by: Holli Bowman & David Lynn Hall County Board of Education April 2003 Modified by Georgia Agriculture Education Curriculum Office September 2005
This presentation is designed to supplement the textbook, Floriculture: Designing Merchandising, Unit 10 “Circular Arrangements”. The author is Charles Griner and it is published by Delmar Publishers.
Step 1: Selecting Materials • low, round container (6’ design bowl) • 1/3 block of floral foam • waterproof anchor tape • 9 standard carnations • 3 stems pompon (daisy) mums • 3 stems baby’s breath • 8 stems leatherleaf fern • floral preservative
Step 2: Preparing the Container • Cut approximately 1/3 block of floral foam. • The floral foam should extend about one inch above the rim of the container. • Saturate the floral foam in a warm preservative solution. • Secure the floral foam to the container with waterproof anchor tape.
Step 2: Continued • Criss-cross the tape over the foam and attach the ends to the container. • Tape it off center to leave room for a flower stem in the middle of the foam. • Do not attach more than one inch of tape to the container. • Long strips of tape will be difficult to hide.
Step 3: Greening the Base • Place a circle of leatherleaf fern around the rim of the container. • Allow the fern to overlap the side of the container. • Save the remaining part of the fern stem for later use.
Step 4:Adding the Base Flowers • Place four standard carnations straight into the foam, opposite each other at the rim of the container. • These four carnations should form a square pattern. • The base of the carnation blooms should extend just past the fern tips. • These carnations should be equidistant from the center of the arrangement.
Step 5: Establishing the Height • Place the carnation, with the straightest stem, in the center of the floral foam at a height of 1 ½ to 2 times the width of the container. • This flower will establish the uppermost boundary of the floral design.
Step 6: Placing Additional Greenery • Place one piece of fern on each side of the center flower stem with the back of the fern facing the stem. • Use the remaining fern stems to green the foam. • Leave pairs of leaflets on the stems to reduce the number of holes in the foam. • Remember that the stems should radiate from the foam.
Step 7: Adding Remaining Primary Flowers • Insert four additional carnations at 45o angles halfway between the two base carnations and center carnation. • Vary the height of these carnations slightly to prevent creating a row effect. • These flowers should be equidistant from the center of the arrangement.
Step 8: Adding Secondary Flowers • Place the pompon (daisy) mums in the spaces between the carnations. • Use large blooms in large spaces and small blooms or buds in small spaces. • Do not crowd the arrangement (no petals touching). • Leave some space around each flower.
Step 9: Adding Filler Flowers • Filler flowers such as baby’s breath or statice are added to soften the design. • Cut small pieces of baby’s breath and carefully place them between flowers in the arrangement. • Allow the filler flowers to stick out slightly around the flowers and foliage.
Step 10: Evaluating the Design • Step back and examine the arrangement from all angles. • Check for holes and add greenery or flowers where they are needed. • Move flowers, if necessary, to create equal space between flowers. • If you move a flower, insert it into a new hole.