AUT 112 – Engines II
490 likes | 1.54k Views
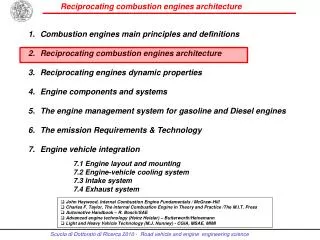
AUT 112 – Engines II. CPT 23 - In-Vehicle Service. OBJECTIVES. After studying Chapter 23, the reader should be able to: Prepare for ASE certification test content area “A” (General Engine Diagnosis). Diagnose and replace the thermostat. Diagnose and replace the water pump.

AUT 112 – Engines II
E N D
Presentation Transcript
AUT 112 – Engines II CPT 23 - In-Vehicle Service
OBJECTIVES After studying Chapter 23, the reader should be able to: • Prepare for ASE certification test content area “A” (General Engine Diagnosis). • Diagnose and replace the thermostat. • Diagnose and replace the water pump. • Diagnose and replace an intake manifold gasket. • Replace a timing a belt. • Explain hybrid engine precautions.
KEY TERMS • EREV • Fretting • HEV • Idle stop • Skewed
THERMOSTAT REPLACEMENT • All thermostat valves move during operation to maintain the desired coolant temperature. • Thermostats can fail in the following ways. • Stuck open • Stuck closed • Stuck partially open • Skewed
THERMOSTAT REPLACEMENT • If the thermostat has a jiggle valve, it should be placed toward the top to allow air to escape. • If a thermostat were to become stuck open or open too soon, this can set a diagnostic trouble code P0128 (coolant temperature below thermostat regulating temperature).
THERMOSTAT REPLACEMENTREPLACEMENT PROCEDURE • STEP 1 Allow the engine to cool for several hours so the engine and the coolant should be at room temperature. • STEP 2 Drain the coolant into a suitable container. • STEP 3 Remove any necessary components to get access to the thermostat. • STEP 4 Remove the thermostat housing and thermostat. • STEP 5 Replace the thermostat housing gasket and thermostat. Torque all fasteners to specifications.
THERMOSTAT REPLACEMENTREPLACEMENT PROCEDURE • STEP 6 Refill the cooling system with the specified coolant and bleed any trapped air from the system. • STEP 7 Pressurize the cooling system to verify that there are no leaks around the thermostat housing. • STEP 8 Run the engine until it reaches normal operating temperature and check for leaks. • STEP 9 Verify that the engine is reaching correct operating temperature.
WATER PUMP REPLACEMENTNEED FOR REPLACEMENT • A water pump will require replacement if any of the following conditions are present. • Leaking coolant from the weep hole • Bearing noisy or loose • Lack of proper coolant flow caused by worn or slipping impeller blades • Note: If the water pump cannot be replaced without removing the timing belt, it is more cost effective to change the pump when the belt is being serviced/replaced.
WATER PUMP REPLACEMENTREPLACEMENT GUIDELINES • STEP 1 Allow the engine to cool to room temperature. • STEP 2 Drain the coolant and dispose of properly or recycle. • STEP 3 Remove engine components to gain access to the water pump as specified in service information. • STEP 4 Remove the water pump assembly.
WATER PUMP REPLACEMENTREPLACEMENT GUIDELINES • STEP 5 Clean the gasket surfaces and install the new water pump using a new gasket or seal as needed. Torque all fasteners to factory specifications. • STEP 6 Install removed engine components. • STEP 7 Fill the cooling system with the specified coolant. • STEP 8 Run the engine, check for leaks, and verify proper operation.
WATER PUMP REPLACEMENTREPLACEMENT GUIDELINES • Use caution if using a steel scraper to remove a gasket from aluminum parts. It is best to use a wood or plastic scraper.
INTAKE MANIFOLD GASKET INSPECTIONCAUSES OF FAILURE • Many V-type engines leak oil, coolant, or experience an air (vacuum) leak caused by a leaking intake manifold gasket. • This failure can be contributed to one or more of the following: • Expansion/contraction rate difference between the cast-iron head and the aluminum intake manifold can cause the intake manifold gasket to be damaged by the relative motion of the head and intake manifold. This type of failure is called fretting. • Plastic (Nylon 6.6) gasket deterioration caused by the coolant
INTAKE MANIFOLD GASKET INSPECTIONCAUSES OF FAILURE • An intake manifold gasket that failed and allowed coolant to be drawn into the cylinder(s).
INTAKE MANIFOLD GASKET INSPECTIONDIAGNOSIS OF LEAKING INTAKE MANIFOLD GASKET • Because intake manifold gaskets are used to seal oil, air, and coolant in most causes, determining that the intake manifold gasket is the root cause can be a challenge.
INTAKE MANIFOLD GASKET INSPECTIONDIAGNOSIS OF LEAKING INTAKE MANIFOLD GASKET • To diagnose a possible leaking intake manifold gasket, perform the following tests. • Visual inspection • Coolant level • Air (vacuum) leak • Smoke Machine
INTAKE MANIFOLD GASKET REPLACEMENT FIGURE 23–5 The upper intake manifold, often called a plenum, attaches to the lower intake manifold. FIGURE 23–4 The lower intake manifold attaches to the cylinder heads.
INTAKE MANIFOLD GASKET REPLACEMENT • STEP 1 Be sure the engine has been off for about an hour and then drain the coolant into a suitable container. • STEP 2 Remove covers and other specified parts needed to get access to the retaining bolts. • STEP 3 To help ensure that the manifold does not warp when removed, loosen all fasteners in the reverse order of the tightening sequence. • STEP 4 Remove the upper intake manifold (plenum), if equipped, and inspect for faults. • STEP 5 Remove the lower intake manifold, using the same bolt removal procedure of starting at the ends and working toward the center.
INTAKE MANIFOLD GASKET REPLACEMENT • STEP 6 Thoroughly clean the area and replace the intake manifold if needed. Check that the correct replacement manifold is being used, and even the current part could look different from the original. • STEP 7 Install the intake manifold using new gaskets as specified. • STEP 8 Torqueall fasteners to factory specifications and in the propersequences. The tightening sequences usually start at the center and work outward to the ends. • STEP 9 Reinstall all parts needed to allow the engine to start and run, including refilling the coolant if needed. • STEP 10 Start the engine and check for leaks and proper engine operation.
INTAKE MANIFOLD GASKET REPLACEMENT • STEP 11 Reset or relearn the idle if specified, using a scan tool. • STEP 12 Install all of the remaining parts and perform a test drive to verify proper operation and no leaks. • STEP 13 Check and replace the air filter if needed. • STEP 14 Change the engine oil if the intake manifold leak could have caused coolant to leak into the engine, which would contaminate the oil.
INTAKE MANIFOLD GASKET REPLACEMENT • Many aftermarket replacement intake manifolds may have a different appearance from the original manifold.
TIMING BELT REPLACEMENTNEED FOR REPLACEMENT • Timing belts have a limited service and a specified replacement interval ranging from 60,000 miles (97,000 km) to about 100,000 miles (161,000 km). • Timing belts are required to be replaced if any of the following conditions occur. • Meets or exceeds the vehicle manufacturer’s recommended timing belt replacement interval. • The timing belt has been contaminated with coolant or engine oil. • The timing belt has failed (missing belt teeth or broken).
Timing Belt Replacement • Here’s some of what can happen if a timing belt is not replaced before it fails.
TIMING BELT REPLACEMENTTIMING BELT REPLACEMENT GUIDELINES • STEP 1 Allow the engine to cool before starting to remove components to help eliminate the possibility of personal injury or warpage of the parts. • STEP 2 Remove all necessary components to gain access to the timing belt and timing marks. • STEP 3 If the timing belt is not broken, rotate the engine until the camshaft and crankshaft timing marks are aligned according to the specified marks. • STEP 4 Loosen or remove the tensioner as needed to remove the timing belt.
TIMING BELT REPLACEMENTTIMING BELT REPLACEMENT GUIDELINES • STEP 5 Replace the timing belt and any other recommended items. Components that some vehicle manufacturers recommend replacing in addition to the timing belt include: • Tensioner assembly • Water pump • Camshaft oil seal(s) • Front crankshaft seal • STEP 6 Check (verify) that the camshaft timing is correct by rotating the engine several revolutions. • STEP 7 Install enough components to allow the engine to start to verify proper operation. Check for any leaks, especially if seals have been replaced. • STEP 8 Complete the reassembly of the engine and perform a test drive before returning the vehicle to the customer.
TIMING BELT REPLACEMENTTIMING BELT REPLACEMENT GUIDELINES • A single overhead camshaft engine with a timing belt that also rotates the water pump.
TIMING BELT REPLACEMENTTIMING BELT REPLACEMENT GUIDELINES • STEP 1 Allow the engine to cool before starting to remove components to help eliminate the possibility of personal injury or warpage of the parts. • STEP 2 Remove all necessary components to gain access to the timing belt and timing marks.
TIMING BELT REPLACEMENTTIMING BELT REPLACEMENT GUIDELINES • STEP 3 If the timing belt is not broken, rotate the engine until the camshaft and crankshaft timing marks are aligned according to the specified marks.
TIMING BELT REPLACEMENTTIMING BELT REPLACEMENT GUIDELINES • STEP 4 Loosen or remove the tensioner as needed to remove the timing belt.
TIMING BELT REPLACEMENTTIMING BELT REPLACEMENT GUIDELINES • STEP 5 Replace the timing belt and any other recommended items. Components that some vehicle manufacturers recommend replacing in addition to the timing belt include: • Tensioner assembly • Water pump • Camshaft oil seal(s) • Front crankshaft seal
TIMING BELT REPLACEMENTTIMING BELT REPLACEMENT GUIDELINES • STEP 6 Check (verify) that the camshaft timing is correct by rotating the engine several revolutions. • STEP 7 Install enough components to allow the engine to start to verify proper operation. Check for any leaks, especially if seals have been replaced.
TIMING BELT REPLACEMENTTIMING BELT REPLACEMENT GUIDELINES • STEP 8 Complete the reassembly of the engine and perform a test drive before returning the vehicle to the customer.
HYBRID ENGINE PRECAUTIONSHYBRID VEHICLE ENGINE OPERATION • Gasoline engines used in hybrid electric vehicles (HEVs) and in extended range electric vehicles (EREVs) can be a hazard to be around under some conditions. • These vehicles are designed to stop the gasoline engines unless needed. • This feature is called idle stop. • This means that the engine is not running, but could start at any time if the computer detects the need to charge the hybrid batteries or other issue that requires the gasoline engine to start and run.
HYBRID ENGINE PRECAUTIONSPRECAUTIONS • Always check service information for the exact procedures to follow when working around or under the hood of a hybrid electric vehicle. • These precautions could include: • Before working under the hood or around the engine, be sure that the ignition is off and the key is out of the ignition. • Check that the “Ready” light is off. • Do not touch any circuits that have orange electrical wires or conduit. The orange color indicates dangerous high-voltage wires, which could cause serious injury or death if touched. • Always use high-voltage linesman’s gloves whenever depowering the high-voltage system.
HYBRID ENGINE PRECAUTIONSPRECAUTIONS • A Toyota/Lexus hybrid electric vehicle has a ready light. If the ready light is on, the engine can start at anytime without warning.
HYBRID ENGINE PRECAUTIONSHYBRID ENGINE SERVICE • The gasoline engine in most hybrid electric vehicles specifies low viscosity engine oil as a way to achieve maximum fuel economy. • The viscosity required is often: • SAE 0W-20 • SAE 5W-20
SUMMARY • Thermostats can fail in the following ways. • Stuck open • Stuck closed • Stuck partially open • Skewed • A water pump should be replaced if any of the following conditions are present. • Leaking from the weep hole • Noisy bearing • Loose bearing • Lack of normal circulation due to worn impeller blades
SUMMARY • A leaking intake manifold gasket can cause coolant to get into the oil or oil into the coolant, as well as other faults, such as a poor running engine. • When a timing belt is replaced, most vehicle manufacturers also recommend that the following items be replaced. • Tensioner assembly • Water pump • Camshaft seal(s) • Front crankshaft seal • When working on a Toyota/Lexus hybrid electric vehicle (HEV), be sure that the key is off and out of the ignition and the READY light is off.
REVIEW QUESTIONS • How can a thermostat fail? • How can a water pump fail requiring replacement? • What will happen to the engine if the intake manifold gasket fails? • Why must timing belts be replaced? • Why is it important that the READY light be out on the dash before working under the hood of a hybrid electric vehicle?
CHAPTER QUIZ 1. A thermostat can fail in which way? • Stuck open • Stuck closed • Stuck partially open • Any of the above
CHAPTER QUIZ 2. A skewed thermostat means it is ________. • Working, but not at the correct temperature • Not working • Missing the thermo wax in the heat sensor • Contaminated with coolant
CHAPTER QUIZ 3. Coolant drained from the cooling system when replacing a thermostat or water pump should be ________. • Reused • Disposed of properly or recycled • Filtered and reinstalled after the repair • Poured down a toilet
CHAPTER QUIZ 4. A water pump can fail to provide the proper amount of flow of coolant through the cooling system if what has happened? • The coolant is leaking from the weep hole. • The bearing is noisy. • The impeller blades are worn or slipping on the shaft. • A bearing failure has caused the shaft to become loose.
CHAPTER QUIZ 5. Intake manifold gaskets on a V-type engine can fail due to what factor? • Fretting • Coolant damage • Relative movement between the intake manifold and the cylinder head • All of the above
CHAPTER QUIZ 6. A defective thermostat can cause the powertrain control module to set what diagnostic trouble code (DTC)? • P0171 • P0172 • P0128 • P0300
CHAPTER QUIZ 7. A replacement plastic intake manifold may have a different design or appearance from the original factory-installed part. • True • False
CHAPTER QUIZ 8. The torque specifications for many plastic intake manifolds are in what unit? • Pound-inches • Pound-feet • Ft-lb per minute • Lb-ft per second
CHAPTER QUIZ 9. When replacing a timing belt, many experts and vehicle manufacturers recommend that what other part(s) should be replaced? • Tensioner assembly • Water pump • Camshaft oil seal(s) • All of the above
CHAPTER QUIZ 10. Hybrid electric vehicles usually require special engine oil of what viscosity? • SAE 5W-30 • SAE 10W-30 • SAE 0W-20 • SAE 5W-40