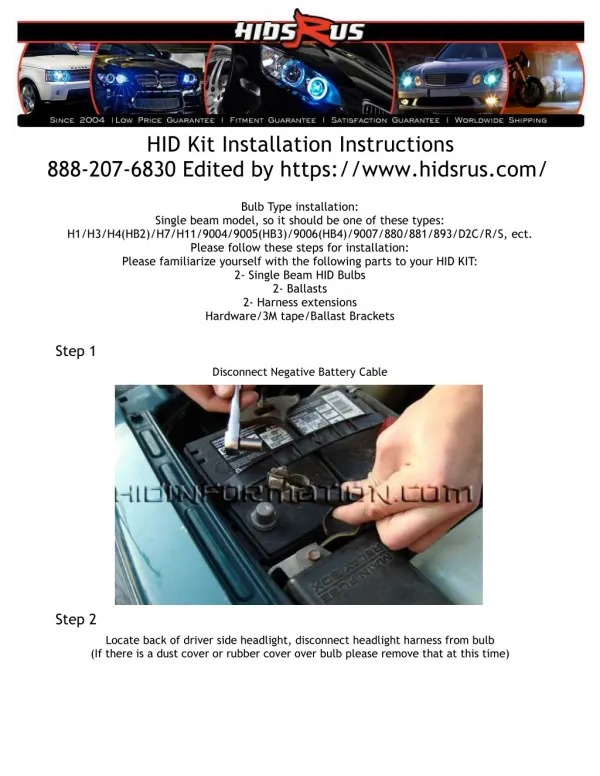
Complete Setup Instructions for the FirstLight Voile Kit
190 likes | 304 Views
This guide provides step-by-step setup instructions for the FirstLight Voile Kit. All necessary parts are included with the kit. You'll need tools like a protractor, pencil, ruler, and drill. Start by mounting the toe and heel plates using Loctite, then position and mark your slider plates. Carefully drill holes and ensure proper alignment. After assembly, check that the Voile slider moves smoothly over the pucks. For further assistance, contact us at sales@firstlightsnowboards.com.au or Adam at +61 (0)413.888.115.

Complete Setup Instructions for the FirstLight Voile Kit
E N D
Presentation Transcript
All parts that are needed are supplied with the Firstlight Voile kit. Tools required are; Protractor Pencil Marker pen Ruler A4 paper Clear tape Drill 7mm bit Countersink bit Hack Saw Locktite
Get two pieces of paper that are larger than the green slider plates and place them over the board inserts.
Tape them down. With a pencil lightly shade over where the inserts are, showing the holes.
Find the place where you want to mount the slider plate. This can be done buy measuring you stance width. Knowing your stance angle for this foot, mark the angle with a protractor.
Find the middle line and center of the slider plate and lay over the paper. Rule a line around the slider.
Cut out the line that was traced around the slider. You may want to punch a small hole through the middle of the shaded holes centers.
Turn the paper over and place it on the bottom of the puck. This is important as it will determine that your stance is correct (goofy or regular). Tape the paper to the slider and mark the hole centers with a marker pen.
Drill the holes in the slider as shown above using a 7mm drill bit. Be sure to have you safety boots on!
Countersink the holes for the screws supplied in the kit. Then mark the center line on each puck and cut the pucks in half with a hack saw. All that is left to do now is mount the pucks as shown above. You can also mount the heal raisers too. You can mount these earlier if you like, I just forgot on this board. Remember to use Locktite.
Check that the Voile slider slides over the green pucks ok. Your done!
If you need any more info please contact sales@firstlightsnowboards.com.au Or Adam on +61 (0)413 888 115


![Instructions for Alexa Setup or Amazon Echo [Alexa App Echo Setup]](https://cdn4.slideserve.com/8316036/alexa-setup-echo-dot-setup-download-alexa-app-dt.jpg)