Download
1 / 23
230 likes | 336 Views
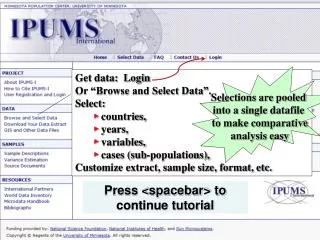
Selections are pooled into a single datafile to make comparative analysis easy. Get data: Login Or “Browse and Select Data”. Select: ► countries, ► years, ► variables, ► cases (sub-populations), Customize extract, sample size, format, etc.

E N D
Selections are pooled into a single datafileto make comparativeanalysis easy Get data: Login Or “Browse and Select Data”.Select: ► countries, ► years, ► variables, ► cases (sub-populations), Customize extract, sample size, format, etc. Press <spacebar> to continue tutorial
Get data: create custom-tailored extracts in 6 stepshttps://international.ipums.org/international • Log-in (must be registered): enter email, password • Select samples: country, year • Select variables: as few or as many as needed • Request, review or change extract • Review and make any changes • Change format: SAS, SPSS, STATA, csv or column text • Customize extract, select “Options”: • Customize sample size • Select cases (e.g.: females, ages 15-49) • Attach characteristics (of mothers, fathers, spouses) • Describe extract, then click “submit”. IPUMS is “event-driven”.Go back or forwardat any time
Select data:Step 2. Select samples Click here, to select samples(the default is “all samples in the database”)
Step 2: Select Samples: a. select country(ies) or year(s) by clicking desired boxb. click “Submit sample selections” First, select samples (click any box or boxes—scroll up-down). Then, click “submit sample selections”. If not, selections are notactivated.
Create Data Extract:Step 3. Select more variables Click “Options”, “Show all groups together” to see all variables in a single list. Or, mouse-over the “Household,” “Person,” or “A-Z” buttons to see drop-down lists of groups of variables
Integrated Variable list for selected samples:Click to select. Scroll down to see more. Check any box to to select variablefor extract
Click a variable name for description, codes, availability, universe, comparability, unharmonized variables and other metadata Click here, to view metadata for CLASSWK.
Integrated metadata for CLASSWK: description, comparability, universe, codes, availability, questionnaire text, etc. Click “View Cart” at any time to review or proceed to check out Click any tab to view detailed metadata
Once satisfied with selected variables and samples, click “Create data extract” to complete extract options Click “Create data extract” to proceed to check-out.
Step 4. Make changes to a. samples, b. variables, c. format and/or structure Click “Change” to make changes to samples, variables, format (SAS, SPSS, STATA) or structure.
Step 4a (optional): sample selection screen, if you wish to remove or add samples Click any boxes desired (or none) and then click “submit sample selections” (even if no new selections are made). To return to the extract request page, next click “Data cart” and finally click “create data extract”
Step 4b (optional). Select or remove variables.Click to select. Scroll down to see more. To return to the extract request page, click “Data cart” and then click “create data extract” Click any box to to select variablefor extract
Step 4c (optional). Change format and/or structure Select format: Stata, SPSS, SAS, csv or keep default (column format) 99% of extracts are for the default: rectangular structure Click “submit” after completing selections
Step 5. Options: a. customize sample, b. select cases, c. attach characteristics or skip options and describe and submit extract Click to “Customize sample size”, “Select cases”, or “Attach characteristics”
Step 5a. Customize sample sizeSet the maximum number of households, percents, or density (%) Insert a number in this row to set the same for all samples
Step 5. Review extract request: b. select cases Click to “Select cases”
5b. Select cases1) Select variable(s), then click submit (at bottom) Click here to select country of birth Note: Select as many variables as desired, but all selections are “and-ed” (e.g., select cases of a certain country of birth and of a certain age and of a specific sex and … etc.).
5b. Select cases2) Now, select values of variable Note option to select individual and all persons resident in household • Windows conventions apply: • <CTRL>+left button to pick more than 1 characteristic • <CTRL+SHFT>+ left button to pick a group of characteristics
Step 5. Review extract request: c. Attach characteristics Click to “Attach characteristics”
Set variables options: c. attach characteristics Click box to Attach variables of head, father, mother and/or spouse; example: age of mother, father and spouse
Step 6. Review and describe extract.Click “submit extract” (otherwise get no data!) Describe the extract so that you remember what it contains Click green button to “Submit extract”
Download or Revise Extract page When the extract is ready, an email will be sent to the registered address. Click the link in the email to download the extract, or click “download” on the confirmation page. • Right click to download: • Formatted data file • Fixed width data file • Command files • Codebooks: basic/DDI Want more help? View “download data” tutorial