Comprehensive Guide to Replacing HP Printer Maintenance Kit Components
This guide provides detailed instructions on replacing essential components of HP printer maintenance kits, including the fuser, feed/pickup rollers, and transfer roller. Learn how to access the parts, safely remove and install new components, and reset the page count for optimal printer performance. Step-by-step visuals ensure clarity and facilitate smooth replacements. Perfect for OIT lab services and individuals looking to maintain their HP printers effectively.

Comprehensive Guide to Replacing HP Printer Maintenance Kit Components
E N D
Presentation Transcript
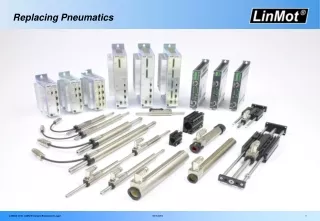
Replacing the Maintenance Kit HP Printers OIT lab services
Parts of the Maintenance Kits • The Fuser • Feed/Pickup Rollers • The Transfer Roller Exit
Accessing the Parts Top Cover Transfer Roller Left Door Fuser Paper Tray Feed/Pickup Rollers Resetting the page count Exit
Removing the Fuser • Open the left door • Remove the duplexer by pushing down on the green tab and slide it out. Exit
Removing the Fuser • Release the fuser by turning the blue levers down. • Don’t turn the gray levers downward. • Use the finger tabs, lift the fuser up and slide it out of the printer. Blue Lever Finger Tab Exit
Replacing the Fuser • Remove the orange packing spacers (one on each side) from the new fuser. • Slide the new fuser firmly into place. • Be sure it is pushed in the printer beyond the lip of its supporting frame and is completely seated. Exit
Replacing the Fuser • Rotate the blue levers up to lock the fuser in place. • Repeat step 8 if levers do not rotate. • Reinstall the duplexer. • Push the duplexer into the printer until it locks in place. You will hear a clicking sound. • Close the left door. Exit
Accessing the Feed Rollers • The feed rollers are inside the paper tray area • Open tray 2 and pull it out until it stops. • Remove the tray by lifting up while pulling the tray away from the printer. • Repeat above steps for tray 3. Exit
Removing the Feed Rollers • Pinch the protruding tab • Slide the roller off the shaft • Replacement is the reverse of installation. • Slide the new rollers onto each shaft until they click into place. Exit
The Transfer Roller • Open the top cover and remove the toner cartridge • The transfer roller is located under the toner • Caution: To prevent damage to the roller DO NOT touch the black foam roller. Exit
Remove the Transfer Roller • Grasp the blue gear on the left and lift it up just enough to clear the retainer clip. • Slide the transfer roller left to release the right end. • Remove the transfer roller assembly. Exit
Replace the Transfer Roller • Place the right end of the new shaft into the hole on the right side. • Slide the roller to the right until the blue gear on the left is in place. • Snap the blue gear into place. Exit
Lock the Roller Guide • Press the metal and black plastic guide until it snaps into place. • Note: If the guide is not snapped into place jams will occur. • Replace toner cartridge and close top cover and close the top cover. Exit
Resetting the Page Count • Close up the printer and turn the power on. • At this point, reset the page count and printer message. • For more information on resetting the page count visit the LM page. Exit