Baseball Outfield and Infield Coverage Guide
Learn about outfield and infield coverage strategies in baseball, including responsibilities and rotations for different scenarios.

Baseball Outfield and Infield Coverage Guide
E N D
Presentation Transcript
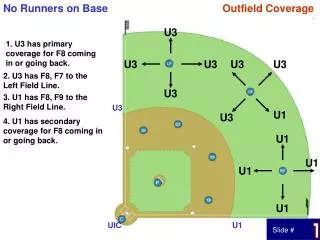
No Runners on Base Outfield Coverage U3 1. U3 has primary coverage for F8 coming in or going back. U3 U3 U3 U3 2. U3 has F8, F7 to the Left Field Line. U3 3. U1 has F8, F9 to the Right Field Line. U3 U1 U3 4. U1 has secondary coverage for F8 coming in or going back. U1 U1 U1 U1 UIC U1 Slide #
U1 inside the Diamond Outfield Coverage 1. U1 has fly balls from Center Field to Right Field. U3 2. U1 can go out on trouble balls from Center Field to Right Field. U3 U3 U3 U3 3. U1 takes routine fly balls to F8. U3 U3 4. U3 has Center Field to Left Field Line. U1 U3 5. U3 should go out on all trouble balls from CF to LF Line. U1 U1 U1 6. U3 has Fair/Foul, Catch/No Catch on Left Field Line. U1 7. UIC has F9 to Right Field Line. UIC 8. UIC has Fair/Foul, Catch/No Catch on Right Field Line. UIC Slide #
U3 inside the Diamond Outfield Coverage 1. U3 has fly balls from Center Field to Left Field. U3 2. U3 can go out on trouble balls from Center Field to Left Field. UIC U3 U3 U1 3. U3 takes routine fly balls to F8. U3 4. U1 has Center Field to Right Field Line. U1 U1 5. U1 should go out on all trouble balls from CF to RF Line. U1 U3 6. U1 has Fair/Foul, Catch/No Catch on Right Field Line. U1 U1 7. 4. UIC has F7 to the Left Field Line. 8. UIC has Fair/Foul, Catch/No Catch on Left Field Line. U1 U1 UIC Slide #
No Runners on Base Infield Line Drive Coverage 1. U1 has line drives to F6, F4 & F3 diving toward Right Field Line. 2. U1 has line drives hit at F4. 3. U1 has line drives to F1, F3 & F4 retreating. 4. U3 has line drives to F4, F5 & F6 diving towards Left Field Line. U3 U3 U3 U3 U1 5. U3 has line drives at F6. U3 U3 UIC 6. U3 has line drives to F5 & F6 retreating. U3 UIC 7. UIC has line drives hit at F1. U1 U1 U1 U1 8. UIC has line drives hit at F3, and F3 diving towards F4. UIC UIC U1 UIC 9. UIC has line drives hit at F5, and F5 diving towards F6. U1 UIC U1 Slide #
U1 inside the Diamond Infield Line Drive Coverage 1. U1 has F3, F4, F5 & F6 diving toward 2nd Base. 2. U1 has line drives hit at F4 & F6, and F1 & F4 retreating. 3. U3 has F5 & F6 diving to the Left Field Line. U3 U3 U3 4. U3 has F5 & F6 retreating. U3 U1 U3 U1 5. UIC has line drives hit at F1, F3 & F5. U1 U1 UIC 6. UIC has F3 retreating and F3 & F4 diving to Right Field Line U1 U1 U1 U1 UIC U1 UIC UIC UIC UIC UIC Slide #
U3 inside the Diamond Infield Line Drive Coverage 1. U3 has F3, F4, F5 & F6 diving toward 2nd base and F6 diving toward 3rd. 2. U3 has line drives hit at F4 & F6, and F1& F6 retreating. 3. U1 has F3 & F4 diving to the Right Field Line. U3 UIC 4. U1 has F3 & F4 retreating. U3 U3 UIC 5. UIC has Line Drives hit at F1, F3 & F5. U3 U3 U3 U3 UIC 6. UIC has F5 retreating and diving towards the Left Field Line. U3 U1 U3 U1 U3 UIC U1 UIC U1 U1 UIC Slide #
1. UIC rotates to 3rd base with... Rotations A. No runners, U1 & U3 stay in, if BR commits to 3rd. B. Runner at 1st Base, if R1 commits to 3rd. C. Runners at 1st & 3rd, if R1 commits to 3rd. D. Runner at 3rd base, U1 & U3 stay in, if BR commits to 3rd. E. Runners at 1st & 2nd, less than 2 outs, R2 tags & commits to 3rd. F. Runner(s) at 1st or 1st & 3rd, U1 or U3 goes out (UIC also has coverage at HP). Slide #
1. UIC rotates to 3rd base with... Rotations A. No runners, U1 & U3 stay in, if BR commits to 3rd. B. Runner at 1st Base, if R1 commits to 3rd. C. Runners at 1st & 3rd, if R1 commits to 3rd. U3 D. Runner at 3rd base, U1 & U3 stay in, if BR commits to 3rd. E. Runners at 1st & 2nd, less than 2 outs, R2 tags & commits to 3rd. F. Runner(s) at 1st or 1st & 3rd, U1 or U3 goes out (UIC also has coverage at HP). BR U1 UIC Slide #
1. UIC rotates to 3rd base with... Rotations A. No runners, U1 & U3 stay in, if BR commits to 3rd. B. Runner at 1st Base, if R1 commits to 3rd. C. Runners at 1st & 3rd, if R1 commits to 3rd. D. Runner at 3rd base, U1 & U3 stay in, if BR commits to 3rd. E. Runners at 1st & 2nd, less than 2 outs, R2 tags & commits to 3rd. U3 F. Runner(s) at 1st or 1st & 3rd, U1 or U3 goes out (UIC also has coverage at HP). R1 BR U1 UIC Slide #
1. UIC rotates to 3rd base with... Rotations A. No runners, U1 & U3 stay in, if BR commits to 3rd. B. Runner at 1st Base, if R1 commits to 3rd. C. Runners at 1st & 3rd, if R1 commits to 3rd. D. Runner at 3rd base, U1 & U3 stay in, if BR commits to 3rd. E. Runners at 1st & 2nd, less than 2 outs, R2 tags & commits to 3rd. R3 U3 F. Runner(s) at 1st or 1st & 3rd, U1 or U3 goes out (UIC also has coverage at HP). R1 BR U1 UIC Slide #
1. UIC rotates to 3rd base with... Rotations A. No runners, U1 & U3 stay in, if BR commits to 3rd. B. Runner at 1st Base, if R1 commits to 3rd. C. Runners at 1st & 3rd, if R1 commits to 3rd. D. Runner at 3rd base, U1 & U3 stay in, if BR commits to 3rd. U3 E. Runners at 1st & 2nd, less than 2 outs, R2 tags & commits to 3rd. R3 F. Runner(s) at 1st or 1st & 3rd, U1 or U3 goes out (UIC also has coverage at HP). BR U1 UIC Slide #
1. UIC rotates to 3rd base with... Rotations A. No runners, U1 & U3 stay in, if BR commits to 3rd. B. Runner at 1st Base, if R1 commits to 3rd. C. Runners at 1st & 3rd, if R1 commits to 3rd. D. Runner at 3rd base, U1 & U3 stay in, if BR commits to 3rd. R2 E. Runners at 1st & 2nd, less than 2 outs, R2 tags & commits to 3rd. U3 F. Runner(s) at 1st or 1st & 3rd, U1 or U3 goes out (UIC also has coverage at HP). R1 U1 UIC Slide #
1. UIC rotates to 3rd base with... Rotations A. No runners, U1 & U3 stay in, if BR commits to 3rd. B. Runner at 1st Base, if R1 commits to 3rd. C. Runners at 1st & 3rd, if R1 commits to 3rd. D. Runner at 3rd base, U1 & U3 stay in, if BR commits to 3rd. E. Runners at 1st & 2nd, less than 2 outs, R2 tags & commits to 3rd. R3 U3 F. Runner(s) at 1st or 1st & 3rd, U1 or U3 goes out (UIC also has coverage at HP). R1 BR U1 UIC Slide #
Rotations 2. UIC rotates to 1st base for the throw back to 1st base, if U1 goes out. 3. UIC has tags at 3rd base only. 4. U1 has HP when UIC rotates to 3rd. 5. U1 has all responsibility at 1st & 2nd with runner(s) at 2nd or 2nd & 3rd. U3 6. U3 has BR at 1st or 2nd on 1. A, B, C & D. (slide #7) 7. U3 has R1 at 1st or 2nd on 1. E. (slide #7) U1 UIC Slide #
Rotations 2. UIC rotates to 1st base for the throw back to 1st base, if U1 goes out. 3. UIC has tags at 3rd base only. 4. U1 has HP when UIC rotates to 3rd. 5. U1 has all responsibility at 1st & 2nd with runner(s) at 2nd or 2nd & 3rd. U3 6. U3 has BR at 1st or 2nd on 1. A, B, C & D. (slide #7) 7. U3 has R1 at 1st or 2nd on 1. E. (slide #7) U1 UIC Slide #
Rotations 2. UIC rotates to 1st base for the throw back to 1st base, if U1 goes out. 3. UIC has tags at 3rd base only. 4. U1 has HP when UIC rotates to 3rd. 5. U1 has all responsibility at 1st & 2nd with runner(s) at 2nd or 2nd & 3rd. 6. U3 has BR at 1st or 2nd on 1. A, B, C & D. (slide #7) R2 R3 U3 UIC has tag 7. U3 has R1 at 1st or 2nd on 1. E. (slide #7) R3 U1 UIC Slide #
Rotations 2. UIC rotates to 1st base for the throw back to 1st base, if U1 goes out. 3. UIC has tags at 3rd base only. 4. U1 has HP when UIC rotates to 3rd. 5. U1 has all responsibility at 1st & 2nd with runner(s) at 2nd or 2nd & 3rd. U3 6. U3 has BR at 1st or 2nd on 1. A, B, C & D. (slide #7) 7. U3 has R1 at 1st or 2nd on 1. E. (slide #7) BR U1 UIC Slide #
Rotations 2. UIC rotates to 1st base for the throw back to 1st base, if U1 goes out. 3. UIC has tags at 3rd base only. 4. U1 has HP when UIC rotates to 3rd. 5. U1 has all responsibility at 1st & 2nd with runner(s) at 2nd or 2nd & 3rd. 6. U3 has BR at 1st or 2nd on 1. A, B, C & D. (slide #7) U3 R2 R3 7. U3 has R1 at 1st or 2nd on 1. E. (slide #7) U1 UIC Slide #
Rotations 2. UIC rotates to 1st base for the throw back to 1st base, if U1 goes out. 3. UIC has tags at 3rd base only. 4. U1 has HP when UIC rotates to 3rd. 5. U1 has all responsibility at 1st & 2nd with runner(s) at 2nd or 2nd & 3rd. U3 6. U3 has BR at 1st or 2nd on 1. A, B, C & D. (slide #7) U3 R3 7. U3 has R1 at 1st or 2nd on 1. E. (slide #7) BR U1 UIC Slide #
Rotations 2. UIC rotates to 1st base for the throw back to 1st base, if U1 goes out. 3. UIC has tags at 3rd base only. 4. U1 has HP when UIC rotates to 3rd. 5. U1 has all responsibility at 1st & 2nd with runner(s) at 2nd or 2nd & 3rd. U3 6. U3 has BR at 1st or 2nd on 1. A, B, C & D. (slide #7) R2 U3 7. U3 has R1 at 1st or 2nd on 1. E. (slide #7) R1 U1 UIC Slide #
Cut these out to make your own pre-game card Slide #