Installing TerraSync
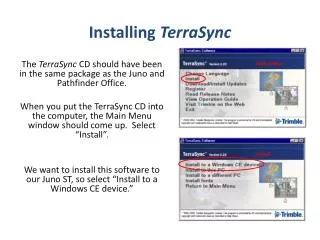
Installing TerraSync. The TerraSync CD should have been in the same package as the Juno and Pathfinder Office. When you put the TerraSync CD into the computer, the Main Menu window should come up. Select “Install”.

Installing TerraSync
E N D
Presentation Transcript
Installing TerraSync The TerraSync CD should have been in the same package as the Juno and Pathfinder Office. When you put the TerraSync CD into the computer, the Main Menu window should come up. Select “Install”. We want to install this software to our Juno ST, so select “Install to a Windows CE device.”
You will now see a series of installation options. In the “Welcome” screen, make sure that the software will be installed under the drive that houses the “Program Files” and click “Next”. Say “Yes” to agree to the terms and conditions on the “Software License Agreement” screen. When you get to the “Customer Information” screen, type in the Serial Number and Authorization Key that came with the software. Most likely, you will find this information on the CD case. When this is done, click “Next”. Type in “EAST” as the name for the “Customer Information” page and click “Next”.
On this screen, check the information that you have entered. • A window should have prompted you to click “No” towards the beginning of installation. Click “OK” here. • Click “No” to install TerraSync in the default directory. This will allow you install it in the permanent directory.
The permanent directory is the “Disk” directory. Select “Disk” from the drop-down list and click “OK”. Your installation is now complete! Now, you should be able to communicate with the satellites and collect GPS data. The next step is to transfer a data dictionary to our rover and move outside for collection.