Download
1 / 13
130 likes | 334 Views
INTRODUCTION TO NAVSEA TRAINING KITS. NAVSEA has developed and authorized standardized shipboard training aids to support the new Damage Control Plotting Symbology in NSTM 079, Volume 2. NAVSEA has developed a total of six flag training kits. Collectively 41 types of

E N D
INTRODUCTIONTO NAVSEA TRAINING KITS NAVSEA has developed and authorized standardized shipboard training aids to support the new Damage Control Plotting Symbology in NSTM 079, Volume 2. NAVSEA has developed a total of six flag training kits. Collectively 41 types of damage or casualties are represented. The six kits consist of the Fire Kit, the Damage Control Kit, the Main Space Kit, the Damage Control 2 Kit, the Structural Kit and the CBR-D Small deck or the CBR-D Kit Large deck. The Fire, Damage Control and Main Space kits have been in u Note: This users guide is intended as a general instruction for the use of NAVSEA issued training flags. It is not intended to as a scenario package replacing CNSF or CNAF scenarios or drill packages.
HOW TO GET REPLACEMENT KITS OR FLAGS • Replacement kits or flags can be purchased under GSA contract: SIN 27-100 Training Devices Contract Number GS-02F-0055U The Slate River Corporation sales@slaterivercorp.com For general guidelines in the use of NAVSEA Damage Control Training Kits. This guide is only intended to assist the ships Damage Control Training Team in the integration of Damage Control Training kit props into existing damage control scenarios. Questions concerning, comments or suggestions for this guide or the Damage Control Training kits should be sent to: henry.j.kuzma@navy.mil
The General Goals of the Damage Control Casualty Flag Training Set • Introduce new Damage Control symbology • Standardize DC training props throughout the fleet • Reduce workload on DCTT by reducing the time spent: Planning and setting up drills Training and retraining the crew on the meaning and purpose of each training prop Developing own props and relearning training props command to command Train crewmembers on system color-coding and future Advanced Damage Control Software Systems Symbology Reduce verbal disclosure.
CONCEPT OF OPERATION All training flag have the same general concept of operations of dividing the casualty into 3 phases. Phase One: Report it (Size it up) Phase Two: Engaged (Fight it) Phase Three: No (Monitor it)
Phase One: Report it (Size it up) The training flag is used alone or in combination with other props to disclose the casualty: • During this phase the DCTT evaluates the emergency teams initial assessment of the casualty. Once the DCTT has observed enough actions it can move onto the next phase.
Phase Two: Engaged (Fight it) • The training flag is used alone or in combination with other props to disclose the Engaged phase of the casualty: • During this phase the DCTT evaluates the emergency teams actions to fight the casualty. Once the DCTT has observed enough actions it can move onto the next phase.
Phase Three: No (Monitor it) • The training flag is used alone or in combination with other props to disclose the No phase of the casualty: • During this phase the DCTT evaluates the emergency teams actions to monitor the casualty. Once the DCTT has observed enough actions it can move onto the next phase.
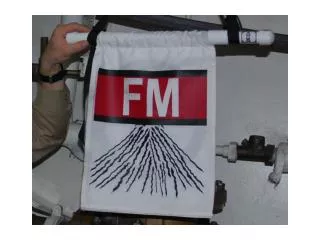
DCTT Flag Procedures – How to Read and Use 1. D-Casualty title abbreviation. 2. DCTT1-Hang the flag DCTT2-Hold the flag 3. 030108-Date Mar 01 2008 Casualty Title Example photo of flag use during each phase of the casualty DCTT Guidance for each Casualty Phase Directions for REPORTED Phase of the casualty Directions for ENGAGED Phase of the casualty Directions for NO Phase of the casualty
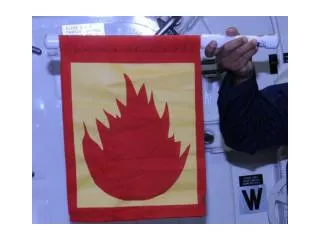
Reported = (Size It Up) No = (Monitor It) Engaged = (Fight It) DCTT FLAG PROCEDURE RUPTURE-FM RFM-DCTT1-030108 SIZE IT UP Casualty initial reports, assessment, evaluation and information. What do I have? FIGHT IT Casualty engagement, What am I doing to make progress MONITOR IT The fight is complete, No further spread, Clean it up 1. Hang the flag by the straps provided with the REPORTED ICON displayed in front. 2. For a ruptured pipe hang the flag on the pipe itself. For a ruptured or leaking valve hang the flag behind the valve if possible. 3. Drawing non-verbal attention to the rupture flag can be achieved using the Sounds of Damage, a LP air hose or water spray bottle. 4. Observe the trainee from 3 to 5 minutes to “size up” the rupture. 5. Record all the actions of the trainee including the time it takes the trainee to discover and report the casualty. 6. It is not necessary for the trainee to complete all the actions in the RFM check list prior to to shifting the flag to the ENGAGED phase of the casualty. Once the trainee has completed or missed enough steps to judge his or her proficiency move to the ENGAGED phase. 1. Flip the flag to ENGAGED symbol. The trainee(s) are now actively ENGAGING/ fighting the casualty. 2. It is nearly impossible to visually determine the GPM flow of a ruptured pipe. A more accurate measurement is the amount of liquid accumulation on the deck or in the bilge and its rate of rise or fall. 3. Lowering and raising the level of the flag by hand or another indicating device can be used to indicate the level of the liquid and rate of rise or fall. 4. Observe the trainee(s) from 10 to 20 minutes to “fight” the rupture using the level of the flag or other device to indicate progress. 5. Record all the actions of the trainee(s) including the reports, type of repair, PPE, tactics and organization. 6. It is not necessary for the trainee to complete all the actions in the RFM check list prior to to shifting the flag to the NO phase of the casualty. Once the trainee has completed or missed enough steps to judge his or her proficiency move to the NO phase. 1.Flip the flag to NO symbol. The trainee(s) are now MONITORING/cleaning up the casualty. 2. Observe the trainee(s) from 5 to 10 minutes to “monitor” the rupture. 3. The trainee(s) should test the effectiveness of repairs, dewater, remove hazards, investigate for hidden and secondary damage. 4.The NO phase is also an opportunity to shift back to ENGAGED to “re-rupture the pipe. This can be used to indicate an improper repair or failed action during the ENGAGED phase causing the trainee(s) to re-trace their steps. 5. Record all the actions of the trainee(s) including the reports, methods of overhaul, PPE, tactics and organization. 6. It is not necessary for the trainee to complete all the actions in the RFM check list prior to to completing the exercise. Once the trainee has completed or missed enough steps to judge his or her proficiency secure and debrief the trainee(s). 7. Conduct an on station debrief immediately to provide trainees (s) feed back and correct errors. .
SIZE IT UP Casualty initial reports, assessment, evaluation and information. What do I have? Reported = (Size It Up) Hang the flag by the straps provided with the REPORTED ICON displayed in front.
FIGHT IT Casualty engagement, What am I doing to make progress Engaged = (Fight It) Flip the flag to ENGAGED symbol. The trainee(s) are now actively ENGAGING/fighting the casualty.
MONITOR IT The fight is complete, No further spread, Clean it up No = (Monitor It) Flip the flag to NO symbol. The trainee(s) are now MONITORING/cleaning up the casualty.