Download
1 / 17
170 likes | 247 Views
Learn how to configure users' browsers for optimal performance with the Janet Web Cache Service (JWCS). Step-by-step guides for Internet Explorer and Netscape browsers. Also, understand how to contact JWCS Support for assistance and error resolution.

E N D
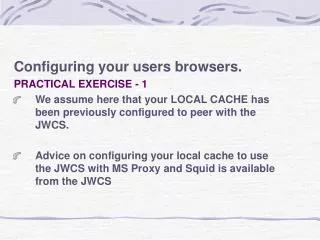
Configuring your users browsers. PRACTICAL EXERCISE - 1 • We assume here that your LOCAL CACHE has been previously configured to peer with the JWCS. • Advice on configuring your local cache to use the JWCS with MS Proxy and Squid is available from the JWCS
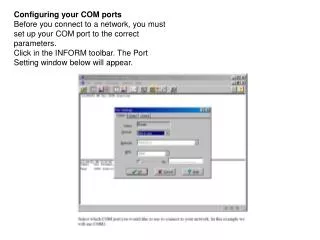
Configuring your users browsers. Internet Explorer PRACTICAL EXERCISE - 1 • You could either choose to have your systems people configure all your browsers, or get the users to amend the settings themselves in someway. • Open Internet Explorer • Go to the “Tools” menu. • Select “Internet Options”
Configuring your users browsers. Internet Explorer PRACTICAL EXERCISE - 1 • Select the “Connections” tab. • You will now have a menu which looks like this: • Press the “LAN Settings” button.
Configuring your users browsers. Internet Explorer PRACTICAL EXERCISE - 1 See the LAN Settings menu as below. • Tick either the “Automatically Detect Settings” or “Use automatic Configuration script” boxes. FOR FURTHER ADVICE REGARDINGTHESE SETTINGS PLEASE CONTACT THE JWCS. • Tick the “Use a Proxy Server” box.
Configuring your users browsers. Internet Explorer PRACTICAL EXERCISE - 1 • Still in the LAN Settings menu, DO NOT tick the “Bypass Proxy for local addresses” box. We will enter those details somewhere else. • Enter your proxy server address and port number in the address and port fields under the “Use Proxy Server” box. • Press the “Advanced” button.
Configuring your users browsers. Internet Explorer PRACTICAL EXERCISE - 1 • Tick the “use same proxy server for all protocols” box. • In the “Exceptions” field, enter your local addresses which should NOT use the proxy. • NON - CACHEABLE items which we discussed earlier are Filtered out in the Web Servers Caching software.
Configuring your users browsers. Internet Explorer PRACTICAL EXERCISE - 1 • Press the “OK” button until you have exited the IE “Internet Options” menu and are back at the main browser screen.
Configuring your users browsers. NETSCAPE PRACTICAL EXERCISE - 1 • Go back to your desktop and open Netscape Navigator / Communicator. • Go to the “edit” menu and select “preferences”
Configuring your users browsers. NETSCAPE PRACTICAL EXERCISE • The Preferences menu looks like that shown here. • Double-click on the “Advanced” menu. 3 sub- menus should then appear.
Configuring your users browsers. NETSCAPE PRACTICAL EXERCISE • Double-click on the “Proxies” menu.
Configuring your users browsers. NETSCAPE PRACTICAL EXERCISE - 1 • The “Proxies” menu can Be configured either manually or by using a script. • For automatic configuration you should enter the URL which points to the location of the config.pac file on your Webserver. e.g. http://wwwconfig.fictional.ac.uk/config.pac
Configuring your users browsers. NETSCAPE PRACTICAL EXERCISE - 1 • For manual configuration, select the “manual proxy configuration” button and press the “view” button.
Configuring your users browsers. NETSCAPE PRACTICAL EXERCISE - 1 • The manual configuration looks like this. • Complete relevant sections and add exceptions into the “Do not use proxy servers for” field. • Click “OK” until you are back to the main browser screen.
Contacting the JANET Web Cache Service Support. – What the user sees. PRACTICAL EXERCISE 2 • The JWCS offer a support service to help users who experience errors and difficulties whilst surfing the web. • Please double click on Internet Explorer. • In the “address” field type: http://www.manchesteronline/zzzxxaa
Contacting the JANET Web Cache Service Support. – What the user sees. PRACTICAL EXERCISE 2 • As you can see, you are presented with an error message from the National JANET Web Cache Service as shown. • Note the email given at the bottom of the section.
Contacting the JANET Web Cache Service Support. – What the user sees. PRACTICAL EXERCISE 2 • When contacting support@wwwcache.ja.net include any error messages shown on this page. • Use the email account and client given to you to contact JWCS Support. • Include the word FAKE at the beginning of your subject.
Contacting the JANET Web Cache Service Support. – What the user sees. PRACTICAL EXERCISE 2 • The JWCS support team will respond to any users’ enquiry sent to support@wwwcache.ja.net. • All replies from JWCS Support are by email and contain a unique TICKET NUMBER in the subject field e.g. JWCS-TICK# 20010521.1954 Re: Janet WWWCache • Usersshould keep this ticket number in the subject field. • The automatic tickets enable JWCS support to track all support enquiries.