Download
1 / 1
10 likes | 132 Views
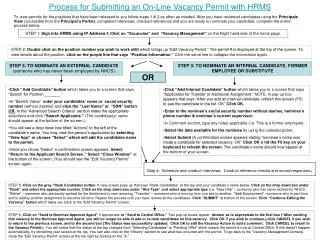
STEP 1: Sign into HRMS using IP Address & Click on “Vacancies” and “Vacancy Management” on the Right hand side of the home page. Process for Submitting an On-Line Vacancy Permit with HRMS.

E N D
STEP 1: Sign into HRMS using IP Address & Click on “Vacancies” and “Vacancy Management” on the Right hand side of the home page. Process for Submitting an On-Line Vacancy Permit with HRMS STEP 2: Double click on the position number you wish to work with which brings up “Edit Vacancy Permit.” The permit # is displayed at the top of the screen. To view details about the position, click on the purple line that says “Position Information.” Click the same line to collapse the information again. STEP 3: TO NOMINATE AN EXTERNAL CANDIDATE (someone who has never been employed by NHCS) STEP 3: TO NOMINATE AN INTERNAL CANDIDATE, FORMER EMPLOYEE OR SUBSTITUTE OR • Click “Add Candidate” button which takes you to a screen that says “Search for Position _______.” • In “Search Value” enter your candidates’ name or social security number (without dashes) and click the “Last Name” or “SSN” button. OR In the “Advanced Search Criteria” section make the appropriate selections and click “Search Applicants.” (The candidate(s) name should appear at the bottom of the screen.), • You will see a drop down box titled “Actions” to the left of the candidate’s name. You may view the person’s application by selecting “View App” or choose “Select” which will add the candidates name to the permit. • Once you chose “Select” a confirmation screen appears. Select “Return to the Applicant Search Screen.” Select “Close Window” at the bottom of the screen. (You should see the “Edit Vacancy Permit” screen again. • Click “Add Internal Candidate” button which takes you to a screen that says “Application for Transfer or Additional Assignment.” NOTE: A pop-up box appears that says “After you add an internal candidate, refresh this screen (F5) to see the candidate in the list. OK” Click OK. • Enter in the nominee’s social security number without dashes, nominee’s phone number & nominee’s current supervisor. • In Comment section, type any notes applicable (i.e. This is a former employee). • Select the date availablefor the nominee by using the calendar picker. • Select Submit (A confirmation screen appears stating “nominee’s name was made a candidate for selected vacancy. OK” Click OK & hit the F5 key on your keyboard to refresh the screen. The candidate’s name should now appear at the bottom of your screen. To view permits for the positions that have been released to you follow steps 1 & 2 as often as needed. After you have reviewed candidates using the Principals View (accessible from the Principal’s Portal), completed interviews, checked references and you are ready to nominate your candidate, complete the entire process below. Step 4: Schedule and conduct interviews. Conduct reference checks and record responses. STEP 5: Click on the grey “Rank Candidates button. A new screen pops up that says “Rank Candidates” at the top and your candidate’s name below. Click on the drop down box under “Rank” and select the appropriate number. Click on the drop down box under “Hire Type” and select appropriate type (i.e. “New Hire” – someone who has never worked for NHCS; “Rehire” – someone who previously worked for the district and is now returning; “Transfer” – someone who is moving from one site to another, “Addl Employment” –someone who is part-time and is adding another assignment to become full-time. Repeat the process until you have ranked all the candidates. Click “SUBMIT” at bottom of the screen. Click “Continue Editing the Vacancy” button which takes you back to the “Edit Vacancy Permit” screen. STEP 6: Click on “Send to Nominee Approval Agent” if appropriate or “Send to Central Office.” Two pop up boxes appear. Answer as is appropriate to the first box (“After sending this vacancy to the Nominee Approval Agent, you will no longer be able to add or re-rank candidates on this vacancy. Click OK if you wish to continue.),click CANCEL if you wish to return to the previous screen, and to the second box (The Status was successfully updated. Click OK to edit the Vacancy Action to add a comment. Click CANCEL to return to the Vacancy Permit.) You will notice that the status at the top changes from “Selecting Candidates” to “Pending Offer” which means the permit is now at Central Office. If this doesn’t happen automatically, try refreshing your screen at the top. You can also click on the “History” section to see what has occurred with the permit. To go back to the “Vacancy Management Console, close the “Edit Vacancy Permit” screen at the top right by clicking on the “X.”