Android: Hello World
Android: Hello World. Frank Xu Gannon University. Steps. Configuration Android SDK Android Development Tools (ADT) Eclipse plug-in Android SDK and AVD Manager Adding Android Platforms Create Android Virtual Device (AVD). Create new android project Generate file structures


Android: Hello World
E N D
Presentation Transcript
Android: Hello World Frank Xu Gannon University
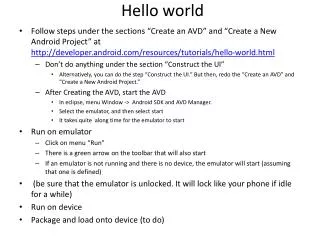
Steps • Configuration • Android SDK • Android Development Tools (ADT) • Eclipse plug-in • Android SDK and AVD Manager • Adding Android Platforms • Create Android Virtual Device (AVD). • Create new android project • Generate file structures • Construct the UI • Run the Application
Download Android SDK • http://developer.android.com/sdk/index.html
Installing the ADT Plugin for Eclipse • Android Development Tools (ADT) • a custom plugin for the Eclipse IDE, • quickly set up new Android projects, • create an application UI, • add components based on the Android Framework API, • debug your applications using the Android SDK tools, and • even export signed (or unsigned) APKs in order to distribute your application.
Configuring the ADT Plugin • Select Window > Preferences... to open the Preferences panel • Select Android from the left panel. • For the SDK Location in the main panel, click Browse... and locate your downloaded SDK directory. • Click Apply, then OK.
Adding Android Platforms and Other Components • Android SDK and AVD Manager • to download essential components into your development environment. • To install a platform in Eclipse: • In the Android SDK and AVD Manager, choose Available Packages in the left panel. • Click the repository site checkbox to display the components available for installation. • Select at least one platform to install, and click Install Selected. If you aren't sure which platform to install, use the latest version.
Create to Create an AVD • You will run your application in the Android Emulator. • Before you can launch the emulator, you must create an Android Virtual Device (AVD). • An AVD defines the system image and device settings used by the emulator.
Steps to AVD • In Eclipse, choose Window > Android SDK and AVD Manager. • Select Virtual Devices in the left panel. • Click New. • The Create New AVD dialog appears. • Type the name of the AVD, such as "my_avd". • Choose a target. The target is the platform (that is, the version of the Android SDK, such as 2.1) you want to run on the emulator. • You can ignore the rest of the fields for now. • Click Create AVD.
File Structure From Eclipse, select File > New > Project.
Project Name • This is the Eclipse Project name — the name of the directory that will contain the project files. • Application Name • This is the human-readable title for your application — the name that will appear on the Android device. • Package Name • This is the package namespace (following the same rules as for packages in the Java programming language) that you want all your source code to reside under. This also sets the package name under which the stub Activity will be generated. • Create Activity • This is the name for the class stub that will be generated by the plugin. This will be a subclass of Android's Activity class. An Activity is simply a class that can run and do work. It can create a UI if it chooses, but it doesn't need to. As the checkbox suggests, this is optional, but an Activity is almost always used as the basis for an application. • Min SDK Version • This value specifies the minimum API Level required by your application. For more information, see Android API Levels.
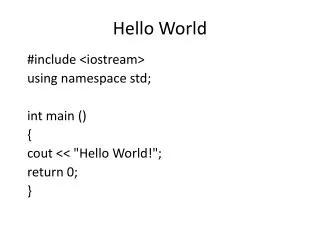
HelloAndroid.java • An Activity is a single application entity that is used to perform actions. • An application may have many separate activities, but the user interacts with them one at a time. The onCreate() method will be called by the Android system when your Activity starts • it is where you should perform all initialization and UI setup. An activity is not required to have a user interface, but usually will.