Using servos with an Arduino
130 likes | 393 Views
Using servos with an Arduino. EAS 199A Fall 2011. Learning Objectives. Be able to identify characteristics that distinguish a servo and a DC motor Be able to describe the difference a conventional servo and a continuous rotation servo

Using servos with an Arduino
E N D
Presentation Transcript
Using servos with an Arduino EAS 199A Fall 2011
Learning Objectives • Be able to identify characteristics that distinguish a servo and a DC motor • Be able to describe the difference a conventional servo and a continuous rotation servo • Be able to use the Arduino Servo library to control servo position
References Information on Arduino Servo library: http://www.arduino.cc/en/Reference/Servo http://www.arduino.cc/playground/Learning/SingleServoExample Additional descriptions of servos http://makeprojects.com/Wiki/Servos http://www.seattlerobotics.org/guide/servos.html
What is a servo? A servo-motor is an actuator with a built-in feedback mechanism that responds to a control signal by moving to and holding a position, or by moving at a continuous speed.
DC Motors and Servos DC Motor • Motion is continuous • Speed controlled by applied voltage Servo • Capable of holding a position • Speed controlled by delay between position updates • Hybrid of motor, gears and controller.
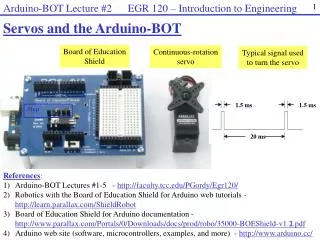
Conventional and Continuous Rotation Two types of servos standard can only rotate 180 degrees continuous rotation can rotate all the way around in either direction pulse tells servo which position to hold pulse tells servo which way to spin & how fast to spin
Control signal is a pulse train Pulse frequency is fixed Typical: 20 ms Pulse width determines position Typical: 1ms to 2 ms
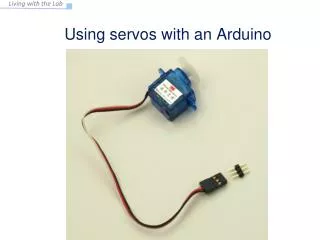
Servo components Small DC motor Gearboxwith small plastic gears to reduce the RPM and increase output torque Special electronics to interpret a pulse signal and deliver power to the motor
Servo from the Sparkfun kit The micro servo from the Sparkfun Inventor’s kit is a conventional servo, i.e. the control signal results in moving the shaft to an angular position.
Arduino Servo library handles the details • Must connect servos on pin 9 or pin 10 • From the Aduino web site: “…use of the library disables analogWrite() (PWM) functionality on pins 9 and 10, whether or not there is a Servo on those pins” http://www.arduino.cc/en/Reference/Servo
Arduino Servo library handles the details • Three components of the Servo Library • Create the servo object Servo my_servo_object; • Attach the object my_servo_object.attach(servo_pi); • Send control signal my_servo_object.write(pos); Name of the object is like a variable name. attach and write are pre-defined methods that act on the servo object.
Modified version of the sweep function // File: sweep_variable_wait // // Modified version of Sweep by BARRAGAN <http://barraganstudio.com> // Use variable dtwait to make the speed of sweep aparent #include <Servo.h> // Make code in Servo.h available to this sketch Servo myservo; // Create servo object called "myservo" intservo_pin=9; // The servo must be attached to pin 9 or pin 10 void setup() { myservo.attach(servo_pin); // attaches the servo pin to myservoobject } void loop() { intpos = 0; // variable to store the servo position intdtwait=15; // duration of wait at the end of each step for(pos = 0; pos < 180; pos += 1) { myservo.write(pos); // Move to position in variable 'pos' delay(dtwait); // wait dtwait for the servo to reach the position } for(pos = 180; pos>=1; pos -= 1) { myservo.write(pos); // Move to position in variable 'pos' delay(dtwait); // wait dtwait for the servo to reach the position } }
Experiment • What happens when you adjust dtwait? • Can adjust the sweep angle? • Make new variable to define end angle of the loop • Open the Knob demo from the Arduino IDE • Connect a potentiometer to an analog input • Use the potentiometer to control the servo position