Tips and Tricks For Quick Guitar Setup
130 likes | 151 Views
Gather up all the now loosened strings with one hand and cut all the strings in one shot about six inches from the bridge with the side cutters - not the kitchen scissors. You can now freely remove each string from itu2019s tuner post, then bundle them all up, and chuck them in the trash. Same goes for the tag ends at the bridge. For new guitar parts visit - FaberUSA.com

Tips and Tricks For Quick Guitar Setup
E N D
Presentation Transcript
Tips and Tricks Every Guitar Player Should Know Guitars are amazingly durable instruments - but they need a little help once in a while to function properly. Whether you play jazz, metal, classical, virtually any style, your guitar will suffer the stresses of string pressure and, because it’s being manipulated by a guitar player, succumb to the normal effects of wear and tear. This means the gear will need some form of maintenance and even the occasional setup.
Why You Should Learn Guitar Repairing You can have a reliable individual do this for you, for a price of course, or you can do it yourself. Personally, I’ve found players fall into basically two categories: those who have no problem spending the money to have the work done for them, and those who are hands-on preferring to do the work themselves. Regardless of which category you identify with, the following tips and tricks for guitar repair will help you save your most valuable resource - your time.
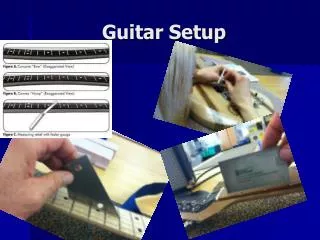
Tools Need For Guitar Repair Since we’re not servicing jet engines, the tools we need are fairly humble. Here’s a short list: • Side Cutters • String Winder • Large and Small Philips Screwdrivers • Large and Small Flat Screwdrivers • An Assortment of Allen Keys • Small Adjustable Wrench • Cloths or Paper Towels • Guitar Polish and Cleaner There are many more depending on how deep you dive, but these should handle the basics.
Removing Strings There’s an “old wives tale” that you should never take all the strings off the guitar at one time. This is totally false. While it is smart to leave a single on to help keep loose parts from falling off, taking all the strings off is actually beneficial to the guitar’s health as it releases built-up compression. The instrument gets a chance to relax and re-normalize.
Strings Repairing Tips When it comes to working with strings in any quantity, remember to batch your processes!! The work will go faster, it will reduce frustration, and allow you more time to play. To get started, grab your trusty string winder and, going around the headstock, slacken each string off in turn. Gather up all the now loosened strings with one hand and cut all the strings in one shot about six inches from the bridge with the side cutters - not the kitchen scissors. You can now freely remove each string from it’s tuner post, then bundle them all up, and chuck them in the trash. Same goes for the tag ends at the bridge. For new guitar parts visit - FaberUSA.com
Basic Cleaning Most instruments will require a little housekeeping. With the strings removed, this is a great time to go over the guitar and remove junk without interference. The body and headstock should get a good going over with an appropriate guitar-safe cleaner applied to a soft cloth or paper towel. Personally, I prefer to use a high quality paper towels. They won’t scratch and the dirt goes straight in the garbage without contaminating the rest of the instrument.
Fretboard Cleaning As for the fretboard, whether raw wood or finished, a good quality guitar cleaner should lift the surface junk. You can either put a few drops on a cloth or lightly sprinkle the fretboard then rub the fretboard clean. If you wish to tackle the frets and give them a bit more sparkle, good old newspaper will do the trick. As it is slightly abrasive, but please be careful to exercise caution with any abrasive around an instrument. Then finish up with a final fretboard cleaning.
Installing New Strings Instal the ball end of each string, one by one, at the bridge in their respective seats. Then move to the headstock and, working from the nut outwards, attach each string in turn to its corresponding tuner post. Allow about an inch and a half of string to accommodate three wraps around each post. Any more than that can cause tuning issues, any less will cause string slippage. Next, give each string a real light stretch - they’ll drop in pitch a fair bit. Go around the headstock again and bring them up close to pitch. Just get them in the ballpark, you still don’t have to be precise just yet.
Strings Repairing Tips The nut, being a fixed point should only be adjusted or recut by someone who knows what they’re doing. So let’s assume it’s close enough to work with. The Les Paul bridge assembly on electric guitars can be adjusted up or down depending on your preference in overall string height. With acoustic instruments, the saddle determines overall string height. It can be shimmed to increase height, or the bottom can be sanded down to reduce height. Again, if you’re not comfortable with this kind of work, take your guitar to someone who knows what they’re doing.
Neck Relief Neck relief works closely with the bridge, and to a lesser extent the nut. When relief is set properly with the other two points being adjusted properly, all three elements work in harmony much like a perfect triangle. In short, you can easily assess relief using any one of the strings on the guitar. The third string makes a great gauge as it’s close to the centreline of the fretboard, and it’s thin enough to make relative measurements.
Fret Adjustment Press the string down at the second fret with one hand, and the fourteenth fret with the other hand. These two points eliminate any mis-reads you may get from the extreme ends of the fretboard (where the gremlins live). If relief is adjusted properly, you should see a gap of light roughly the same thickness of the third string itself when viewing the top of the seventh or eighth fret. These points represent the middle of the pressed string between your fingers.
Final Thoughts Give each string a good pull along it’s full length, each one in turn, then quickly bring them all up to pitch. Keep in mind the first couple of stretches will drop the pitches quite a bit, so save the real tuning precision for the last attempt or two. Playing the strings will also heat them up a bit and usually bring out a couple of tuning wobbles in the process. Totally normal, just keep at it. By following these steps, you should now find you have a decent setup, and your strings have become pretty stable in short order. Now you have more time to play!


![OMG! Awesome Tips and Tricks for Alexa Setup and Echo Dot Setup [ Checklist]](https://cdn4.slideserve.com/8304796/alexa-setup-echo-setup-dt.jpg)