Document Manager Guide for Efficient Real Estate Listing Management
Learn how to upload, view, and manage essential real estate documents efficiently using a document manager tool. This guide covers methods for document upload, creating fax coversheets, setting reminders, and more. Discover ways to streamline your listing process and enhance productivity.

Document Manager Guide for Efficient Real Estate Listing Management
E N D
Presentation Transcript
Document Manager For those with Add/Edit Permissions
upload the basic listing documents OREC Disclosure, Disclaimer HUD Lead-based Paint
From the Add/Edit ‘Property List’ tab • Enter the Listing in MLS then go back to the Property List tab • Select the List Number on the MarketLinx page then click the ‘Add/Edit Docs’ button. • Or go to MY TOOLS in MarketLinx • Click ‘Add/Edit Documents’ • Doc Mgr window opens in front of MarketLinx. • The file folder will auto-create unless the county name is “Out of Area”.
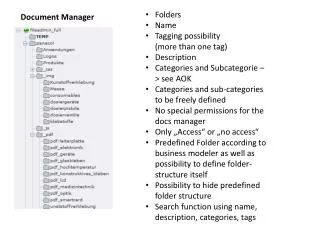
Summary page – shows what is in this file • View a list of all uploaded docs. • View a list of ‘Documents Pending Upload’, such as the OREC and HUD disclosures. • Upload a new or change an image – click on image place holder to upload your file. • Print coversheet(s) for one or more docs to submit by fax. • Upload docs that are already in electronic format; i.e. PDF.
Create Fax Cover Sheet(s) Check the box of one or more documents in the ‘Document Pending Upload’ section. Click the ‘Create Coversheet(s)’ link. Click the Print button after the new window opens. Each page is the bar coded coversheet(s) for the specific document named on each page. Fax the docs to number printed on the coversheet.
Uploading Other Documents Click the ‘ Add New Doc’ link. New Window opens.
Add a Document • Three Upload Methods: • Upload Now • Print Coversheet for Fax • Creates a placeholder for uploading the doc at a later time. Select Name of New Document from the drop-down list. Check the box if a MLS Doc
Choose Upload Method • Upload Now • For electronic format documents, such as PDF accessible from your computer. • Print a Coversheet • as previously described. • Create a Placeholder • Email or print the coversheet for another person to fax in the doc at a later time.
Become More Efficient • Less paper to file and track • Set document reminders and due dates throughout the transaction • Decide who to share access to what forms • Selling Associates, Buyers, Appraisers, Closers • Create a Document Package to email • Create an Archive Report of all docs after the transaction closes for your personal records and seller/buyer records.
Learn a Little or a Lot • Get the most out of this time-saving tool. • Ongoing Hands-on classes in the NORES computer lab. • Contact Polly about hosting a group demonstration at your location. • (918) 664-0505 • Register online in Member Services. • Education \ Class Calendar • http://TulsaRealtors.com