Download
1 / 44
440 likes | 566 Views
The NOTAM Entry System (NES) is an FAA initiative aimed at simplifying and accelerating the Temporary Flight Restriction (TFR) request process. Registered users can request a "Certificate" from the US NOTAM office to access a secure FAA website, which allows them to submit TFR requests to their local ARTCC. This guide details step-by-step instructions for using NES, including login procedures, entering incident details, setting time ranges, defining affected areas, and submitting requests. It serves as a comprehensive resource for efficient TFR management in airspace operations.

E N D
What is NES? • The NOTAM Entry System (NES) is an FAA program designed to simplify and expedite the TFR request process. • By requesting a “Certificate” from the US NOTAM office, registered users will be able to access a secured FAA website to enter a TFR request to their local ARTCC.
1: Select and Click on Favorite Button 11 3: Select and Click on “LOGON 2: Select NOTAM Entry System (NES) from Favorite Drop List.
2: Enter password 3: Click Submit Button 1: Enter your Initials. Note – the system will lock you out if you try to log on 3 times unsuccessfully.
Once in the system, select Once in the system, Select/Click on 91.137 Form.
Use drop down menu for selecting reason for requesting TFR under 91.137 (A) (2). For wildland fires select “Fire Fighting” or type in “Fire Fighting Aircraft Operations. FIRE FIGHT 2: Type in Incident Name and “fire” For example: Cedar Fire
Click on ARTCC for Drop down menu. Select the appropriate ARTCC for the TFR location.
Select the State in which the incident is located from the Drop down menu. General Location: Type in the City or well known geographical reference nearest to the Incident.
1: Click on Time Ranges. This will open a box which allow you to specifies time ranges for the TFR. 2: For fires,Do not change the effective and expire times as shown shown in Step 1. .
3: Click on “Get Time Range in Step 2. this bring in the time ranges specified in Step 1. 4: Click on “Save New Time Range in Step 3. This save the time range on the TFR form.
5: Once Time saved, click on exit button to close Time Range Box.
Affected Area: You enter the TFR dimension by Selecting either Circle or Polygon. DO NOT SELECT CORRIDOR. Corridor only used for Presidential TFR
Circle TFR 1. Enter Circle Radius as specified on the TFR request form. 2. Suggested guideline is 5 NM • Enter latitude and longitude of the TFR. Remember to Type N (north) after latitude and W (west) after Longitude. Remember Latitude and Longitude need to be in Degree,Minutes,Seconds. NOT IN DECIMALS and no punctuation.
Click on “Find Navigation Aids” Button which will provide a list of the closest NavAid VORs. Select the top NavAid as this is usually the closest to the incident.
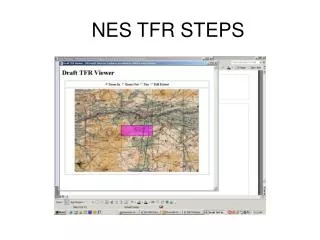
The selected VOR will appear in the Box under Preview To see a TFR on a Sectional map Select /Click on “view graphic”. This will Allow you to see what the TFR will look like.
Click on “Save Circle” to save the Circle TFR information.
Alternate way to describe TFR is by using a Nav Aid Bearing and Distance. • You may also choose to define your TFR by entering a bearing and distance from the closest Nav Aid.
The Circle TFR dimensions will appear in the BOX Under Affected Area. Type in Altitude from TFR request form and Select MSL. All wildland fires are in MSL. FAA will not convert for you.
Type in the TFR Coordinating Unit – this will be Published in the TFR NOTAM. It could be the local GACC or Dispatch Center for the Incident depending on your local policy. 2. Type in the GACC or Dispatch Center Phone number – This will be published in the TFR NOTAM. Needs to be a 24 hour a day contact number. 3. Type in Air to Air Frequency for TFR.
“Authors” Comments Box: This information is not published in the NOTAM but is shared internally between FAA offices and Dispatch. You can add comments about the TFR such as the Resource Order Number and Request Number for the TFR request. If you are using someone else’s profile, suggest putting your name and phone number as point of contact so the ARTCC can call you if they have any questions. Additional useful information is the impacted MTR’s route name and segments and SUA’s. For example – “Affects IR345 Segments B-J and the Goose MOA” which can be provided from IAMS/CAHIS. USNOF Comments will be entered by the US Notam Office.
2. Click on Save Button to save TFR information. 1. Preview Button, To review TFR before submitting to ARTCC. Print and attach to the TFR resource order. 4. Submit to Approver, Submit Draft TFR to ARTCC • Delete Button, Delete all TFR information if necessary.
Example of TFR Draft NOTAM 1. Work Number automatically assigned by Software. 2. Return to Draft Button bring you back to Draft TFR work page. 3. TFRMAP Button produces a graphic map • Print Button allows you to print the TFR draft information for documentation.
How to enter a polygon TFR 1. Review TFR Request Form Information. 2. Latitude/Longitude information needs to be entered in a clockwise direction. 3. A rectangular shaped Polygon requires 4 data points. 4. You need to select the closest Navigation Aid for each Latitude/ Longitude data point. 5. Remember to SAVE the polygon information 6. Enter the Lat/Long then select “Find Navigation Aid.” Repeat for each coordinate.
Once the Draft TFR is saved and /or submitted to the ARTCC, the DRAFT moves to the work list. Work List can be accessed by Selecting/Clicking on Work List. 2. Work List allows you to follow the approval process of the TFR. You have to refresh the screen to view the TFR process • The TFR will disappear from the screen. To view the TFR, you will need to go to the NOTAM List.
NOTAM List show the status of your TFR And the NOTAM number for the TFR
Go to https://www.notams.faa.gov And select ARTCC TFRs
1. Scroll down to the appropriate ARTCC and review your TFR. Be sure to review the map (Click on “map it”) 2. Enter the assigned NOTAM number into ROSS and show The TFR Resource Order as filled.
Select the TFR you wish to display (Note – this will eliminate a very Long list of TFRs.
This process allows you to display a “short” list of the TFR’s you are involved with.
QUESTIONS • Contact Julie Stewart (Interagency Airspace Program Manager) at 503-808-6728. • For FAA support from the US NOTAM, contact Mr. Phil Vigil at 703-904-4557.