Download
1 / 12
120 likes | 279 Views
Formatting Your Research Paper, MLA Style. #1 Rule for any formatting style: Always Follow your instructor’s guidelines. Format: General Guidelines. Type on white 8.5᾿ x 11᾿ paper. Double-space everything (check spacing icon ).

E N D
#1 Rule for any formatting style: Always Follow your instructor’s guidelines
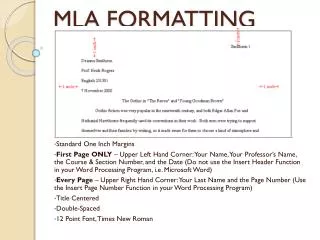
Format: General Guidelines • Type on white 8.5᾿ x 11᾿ paper. • Double-space everything (check spacing icon ). • Use 12 pt. legible font (like Times New Roman or Arial). • Leave only one space after ending punctuation marks. • Set all margins to 1 inch on all sides (default setting). • Indent the first line of paragraphs one half-inch. (done with tab key). • Use header with page numbers and last name in the upper right corner.
Formatting the 1st Page In the upper left corner of the 1st page, list your name, your instructor's name, the course, and date. Create a header in the upper right corner at one half-inch from the top and one inch from the side. Center the paper’s title (use standard caps, no underlining, italics, quote, or bold) to • There is no title page (unless your teacher requires it). • Double space everything (default setting).
Creating a Header • Choose “insert,” then “page number.” • Click on “top of page.” • Then choose “plain number 3.” • Type your last name and 1 space.
This will appear if you did not check “different first page”
Citations • There are two places you will use citations: in-text and works cited page. • You will need your “bibliography” information to do both. • The next slide will show you step-by-step how to accomplish this.
As you are typing, you may need to cite something (in-text citation). At the end of the sentence you wish to cite: • Click on “references,” then “insert citation,” then “add new source.” • Enter the bibliographic information , starting with the type of source you are citing. If you are citing a web source or database be sure you check the box “Show all bibliographic fields.” This allows you to enter the URL if your instructor requests it. • Click “ok.” This will automatically insert the in-text citation into your paper. • Then you can just go on typing your next sentence!
Works Cited Page: Basic Format • separate page at end of research paper • one-inch margins all the way around (default setting) • last name, page number header • title--Works Cited (just those two words, no quotations, no bold, no nothing!) centered at top of page • double spaced (do not skip spaces between entries).
Creating the Works Cited Page • Center the title on the first line of the new page. • Before going on, be sure your alignment is back to the left side. • Click on “bibliograpy” then “works cited.” Your sources will automatically appear! • As you create each citation, they will all group themselves alphabeticallywith hanging indents.
If you have to edit your citation, click on “manage sources” then “edit.”