
JSP Technology: Features, Advantages, and Life Cycle
Learn about JSP technology, its advantages over Servlets, life cycle phases, and how to create a simple JSP page. Explore JSP's features like Expression Language and Custom Tags.

JSP Technology: Features, Advantages, and Life Cycle
E N D
Presentation Transcript
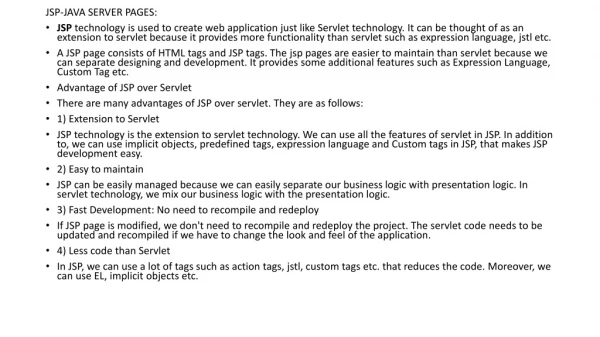
JSP-JAVA SERVER PAGES: • JSP technology is used to create web application just like Servlet technology. It can be thought of as an extension to servlet because it provides more functionality than servlet such as expression language, jstl etc. • A JSP page consists of HTML tags and JSP tags. The jsp pages are easier to maintain than servlet because we can separate designing and development. It provides some additional features such as Expression Language, Custom Tag etc. • Advantage of JSP over Servlet • There are many advantages of JSP over servlet. They are as follows: • 1) Extension to Servlet • JSP technology is the extension to servlet technology. We can use all the features of servlet in JSP. In addition to, we can use implicit objects, predefined tags, expression language and Custom tags in JSP, that makes JSP development easy. • 2) Easy to maintain • JSP can be easily managed because we can easily separate our business logic with presentation logic. In servlet technology, we mix our business logic with the presentation logic. • 3) Fast Development: No need to recompile and redeploy • If JSP page is modified, we don't need to recompile and redeploy the project. The servlet code needs to be updated and recompiled if we have to change the look and feel of the application. • 4) Less code than Servlet • In JSP, we can use a lot of tags such as action tags, jstl, custom tags etc. that reduces the code. Moreover, we can use EL, implicit objects etc.
JSP life cycle is also managed by container. Usually every web container that contains servlet container also contains JSP container for managing JSP pages. • JSP pages life cycle phases are: • Translation – JSP pages doesn’t look like normal java classes, actually JSP container parse the JSP pages and translate them to generate corresponding servlet source code. If JSP file name is home.jsp, usually its named as home_jsp.java. • Compilation – If the translation is successful, then container compiles the generated servlet source file to generate class file. • Class Loading – Once JSP is compiled as servlet class, its lifecycle is similar to servlet and it gets loaded into memory. • Instance Creation – After JSP class is loaded into memory, its object is instantiated by the container. • Initialization – The JSP class is then initialized and it transforms from a normal class to servlet. After initialization, ServletConfig and ServletContext objects become accessible to JSP class. • Request Processing – For every client request, a new thread is spawned with ServletRequest and ServletResponse to process and generate the HTML response. • Destroy – Last phase of JSP life cycle where it’s unloaded into memory.
Life cycle methods of JSP • JSP lifecycle methods are: • jspInit() declared in JspPage interface. This method is called only once in JSP lifecycle to initialize configparams. • _jspService(HttpServletRequest request, HttpServletResponse response) declared in HttpJspPage interface and response for handling client requests. • jspDestroy() declared in JspPage interface to unload the JSP from memory.
As depicted in the above diagram, JSP page is translated into servlet by the help of JSP translator. The JSP translator is a part of webserver that is responsible to translate the JSP page into servlet. Afterthat Servlet page is compiled by the compiler and gets converted into the class file. Moreover, all the processes that happens in servlet is performed on JSP later like initialization, committing response to the browser and destroy. • Creating a simple JSP Page • To create the first jsp page, write some html code as given below, and save it by .jsp extension. We have save this file as index.jsp. Put it in a folder and paste the folder in the web-apps directory in apache tomcat to run the jsp page. • index.jspLet's see the simple example of JSP, here we are using the scriptlet tag to put java code in the JSP page. We will learn scriptlet tag later. In JSP, java code can be written inside the jsp page using the scriptlet tag. Syntax:<% java source code %> <html> <body> <% out.print(2*5); %> </body> </html>
The Expression Language (EL) simplifies the accessibility of data stored in the Java Bean component, and other objects like request, session, application etc. • There are many implicit objects, operators and reserve words in EL. • It is the newly added feature in JSP technology version 2.0. Syntax for Expression Language (EL) • ${ expression }
EL param example • In this example, we have created two files index.jsp and process.jsp. The index.jsp file gets input from the user and sends the request to the process.jsp which in turn prints the name of the user using EL. index.jsp <form action="process.jsp"> Enter Name:<input type="text" name="name" /><br/><br/> <input type="submit" value="go"/> </form> process.jsp Welcome, ${ param.name }
Here are some examples of JSP EL expressions: • A) ${myBean.color} • B) ${true} • C) ${session.maxInactiveInterval / 60 } The JSP EL makes available ■ Any declared JavaBean, using “.” to access properties (example A) ■ Any JSP EL literal (example B) ■ Any JSP implicit object (example C)
Custom Tags: • Custom tags are user-defined tags. They eliminates the possibility of scriptlet tag and separates the business logic from the JSP page. • The same business logic can be used many times by the use of custom tag. Advantages of Custom Tags • The key advantages of Custom tags are as follows: • Eliminates the need of scriptlet tag The custom tags eliminates the need of scriptlet tag which is considered bad programming approach in JSP. • Separation of business logic from JSP The custom tags separate the the business logic from the JSP page so that it may be easy to maintain. • Re-usability The custom tags makes the possibility to reuse the same business logic again and again.
Custom tag: • In this example, we are going to create a custom tag that prints the current date and time. We are performing action at the start of tag. • For creating any custom tag, we need to follow following steps: • Create the Tag handler class and perform action at the start or at the end of the tag. • Create the Tag Library Descriptor (TLD) file and define tags • Create the JSP file that uses the Custom tag defined in the TLD file Understanding flow of custom tag in jsp
Create the Tag handler class • To create the Tag Handler, we are inheriting the TagSupport class and overriding its method doStartTag().To write data for the jsp, we need to use the JspWriter class. • The PageContext class provides getOut() method that returns the instance of JspWriter class. TagSupport class provides instance of pageContextbydefault. Syntax to use custom tag There are two ways to use the custom tag. They are given below: <prefix:tagnameattr1=value1....attrn=valuen/> <prefix:tagnameattr1=value1....attrn=valuen> body code </prefix:tagname>
To create the Tag Handler, we are inheriting the TagSupport class and overriding its method doStartTag().To write data for the jsp, we need to use the JspWriter class. • The PageContext class provides getOut() method that returns the instance of JspWriter class. TagSupport class provides instance of pageContextbydefault. • MyTagHandler.java • packagecom.javatpoint.sonoo; • importjava.util.Calendar; • importjavax.servlet.jsp.JspException; • importjavax.servlet.jsp.JspWriter; • importjavax.servlet.jsp.tagext.TagSupport; • publicclassMyTagHandlerextendsTagSupport{ • publicintdoStartTag() throwsJspException { • JspWriter out=pageContext.getOut();//returns the instance of JspWriter • try{ • out.print(Calendar.getInstance().getTime());//printing date and time using JspWriter • }catch(Exception e){System.out.println(e);} • return SKIP_BODY;//will not evaluate the body content of the tag • } • }
Create the TLD file • Tag Library Descriptor (TLD) file contains information of tag and Tag Hander classes. It must be contained inside the WEB-INFdirectory. • File: mytags.tld • <?xml version="1.0" encoding="ISO-8859-1" ?> • <!DOCTYPE taglib • PUBLIC "-//Sun Microsystems, Inc.//DTD JSP Tag Library 1.2//EN" • "http://java.sun.com/j2ee/dtd/web-jsptaglibrary_1_2.dtd"> • <taglib> • <tlib-version>1.0</tlib-version> • <jsp-version>1.2</jsp-version> • <short-name>simple</short-name> • <uri>http://tomcat.apache.org/example-taglib</uri> • <tag> • <name>today</name> • <tag-class>com.javatpoint.sonoo.MyTagHandler</tag-class> • </tag> • </taglib>
Create the JSP file • Let's use the tag in our jsp file. Here, we are specifying the path of tld file directly. But it is recommended to use the uri name instead of full path of tld file. We will learn about uri later. • It uses taglib directive to use the tags defined in the tld file. • File: index.jsp • <%@ tagliburi="WEB-INF/mytags.tld" prefix="m" %> • Current Date and Time is: <m:today/>
JSP API: The JSP API consists of two packages: javax.servlet.jsp javax.servlet.jsp.tagext The javax.servlet.jsp package has two interfaces and classes. The two interfaces are as follows: JspPage HttpJspPage The classes are as follows: JspWriter PageContext JspFactory JspEngineInfo JspException JspError
According to the JSP specification, all the generated servlet classes must implement the JspPage interface. It extends the Servlet interface. It provides two life cycle methods. Methods of JspPage interface public void jspInit(): It is invoked only once during the life cycle of the JSP when JSP page is requested firstly. It is used to perform initialization. It is same as the init() method of Servlet interface. public void jspDestroy(): It is invoked only once during the life cycle of the JSP before the JSP page is destroyed. It can be used to perform some clean up operation public void _jspService(): It is invoked each time when request for the JSP page comes to the container. It is used to process the request. The underscore _ signifies that you cannot override this method.
SCRIPTING ELEMENTS: • In JSP, java code can be written inside the jsp page using the scriptlet tag. Let's see what are the scripting elements first. • JSP Scripting elements • The scripting elements provides the ability to insert java code inside the jsp. There are three types of scripting elements: • scriptlet tag • expression tag • declaration tag JSP scriptlet tag • A scriptlet tag is used to execute java source code in JSP. Syntax is as follows: • <% java source code %> In this example, we are displaying a welcome message. <html> <body> <% out.print("welcome to jsp"); %> </body> </html>
In this example, we have created two files index.html and welcome.jsp. The index.html file gets the username from the user and the welcome.jsp file prints the username with the welcome message. File: index.html <html> <body> <form action="welcome.jsp"> <input type="text" name="uname"> <input type="submit" value="go"><br/> </form> </body> </html> File: welcome.jsp <html> <body> <% String name=request.getParameter("uname"); out.print("welcome "+name); %> </form> </body> </html>
The code placed within JSP expression tag is written to the output stream of the response. So you need not write out.print() to write data. It is mainly used to print the values of variable or method. • Syntax of JSP expression tag • <%= statement %> • In this example of jsp expression tag, we are simply displaying a welcome message. • <html> • <body> • <%= "welcome to jsp" %> • </body> • </html>
In this example, we are printing the username using the expression tag. The index.html file gets the username and sends the request to the welcome.jsp file, which displays the username. File: index.jsp <html> <body> <form action="welcome.jsp"> <input type="text" name="uname"><br/> <input type="submit" value="go"> </form> </body> </html> File: welcome.jsp <html> <body> <%= "Welcome "+request.getParameter("uname") %> </body> </html>
JSP Declaration Tag • TheJSP declaration tag is used to declare fields and methods. • The code written inside the jsp declaration tag is placed outside the service() method of auto generated servlet. • So it doesn't get memory at each request. • Syntax of JSP declaration tag • The syntax of the declaration tag is as follows: • <%! field or method declaration %> Difference between JSP Scriptlet tag and Declaration tag
Example of JSP declaration tag that declares field In this example of JSP declaration tag, we are declaring the field and printing the value of the declared field using the jsp expression tag. index.jsp <html> <body> <%! int data=50; %> <%= "Value of the variable is:"+data %> </body> </html>
Example of JSP declaration tag that declares method • In this example of JSP declaration tag, we are defining the method which returns the cube of given number and calling this method from the jsp expression tag. But we can also use jsp scriptlet tag to call the declared method. • index.jsp <html> <body> <%! int cube(int n){ return n*n*n*; } %> <%= "Cube of 3 is:"+cube(3) %> </body> </html>
JSP Directives: JSP syntax falls into two categories: JSP directives and JSP actions • JSP directives are statements in the JSP syntax that govern properties that are global to the JSP, • JSP actions are statements in the JSP syntax that control some aspect of how a portion of the JSP output is created, such as including the output of another web component within the JSP, or including a property value from a JavaBean in a JSP • JSP Directives: • JSP directives, which dictate properties global to the JSP, are all of the form <%@ directive_name attribute-1="value-1"...attribute-n=”value-n” %> They can appear anywhere in the JSP file,
The three directives are • page • This directive governs general properties of the JSP, such as characterizing its output, buffering properties, and using imports for Java scriptlets. • include • This directive allows a JSP to include the content of another file. This can be useful for including, for example, a standard header in your JSP. • Taglib • This directive allows a JSP to declare that it will use special tags from something called a tag library. A tag library is a collection of Java classes that formulate small snippets of markup output, each of which is associated with a markup tag that can be included in a JSP page.
Page Directives: General Properties Global to the JSP • JSP page directives are a collection of instructions to the JSP runtime as to how to process the JSP. • There are several different kinds • Attributes Governing JSP Output Two page directive attributes declare information about the output of a JSP: contentType and pageEncoding. The contentType attribute allows the JSP to declare the MIME type of the content it produces, • and the pageEncoding allows the JSP to declare the character encoding it uses. <%page contentType"text/html"%> <%page pageEncoding="utf-8"%>
Attributes Governing Languages Used in JSPs • JSPs use the Java language for scriptletsand JSP Expression Language (JSP EL). • Four page directive attributes govern the use of these • languages in a JSP: language, isELIgnored, isScriptingEnabled, and import. • A JSP may declare the-directive to indicate it uses Java in its scriptlets, although this particular value is not usually necessary to declare because Java is always supported in JSPs. • <%page language="java"%> • If a JSP does not use JSP EL, it may declare it as • <%page isELIgnored ="true"%> • a JSP that uses no scriptlets at all may declare it by using the page directive isScriptingEnabled. • <%page isScriptingEnabled ="false”%>
<%page import ="java.util.*"%> • <%page import ="java.text.*"%> • Many developers prefer the second style, where the import is split into multiple page directives using the import with a single package Attributes Controlling How the JSP Behaves at Runtime • autoFlush and buffer. The buffer attribute defines whether • any buffering is used at all and, if so, how large the buffer should be. The second, the autoFlush • attribute, is a switch that instructs the JSP implementation whether to flush the buffer when it fills or • whether to require the JSP to flush the buffer manually. For example • <@page autoFlush="false" buffer="8kb"%> • instructs the JSP implementation to use a buffer no smaller than 8 kilobytes and not to flush it • automatically. Contrastingly, • <@page buffer="none"%> • instructs the JSP implementation not to use a buffer at all, and • <@page buffer="6kb"%> • instructs the JSP implementation to use a buffer of size at least 6 kilobytes with automatic flushing • of content when the buffer fills.
JSP Error Pages JSPs may act as error pages for other web components. This is useful if you wish • to customize the page that the client sees if a JSP generates an unhandled runtime error. In such cases, the JSP that wishes to act as a nicely formatted error page must use the isErrorPage attribute in a page directive: • <@page isErrorPage="true"%> • Turning Off HttpSessionTracking • some JSPs that do not make use of the HttpSession can turn off the session tracking mechanism by using the session attribute of the page directive, such as • <@page session="false"%>
1.Example for import attribute: <html> <body> <%@ page import="java.util.Date" %> Today is: <%= new Date() %> </body> </html> 2.Example of contentType attribute <html> <body> <%@ page contentType=application/msword %> Today is: <%= newjava.util.Date() %> </body> </html>
errorPageattribute: • The errorPage attribute is used to define the error page, if exception occurs in the current page, it will be redirected to the error page. • Example of errorPage attribute • //index.jsp <html> <body> <%@ page errorPage="myerrorpage.jsp" %> <%= 100/0 %> </body> </html>
include directive: • The include directive is used to include the contents of any resource it may be jsp file, html file or text file. The include directive includes the original content of the included resource at page translation time (the jsp page is translated only once so it will be better to include static resource). • Advantage of Include directive • Code Reusability • Syntax of include directive • <%@ include file="resourceName" %> • Example of include directive • In this example, we are including the content of the header.html file. To run this example you must create an header.html file. <html> <body> <%@ include file="header.html" %> Today is: <%= java.util.Calendar.getInstance().getTime() %> </body> </html>
taglib directive: • The JSP taglib directive is used to define a tag library that defines many tags. We use the TLD (Tag Library Descriptor) file to define the tags. In the custom tag section we will use this tag so it will be better to learn it in custom tag. • Syntax JSP Taglib directive • <%@ tagliburi="uriofthetaglibrary" prefix="prefixoftaglibrary" %> • In this example, we are using our tag named currentDate. To use this tag we must specify the taglib directive so the container may get information about the tag. <html> <body> <%@tagliburi="http://www.javalib.com/tags" prefix="mytag" %> <mytag:currentDate/> </body> </html>
JSP actions: • JSP actions use constructs in XML syntax to control the behavior of the servlet engine. You can dynamically insert a file, reuse JavaBeans components, forward the user to another page, or generate HTML for the Java plugin. • There is only one syntax for the Action element, as it conforms to the XML standard − <jsp:action_name attribute=“value” /> The jsp:useBean, jsp:setProperty and jsp:getProperty tags are used for bean development. So we will see these tags in bean developement.
jsp:forward action tag • The jsp:forward action tag is used to forward the request to another resource it may be jsp, html or another resource. Syntax of jsp:forward action tag without parameter <jsp:forward page="relativeURL | <%= expression %>" /> • Example of jsp:forward action tag without parameter • In this example, we are simply forwarding the request to the printdate.jsp file. index.jsp <html> <body> <h2>this is index page</h2> <jsp:forward page="printdate.jsp" /> </body> </html> • printdate.jsp <html> <body> <% out.print("Today is:"+java.util.Calendar.getInstance().getTime()); %> </body> </html>
Syntax of jsp:forward action tag with parameter • <jsp:forward page="relativeURL | <%= expression %>"> • <jsp:param name="parametername" value="parametervalue | <%=expression%>" /> • </jsp:forward>
Example of jsp:forward action tag with parameter • In this example, we are forwarding the request to the printdate.jsp file with parameter and printdate.jsp file prints the parameter value with date and time. • index.jsp <html> <body> <h2>this is index page</h2> <jsp:forward page="printdate.jsp" > <jsp:param name="name" value="javatpoint.com" /> </jsp:forward> </body> </html> printdate.jsp <html> <body> <%out.print("Today is:"+java.util.Calendar.getInstance().getTime()); %> <%= request.getParameter("name") %> </body> </html>
jsp:include action tag: • The jsp:include action tag is used to include the content of another resource it may be jsp, html or servlet. • The jsp include action tag includes the resource at request time so it is better for dynamic pages because there might be changes in future. • The jsp:include tag can be used to include static as well as dynamic pages. • Advantage of jsp:include action tag • Code reusability : We can use a page many times such as including header and footer pages in all pages. So it saves a lot of time. Difference between jsp include directive and include action
Syntax of jsp:include action tag without parameter <jsp:include page="relativeURL | <%= expression %>" /> • Syntax of jsp:include action tag with parameter <jsp:include page="relativeURL | <%= expression %>"> <jsp:param name="parametername" value="parametervalue | <%=expression%>" /> </jsp:include> • Example of jsp:include action tag without parameter In this example, index.jsp file includes the content of the printdate.jsp file. • File: index.jsp <h2>this is index page</h2> <jsp:include page="printdate.jsp" /> <h2>end section of index page</h2> • File: printdate.jsp <% out.print("Today is:"+java.util.Calendar.getInstance().getTime()); %>
Java beans: • A JavaBean is a specially constructed Java class written in the Java and coded according to the JavaBeans API specifications. • Following are the unique characteristics that distinguish a JavaBean from other Java classes − • It provides a default, no-argument constructor. • It should be serializable and that which can implement the Serializable interface. • It may have a number of properties which can be read or written. • It may have a number of "getter" and "setter" methods for the properties.
The jsp:useBean action tag is used to locate or instantiate a bean class. If bean object of the Bean class is already created, it doesn't create the bean depending on the scope. But if object of bean is not created, it instantiates the bean. • Syntax of jsp:useBean action tag <jsp:useBean id= "instanceName" scope= "page | request | session | application" class= "packageName.className" type= "packageName.className" beanName="packageName.className | <%= expression >" > </jsp:useBean> • Attributes and Usage of jsp:useBean action tag • id: is used to identify the bean in the specified scope. • scope: represents the scope of the bean • request: specifies that you can use this bean from any JSP page that processes the same request. It has wider scope than page. • session: specifies that you can use this bean from any JSP page in the same session whether processes the same request or not. It has wider scope than request. • application: specifies that you can use this bean from any JSP page in the same application. It has wider scope than session.
class: instantiates the specified bean class (i.e. creates an object of the bean class) but it must have no-arg or no constructor and must not be abstract. • type: provides the bean a data type if the bean already exists in the scope. It is mainly used with class or beanName attribute. If you use it without class or beanName, no bean is instantiated. • beanName: instantiates the bean using the java.beans.Beans.instantiate() method.
The Java Environment for JSPs: • The Java environment in which JSPs can operate can be described in two different ways. The • first is to describe the Java objects that the JSP implementation makes available in the form of named variables from a scriptlet. • The second approach is to tour the JSP Java API classes. • Java objects in the form of named variables that are available in the Java environment for a JSP are called the JSP’s implicit objects. implicit objects : The implicit objects are defined in JSP for developing the fast web application purpose. A Java developer can use these objects directly in their code. Implicit objects are created by the web container, these objects are called the Java objects that implements the Servlet and JSP API's interfaces. In JSP nine (9) implicit objects are defined these are as follows
Out object: Out object denotes the Output stream in the context of page. The class or the interface name of the object out is "jsp.JspWriter". This object is instantiated implicitly from JSP Writer class and can be used for displaying anything within delimiters. • Methods in out object • print • println • newLine • clear • clearBuffer • flush • isAutoFlush • getBufferSize • getRemaining.
Request object: The 'request' object takes the value from the web browser and pass it to the server. This is performed using an HTTP request such as: headers, cookies or arguments. • Methods of the "request" object : • getCookies() • getHeader(String name) • getHeaderNames() • getAttribute(String name) • getAttributeNames() • getMethod() • getParameter(String name) • getParameterNames() • getParameterValues(String name) • getQueryString() • getRequestURI() • setAttribute(String,Object) • removeAttribute(String)
'response' object: Using 'response' object , reply is sent back to the browser. It is an implicit object of class "HttpServletResponse" class and using this object, response parameters can be modified or set.Theresponse object handles the output of the client. The response object is generally used by cookies. The response object is also used with HTTP Headers. • Methods of response object • setContentType() • addCookie(Cookie cookie) • addHeader(String name, String value) • containsHeader(String name) • setHeader(String name, String value) • sendRedirect(String) • sendError(int status_code)
In this example, first page is login html page which sends login info. to the JSP page which redirects to another page according to the correct or incorrect login. It has two separate pages - one for incorrect login & another for correct login. response-redirect.html


