Download
1 / 22
220 likes | 244 Views
Learn how to add and edit historical immunizations for all user roles except Reports Only. Understand the difference between New and Historical Immunizations and steps for managing them effectively.

E N D
Adding and Editing Historical Immunizations For all user roles except Reports Only
New vs. Historical Immunizations • Immunizations are documented as “new” or “historical” depending on whether or not they were given using inventory managed in the NCIR. • Inventory managed in the NCIR: Inventory that has been added (i.e. Lot Number, NDC, Quantity on Hand) in the NCIR and is being tracked in the NCIR. To view NCIR-managed inventory, click Manage Inventory and then Show Inventory. • If the dose IS from NCIR-managed inventory, document as a New Immunization Entry. • If the dose is NOT from NCIR-managed inventory, document as a Historical Immunization.
New vs. Historical Immunizations New Immunization Entry Historical Immunization Private doses from private inventory NOT managed in the NCIR Immunizations entered from valid immunization records • Public doses (all public inventory is required to be managed in the NCIR) • Private doses from private inventory that you opted to manage in the NCIR
Steps for Adding Historical Immunizations From within the client record, click History/Recommend.
Steps for Adding Historical Immunizations Review the History/Recommendations Screen. The Client Information section lists the patient’s personal and demographic information and any client comments. The History section details the patients immunizations that are documented in the NCIR. The client’s Current Age is shown in the blue strip. The Vaccines Recommended section is based on the ACIP schedule, current age, vaccination history, and any client comments.
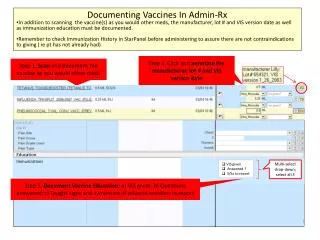
Steps for Adding Historical Immunizations Click Historical Immunization. Click Historical Immunization. This will open the Historical Immunization Entry Grid screen.
Steps for Adding Historical Immunizations Under the Vaccine column, find the vaccines to be documented.
Steps for Adding Historical Immunizations • If a vaccine is not listed, click the blank dropdown arrow in the last box in the Vaccine column. • Find and click on the vaccine to add it to the grid. Less commonly administered vaccines are listed in the dropdown box.
Steps for Adding Historical Immunizations In the first text box next to each vaccine to be documented, enter the Provider Organization name. In the Provider Organization column, enter the name of the organization that administered the immunization (this would be your organization name unless you are entering shots from a valid immunization record).
Steps for Adding Historical Immunizations In the next text box, enter the Date of Administration. Document the date the vaccine was administered.
Steps for Adding Historical Immunizations Click Tradename Details. Click on the Tradename Details Button. Note: You are not required to document the Trade Name if entering from a valid shot record that does not provide this information.
Steps for Adding Historical Immunizations Enter the Trade Name and Lot Numberand click Save. Click Save. Select the Trade Name from the drop down box. Enter the Lot Number. You must document Trade Name and Lot Number in case of vaccine recall.
Steps for Adding Historical Immunizations Review the history to verify that the documented immunization(s) loaded accurately. When you click Saveand Submit (or Save from the Tradename Details screen) you are sent back to the main History/ Recommend screen.
Short Cut: Adding Multiple Vaccines Administered by the Same Provider In the first/top blank box in the Provider Organization column, type the name of the provider organization thatgave the vaccines. Click in the box to paste Next to each vaccine the provider administered, left-click inside the blank text box. The information entered at the top is auto-pasted. Click in the box to paste
Short Cut: Adding Multiple Vaccines Administered on the Same Day In the first/top blank box in the vaccination date column, type the date the doses were given. Next to each vaccine administered on that date, left-click inside the blank date column text box. The date entered at the top is auto-pasted.
Save VS. Save and Submit Save and Submit uploads all the documented information and returns you to the main History/ Recommend screen. Save allows you to save the information that you have entered, but does not take you away from the historical immunization entry grid screen.
Any user at any organization may edit information documented for a historical immunization. Editing historical immunizations
When to Edit a Historical Immunization • To correct information documented inaccurately: • The Trade Name, Vaccine Lot Number, Date Provided, Date Estimated indicator, or Provider Org Name • To indicate an inadequate amount of a vaccine was given or the vaccine given is not anticipated to be effective. • To document a vaccine reaction for that specific dose. • To delete the dose.
Steps for Editing Historical Immunizations In the history section in the client record, find the row with for the dose that needs to be edited. Click on the icon in the Edit column (last column). Click
Steps for Editing Historical Immunizations • Make the edits and click Save. • (Or click Delete and then OK to delete the dose).