RAD-57 EMS Carry Case
180 likes | 773 Views
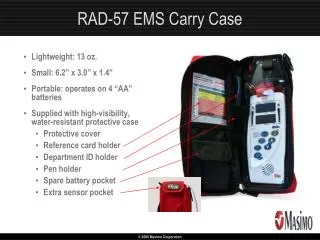
RAD-57 EMS Carry Case. Lightweight: 13 oz. Small: 6.2” x 3.0” x 1.4” Portable: operates on 4 “AA” batteries Supplied with high-visibility, water-resistant protective case Protective cover Reference card holder Department ID holder Pen holder Spare battery pocket Extra sensor pocket.

RAD-57 EMS Carry Case
E N D
Presentation Transcript
RAD-57 EMS Carry Case • Lightweight: 13 oz. • Small: 6.2” x 3.0” x 1.4” • Portable: operates on 4 “AA” batteries • Supplied with high-visibility, water-resistant protective case • Protective cover • Reference card holder • Department ID holder • Pen holder • Spare battery pocket • Extra sensor pocket
RAD-57 Operation / Powering Up • POWER • Press to turn ON • Press and HOLD to turn OFF • Battery Indicator • 4 Green LED’s • Each represents approximately 25% battery life • Use only Alkaline batteries • Do Not use rechargeable batteries • Battery Compartment • Located in back panel • Holds 4 “AA” alkaline batteries • Operates 8-10 hours
RAD-57 Operation / Startup Sequence • Place sensor on finger (relatively clean & dry) • Press “Power” button • Verify All LED’s light up and a 1 second tone is heard* • Startup mode begins • All preset configurations are displayed • Scrolling zeroes 0 – 0 – 0 and flashes dashed lines • May take up to 25 seconds • Do not move sensor during startup • When complete reading is displayed • Begin patient monitoring • Defaults to pulse rate and oxygen saturation reading • “PI” bar graph displays strength of arterial perfusion * Refer to operator’s manual for additional verifications prior to patient monitoring.
RAD-57 Operation / Sensor Placement Optimal LED path • Sensor placement is very IMPORTANT • When possible, use ring finger, non-dominant hand • Insert finger until the tip of finger hits the STOP Block • Sensor should not rotate or move freely on finger • LED’s (red light) should pass through mid-nail, not cuticle • There is a top and bottom, cable should be on top (nail side)
RAD-57 Operation / Pulse Rate and Saturation • Display after Startup • Oxygen Saturation on top in Red • Pulse Rate on bottom in Green • Green PI scale, indicates strength of arterial pulse • Low SIQ LED indicates poor SpO2 signal quality • Press “Display” to display % carboxyhemoglobin • Press “Bell” to silence alarms PI Scale Low SIQ LED Alarm Silence LED Display button toggles from SpO2 to SpCO Battery level
RAD-57 Operation / Alarms • When parameter is violated, audible alarm will sound, parameter will flash • Preset at factory: • Sp02 (oxygen saturation) • Low: 90% • High: none • Pulse Rate • Low: 50 • High: 140 • SpCO (carboxyhemoglobin) • Low: none • High: 10% • Alarms adjust: • Press “Mode/Enter” twice • Press “Next” key to scroll through parameters • Use up and down keys to adjust • Changes remain until user restores to factory defaults Alarm Indicator (flashes)
RAD-57 Operation / Measuring CO Slow: Low SpCO Confidence Fast: SpCO Alarm • Press “Display” button for SpCO reading • To scroll back to SpO2 mode press “Display” again • Carboxyhemoglobin displayed in % on top • “CO” displayed on bottom confirming mode • Real-time SpCO indicator continuously reads SpCO • Green: 1-3% • Yellow: 4-11% • Red: 12% and above • Confirm abnormal readings by taking several measurements on different fingers and average the readings CO label when SpCO is displayed
RAD-57 Operation / Troubleshooting Error Messages: • “NO Cbl” • Cable not seated properly into top of Rad-57 • Defective cable • “SEN OFF” • Sensor off finger • Sensor misaligned • “bAd CbL” • Defective cable • Replace cable • “CbL” • Incompatible cable • Connect appropriate cable • “bAd SEN” • Defective sensor • Replace sensor • “SEN” • Unrecognized sensor • Connect appropriate sensor
RAD-57 Operation / Troubleshooting • Will not power on • Check battery compartment • Replace batteries • Continuous Startup mode (Scrolling zeroes 0 – 0 – 0 and flashes dashed lines) • Shield sensor from flashing lights, strobes or high ambient light with Masimo Light Shield* • Try other fingers • Single battery level indicator flashes (with audible alarm) • Battery level too low • Replace batteries immediately • “Err” message • Return for service, Call 800-326-4890 • Continuous Speaker Tone • Power down and remove batteries • Return for service, Call 800-326-4890 * Contact your Masimo sales rep to order a Masimo Light Shield.
RAD-57 Operation / Light Shield Use Face protrusion of light shield down, and insert the end of the sensor into the hole Ensure that sensor hits the back of the light shield Orient the sensor so the cable is coming out of the top of the hole while in the light shield Open the sensor by applying pressure from the top and bottom of the light shield Insert finger until the tip of finger hits the STOP Block LED’s (red light) should pass through mid-nail, not cuticle Orient the sensor so the cable is running over the top of the patient’s hand Optimal LED path Apply pressure to open sensor Protrusion
RAD-57 Operation / Improving Accuracy • The Rad-57 is designed with an accuracy of +/- 3 digits with a range of 1% - 40% for one standard deviation (67% of patients) • Example: A reading of 10% could have a range from 7% - 13% • Measurements may vary from reading to reading, even on the same patient, within the accuracy specification • Proper probe placement may improve accuracy • If an abnormal level of CO is detected, always confirm by measuring other fingers and average • Flashing lights, strobes or high ambient light may interfere, use a Masimo Light Shield or other means of shielding