Download

1 / 14
140 likes | 251 Views
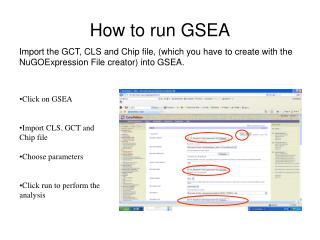
How to run RSM on imtf4. As of 2010/8/2 by Kei Yoshimura (AORI). Using Cygwin in your laptop. Double click “cygwin” run “startx” from any terminal, login to imtf4 machine Try “grads” to check X-window works. $ ssh –Y rsm1 @imtf4.ees.hokudai.ac.jp

E N D
How to run RSM on imtf4 As of 2010/8/2 by Kei Yoshimura (AORI)
Using Cygwin in your laptop • Double click “cygwin” • run “startx” • from any terminal, login to imtf4 machine • Try “grads” to check X-window works. $ ssh –Y rsm1@imtf4.ees.hokudai.ac.jp rsm1~rsm6 are available depends on traffic. password: rsm10sapporo “@” symbol is located right-hand side of your keyboard(next to “P”)!!
Cygwin’s window size problem • Please change your terminal window size by • click and hold the up-right corner of the terminal. • once drag your mouse outside of terminal • drag back into the terminal • adjust terminal size • Create your directory on your home directory, such as • mkdir /work1/RSM/[your name] • cd /work1/RSM/[your name]
Preparation for installation • log-in imtf4 $ ssh –Y rsm1@imtf4.ees.hokudai.ac.jp rsm1~rsm6 are available with password rsm10sapporo
Technical Notes • Use /work1/RSM/[your_name] directory instead of /home directory. Then delete your directory in /home. (please do not delete other’s!) • Select 2 for number of pes. • You may use your computer in your institute instead of imtf4. In this case, You need • either intel or pgi fortran • mpich program if you want to MPI • CVSROOT=:pserver:anoncvs@rokka.ucsd.edu:/rokka1/kana/cvs-server-root/cpscvs (see http://g-rsm.wikispaces.com/Installation)
Typical Troubleshoot • Compilation error: • “cvs co” doesn’t work! set CVSROOT correctly • compilation stops! Ask assistants! • Execution error: • Finish too early! check files in output directory (r_000). You should have sig.ft48. • Overflown (lots of “*” in out_rfcst files)! shorten DELTAT_REG in rsm/rsim files and rerun. • Post-process error: • grib2ctl.pl does not work! copy /home/rsm1/grib2ctl.pl to your working directory and try again.
Recompile without downloading • If you have downloaded the necessary files, you don’t need to do “./install” process. • If you have problem in “libs”, • cd libs • configure-libs • make (or make clean, make) • If you have problem in “rsm”, • cd rsm • configure-model • make (or make clean, make) • If you want to create other executable script • cd rsm_runs • configure-scr XXXXX [rsim, rsm, etc.]
Preparation for installation 2 • Set CVSROOT environment For your information: • CVS: Concurrent Versions System • The CVS in Hokudai is mirrored from Scripps, California. $ export CVSROOT=/work1/RSM/cpscvs or $ setenv CVSROOT /work1/RSM/cpscvs !! without “=“
Installation through CVS $ cd /work1/RSM/[your name] # go to working directory $ mkdir test ; cd test # creating working directory $ cvs co INSTALL # needs to be all capital $ ./install choose followings model: rsm architecture: mpi institution: ecpc machine: linux nickname: imtf4 compiler: intel additional options: no domain: 37 (81x87, Japan, 30km) -> you can choose any. but smaller domain is recommended time: 00:30 (just press enter) # of pes: 2 script: rsm Then compilation starts. This process may take 10-15 minutes.
Running RSM • rsm runs in rsm_runs directory. • this script (rsm) runs a 48 hours simulation from 1990/3/9 0Z. • check the calculation status by or $ cd rsm_runs $ ./rsm $ top $ tail –f r_000/out-rfcst.ft48 Calculation takes 10 minutes or so.
Visualize the results 1 • Let’s use GrADS. • Modify r_pgb.ctl as follows (shown by red): $ cd r_000 $ ~/grib2ctl.pl r_pgb.ft00 > r_pgb.ctl dset ^r_pgb.ft%f2 index ^r_pgb.ft00.idx options template undef 9.999E+20 ... tdef17 linear 00Z09mar1990 3hr zdef 12 levels ... then execute “gribmap” $ gribmap –i r_pgb.ctl
Visualize the results 2 • Launch grads and open r_pgb.ctl • For example, you can see an animation of 500hPa level by • More description is available at • http://www.iges.org/grads/ • http://meteora.ucsd.edu/~kyoshimura/?IT%20memo%2FGrADS%20memo $ grads > open r_pgb.ctl > set z 6 # set the height at 500hPa > set t 1 17 # set the time from 1990/3/9 0Z to 3/11 0Z > d hgtprs # visualize the height
Changing the model domain • You may choose domain from def/def_rsm • modify rsm/configure-model and compile again. [kei@shuidef]$ ls -1 def_rsm/ CVS rsm1024x651_g62k28_usa_10km_merc rsm1024x669_g62k28_usa_10km_merc rsm108x109_g62k28_california_5km_merc ... $ cd rsm edit MODEL_DEFINE in configure-model $ ./configure-model $ make clean ; make $ cd ../rsm_runs $ configure-scrrsm
Changing simulation period • Use rsim script in rsm_runs directory • Continue to next slides. $ cd rsm_runs $ ./configure-scrrsim edit year, date, time, as you like. $ ./rsim