Download
1 / 21
210 likes | 328 Views
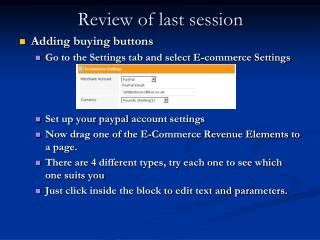
Review of last session. The Weebly Dashboard Controls your account and your sites From here you can change your account details Edit your sites Add sites. Review of last session. The Weebly Dashboard cont. Click on the Edit button to edit your site

E N D
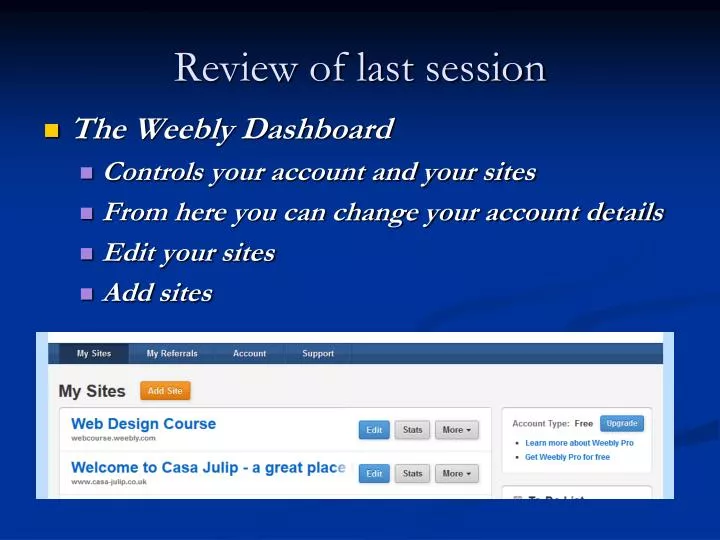
Review of last session • The Weebly Dashboard • Controls your account and your sites • From here you can change your account details • Edit your sites • Add sites
Review of last session • The Weebly Dashboard cont. • Click on the Edit button to edit your site • Click on the Stats button to get some basic usage information • Click on the more buttonto access • Blog comments • Contact form entries • Copy your site • Delete your site
Review of last session The Elements Tab An element is an object that allows you to add content to your web pages. You can add text, pictures, videos, HTML, maps and more.
Review of last session • The design Tab • The design tab allows you to change the look and feel of your website. Its main purpose is to let you change the template that your website is using. • A template is a pre-designed layout for a website. • The Weebly templates are easy to use and get you up and running with your website easily. • To change your template you just click on preview, if you like what it looks like just click on “use Theme” • You can also set Text parameters here for Titles and Paragraph text. • Set link colours here as well.
Review of last session • The Pages Tab • The pages tab allows you to create new web pages and manage pages you have already created. You can create as many pages as you want and either show or hide them in the navigation. • You can also move the pages in the position on the navigation bar.
Review of last session • 6. The Settings Tab • This is were you can set up the domain name and page titles etc.
Review of last session • Add text to your website • Title • Paragraph • Title and paragraph • Editing text • Bold • Italic • Underline • Colour • Size • Link • Position
Review of last session • Add photographs • Photograph on its own • Upload photo • Edit picture • Enlarge photo • Add a caption • Remove • Top menu • Change photo • Set border and margins • Photograph with title and paragraph
Review of last session • Add multiple columns • Select the No. of columns and spacing • Now drag a text or picture element in each column
Review of last session • Add a Contact form • It is made up of several elements • A title • A name box • An email box • A comment box • You can add other elements • Eg. A phone number box
Create your own Website • Changing your template • Go to the Design tab • Pick a template from the “favourites” section , or click on “All Themes” and chose a template from the many available • When you have selected a template click on “preview” • If you like the look of the template click on “use theme”
Create your own Website editing your header • you can change the picture and text on your header (not all templates) • Move your mouse over the header, if you see this button then you can edit your header, just click on the button. • You can change the background colour • Change the picture (s) • Add text • Save to single, multiple or all pages
Create your own Website adding a photo gallery or slide-show The gallery element enables you to upload photos in bulk, which are arranged in a click-to-see-a-larger-version grid format that you can control. Select “photo gallery” icon and drag onto page Then click the Upload Images button that appears in the element. This will let you select images from your computer to upload. You can select multiple images by holding the CTRL key on a PC Give the photos a few minutes to upload and then you'll see your gallery on the page
Create your own Website • Each image in the gallery automatically links to a larger version of the image. You can also link an image elsewhere (another site or page) if you like or add a caption that will appear on the enlarged version of an image. Just click on the gallery to see these options. • And you can use the gallery toolbar to make changes to the gallery. • Upload More Images • Determine the number of columns you want. The default is 3, but you can have from 2 to 6. • Select the amount of spacing to place between each image. • Choose if you want a border around each thumbnail or not. • And select if you want to crop the thumbnails to either squares or rectangles to make the layout more uniform.
Create your own Website • Add a picture slide-show • the slideshow element (available under the "Multimedia" category of elements) enables you to show off your photos with style. • This will open the "Choose a Slideshow Style" dialog box where you can select which style of slideshow you want. (This can always be changed later) • You'll now be prompted to upload photos. Hit the big Upload Photos button to get started.
Create your own Website Once your pictures have finished uploading you'll see them all on the photo management screen. You can drag photos to re-order them, click the "x" next to each to delete them and click the "bubble" icon to add a caption that'll appear along with the photo in the slideshow. When you're ready to move on, click Save and you'll new see the slideshow as part of the page.
Create your own Website • Add A Google map • drag the map element onto your page, click in the element to get the edit menu • This opens up the Map toolbar. You can make a number of changes from here. • The most important is the Address. You should enter the address you want right in this box. • Change the size of the map using Width and Height. • Position the Map to the Left, Centre or Right of the element. • Determine if you want a Marker showing your address on the map • Set the initial Zoom level. • You can also change a few of the less used settings via the Advanced menu.
Create your own Website • Add files • Drag the “File” element onto a page • Click inside the element to open thetop toolbar, click on “upload new file” • Browse and select the file to upload • This will add the file, users can then clickon the “Download File” text • They will get the option to open or save thefile to their computer.
Create your own website • Adding Video • Adding a YouTube video • Go to the multimedia tab and drag the youtube element on your page • click anywhere in the element to bring up the Toolbar. • You need to enter the direct link to the youtube video in the provided field. • You can change the size of the video • You can change its position in the window • In the advanced tab you can change the margins
Create your own website • Adding Video cont. • To find the direct link, click the Share button beneath the YouTube video. And copy / paste from there. No other link will work, so be sure to use the one found here.
Create your own website • Adding Video cont. • You can also add a SWF (flash) video. (a self contained file that can be a game, a video, a video slide show etc.) • Again in the multimedia tab drag the SWF element onto your page. • Click in the box to upload your SWF file • This will bring up the SWF toolbar. • You can use the Upload New File button to upload the file and set the Width, Height and Alignment. • http://www.leconcombre.com/board/dl/us/downloadflas0us.html • http://elegans.imbb.forth.gr/games/