Download

1 / 24
240 likes | 608 Views
WELCOME FOR TRAINING OF SYSTEM GSPN. 1.-La pagina del GSPN 2.- código de taller 3.-clave del ASC. 1.-Abres en Negocios o en ingles Business. Buscamos la opción Service Tracking damos clic se abre otra ventana. Aquí creamos una orden de servicio nueva.

E N D
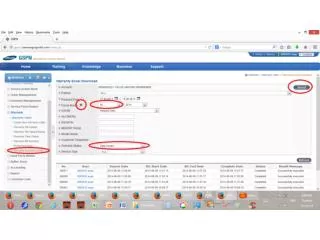
Buscamos la opción Service Tracking damos clic se abre otra ventana
1.-en orden de trabajo colocar un numero creado por el ASC 2.- Colocar nombre del cliente 2.-Ingresar modelo y serie del artefacto ORDEN DEL CSA
2.- DATOS DEL CLIENTE GUARDAR
3.- UNA VEZ GUARDADA LA ORDEN SE PROCEDE A CONFIRMAR CONFIRMAR
CONFIRMAR MODELO Y SERIE DEL ARTEFACTO INGRESADO CONFIRMAR GUARDAR
UNA VEZ VERIFICADO MODELO Y SERIE SE PROCEDE A LLENAR FECHA DE COMPRA Y TIPO DE SERVICIO
Y SE PROCEDE A GUARDAR LA ORDEN Y SE ASGINA NUMERO DE INGRESO A SAMSUNG
En información de trabajo se procede a llenar los daños del artefacto
En información de trabajo se procede a llenar los daños del artefacto
Si no se pide repuesto, se cierra la orden con la fecha de reparación por parte del técnico asignado
Una vez guardada la orden se procede a ir a INFORMACION DE REPARACION Y SE ABRE LA OPCION CREAR RECLAMO DE GARANTIA
En la sección de reference se adjunta la factura del cliente y la foto de la serie del artefacto
Una vez llenados los campos se pone verificar si se procede a ver todos los errores que tiene la orden
Una vez que no exista errores se procede a guardar y esta lista la orden a cobro