Activity 3 Creating a table in Design View
170 likes | 545 Views
Activity 3 Creating a table in Design View. We are going to create a table in Design View. After that, enter the data below into the new table. Activity 3 Creating a table in Design View. Activity 3 Creating a table in Design View.

Activity 3 Creating a table in Design View
E N D
Presentation Transcript
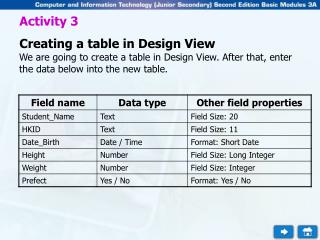
Activity 3 Creating a table in Design View We are going to create a table in Design View. After that, enter the data below into the new table.
Activity 3 Creating a table in Design View
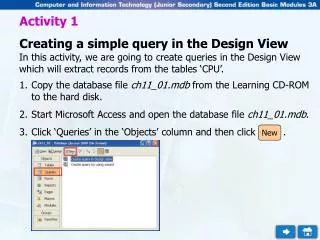
Activity 3 Creating a table in Design View • Start Microsoft Access and open the database db1.mdb which is created in Activity 2. • In the database window, click ‘Tables’ from the ‘Objects’ panel and then click . Alternatively, you can double-click ‘Create table in Design view’ to go to Step 4. New
Activity 3 Creating a table in Design View • Select ‘Design View’ in the ‘New Table’ dialogue box and click . • Click the first cell under the ‘Field Name’ and enter ‘Student_Name’. OK
Activity 3 Creating a table in Design View • Select the data type ‘Text’ from the pull down menu. • Change the value of the ‘Field Size’ to ‘20’.
Activity 3 Creating a table in Design View • Enter the properties for the rest of the fields by repeating steps 4 to 6. • Click the field ‘HKID’. Select ‘Edit’ ‘Primary Key’ to set ‘HKID’ as the primary key of the table. Alternatively, click the ‘Primary Key’ button on the menu bar to set the primary key. After a primary key is set, the icon is displayed next to the field.
Activity 3 Creating a table in Design View
Activity 3 Creating a table in Design View • Select ‘File’ ‘Save’ to save the table. • Enter “Student’s Profile” in the ‘Save As’ dialogue box and click . OK
Activity 3 Creating a table in Design View • Select ‘View’ ‘Datasheet View’ or click ‘Datasheet View’ button on the menu bar to switch to Datasheet View. Then enter data into the table. • Select ‘File’ ‘Close’ to close the table. • Select ‘File’ ‘Exit’ to exit Microsoft Access.
Activity 3 Creating a table in Design View • Select ‘View’ ‘Datasheet View’ or click ‘Datasheet View’ button on the menu bar to switch to Datasheet View. Then enter data into the table. • Select ‘File’ ‘Close’ to close the table. • Select ‘File’ ‘Exit’ to exit Microsoft Access.