Download
1 / 50
510 likes | 705 Views
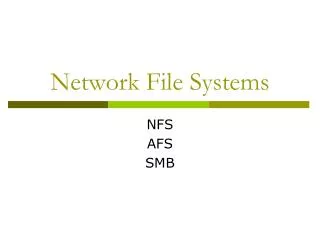
4) Exporting an IDF file with CircuitWorks. CircuitWorks 7 can save SolidWorks assemblies as IDF files that can be read by ECAD systems. CircuitWorks 7 can save SolidWorks assemblies as IDF files that can be read by ECAD systems. This is an example of an assembly created by

E N D
CircuitWorks 7 can save SolidWorks assemblies as IDF files that can be read by ECAD systems
CircuitWorks 7 can save SolidWorks assemblies as IDF files that can be read by ECAD systems This is an example of an assembly created by processing an IDF file with CircuitWorks
These two components are in a position that’s going to cause a problem in our SolidWorks assembly This is an example of an assembly created by processing an IDF file with CircuitWorks
We now want to save these changes back out as an IDF file, so the Electrical Engineers can update their system
To save the assembly, select File > Save As IDF.. From the CircuitWorks menu We now want to save these changes back out as an IDF file, so the Electrical Engineers can update their system
To save the assembly, select File > Save As IDF.. From the CircuitWorks menu …or click the ‘Save As IDF’ icon
CircuitWorks will display the IDF Export Wizard with two Options: Express export or Full export
Express export can be used when the assembly has been generated by an IDF file and components have been moved
Express export can be used when the assembly has been generated by an IDF file and components have been moved Full export allows much more control over the export process. It can be used when assemblies have been modelled from scratch in SolidWorks, or major changes have been made
Express export can be used when the assembly has been generated by an IDF file and components have been moved Full export allows much more control over the export process. It can be used when assemblies have been modelled from scratch in SolidWorks, or major changes have been made As we’ve only moved two components, Express export has been selected
CircuitWorks prompts for a filename and location for the newly created IDF file
Type a filename and click Save
CircuitWorks reports that the file has been successfully exported
CircuitWorks can also write out IDF data when more major changes have been made to the board or assembly
Here the sketch profile has been modified, additional holes added and components moved
This time full export is selected CircuitWorks displays the export wizard again
The next page of the Export Wizard prompts for board options
Set the file type you would like to export: IDF 2.0 or IDF 3.0 The next page of the Export Wizard prompts for board options
Set the file type you would like to export: IDF 2.0 or IDF 3.0 Set an alternative board thickness if required
Set the file type you would like to export: IDF 2.0 or IDF 3.0 Set an alternative board thickness if required If holes are to be exported, the type and owner of the holes can be set here
Set the file type you would like to export: IDF 2.0 or IDF 3.0 Set an alternative board thickness if required If holes are to be exported, the type and owner of the holes can be set here Click Next > to continue the export process
The next page of the Export Wizard prompts for other features to export
Select which features to export from the list The next page of the Export Wizard prompts for other features to export
If you’re exporting the file in IDF 3.0 format, the owner of the features can be set here The next page of the Export Wizard prompts for other features to export
The final page of the Export Wizard prompts for advanced export options
The name of the exporting system can be set here The name of the exporting system can be set here The final page of the Export Wizard prompts for advanced export options
The name of the exporting system can be set here The name of the exporting system can be set here Setting this option will display a dialog on export allowing the user to edit the component reference designators The final page of the Export Wizard prompts for advanced export options
The other options on this page can be set to tailor CircuitWorks IDF export for use with specific ECAD systems The name of the exporting system can be set here The name of the exporting system can be set here Setting this option will display a dialog on export allowing the user to edit the component reference designators The final page of the Export Wizard prompts for advanced export options
The other options on this page can be set to tailor CircuitWorks IDF export for use with specific ECAD systems The name of the exporting system can be set here The name of the exporting system can be set here Setting this option will display a dialog on export allowing the user to edit the component reference designators Click Next > to start the export process
CircuitWorks will prompt for a filename and location for the IDF file
Click Save to save the IDF file and start the export process
CircuitWorks reports its progress as the board and components are exported
If you want to check your assembly has exported correctly, you can open the newly created IDF file in CircuitWorks
Browse to and open the IDF file CircuitWorks has just exported
For more information or to download an evaluation copy of CircuitWorks, visit www.circuitworks.netor email info@circuitworks.net