
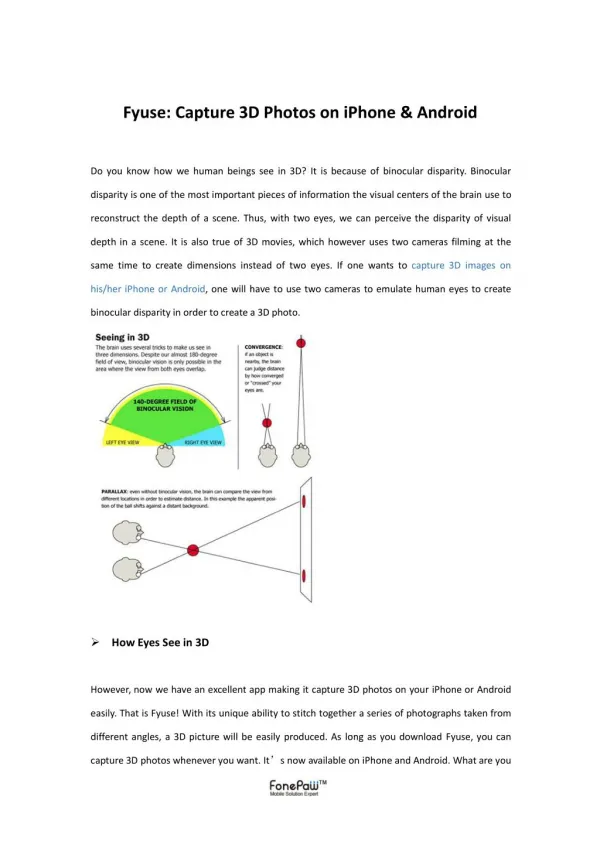
Uploaded by
linus
0 SLIDES
130 VIEWS
0LIKES
Create Your Own Calculator: 2nd iPhone Programming Exercise
DESCRIPTION
This exercise, part of CSE 391 Fall 2012, challenges students to develop a basic calculator app for iPhone using Objective-C. Students will focus on implementing fundamental functionalities like addition, subtraction, multiplication, and division. The exercise encourages understanding of user interface design, handling user input, and applying logic to perform calculations. This hands-on project is integral for mastering iOS development and reinforces concepts learned in class. Dive into programming and enhance your skills by building a functional calculator app.
Download

1 / 0
Download Presentation 
Create Your Own Calculator: 2nd iPhone Programming Exercise
An Image/Link below is provided (as is) to download presentation
Download Policy: Content on the Website is provided to you AS IS for your information and personal use and may not be sold / licensed / shared on other websites without getting consent from its author.
Content is provided to you AS IS for your information and personal use only.
Download presentation by click this link.
While downloading, if for some reason you are not able to download a presentation, the publisher may have deleted the file from their server.
During download, if you can't get a presentation, the file might be deleted by the publisher.
E N D
Presentation Transcript
-
Create a calculator–2nd iPhone programming exercise
CSE 391 Fall 2012 - A little background… Last summer, to celebrate our 25th wedding anniversary, we took the family on the ferry across the Bay of Fundy from Bar Harbor, Maine, to Yarmouth, Nova Scotia. We took the van and spent a week exploring. You don’t need an international driver’s license to drive in Canada, but the speed limit signs are all in kilometers per hour (kph). It would have been useful to have an app on my iPhone that converted mph to kph – I didn’t want to get a ticket for speeding!
- Design and resources I thought this could be a fairly simple app. It would have an input field to enter your driving speed, a button to convert mph to kph, a button to convert kph to mph, and an output field to give you the result. Just to make the app more graphically interesting, I thought the buttons should look like the speed limit signs typical of the US and Canada. I also realized that these elements would have to fit in the top half of the screen to allow room for a keypad to enter the driving speed.
- Setting up I created a Single View Application project in Xcode. In the Main.storyboardfile I needed to create some objects to work with, namely two fields (input and output), two buttons, and two labels (for the buttons). I added one more label to display a message as well. The objects inherit their methods and properties from the UIKitsuperclass. The fields, buttons, and labels are IBOutlets, of the type UITextField, UIButton, and UILabel respectively. Two method headers, IBActions for each button, are also declared. The code is on the next slide.
- ViewController.h code #import <UIKit/UIKit.h> @interfaceMPHconverterViewController : UIViewController { } @property (nonatomic, strong) IBOutletUILabel*mph, *kph; @property (nonatomic, strong) IBOutletUIButton*toMiles, *toKilos; @property (nonatomic, strong) IBOutletUITextField*input, *output; (IBAction) convertToMiles; (IBAction) convertToKilos; @end
- Building the interface: fields I added my images of the road signs to the Supporting Files folder of Xcode project and saved it. I launched Interface Builder by clicking the Main.storyboardfile. From the Objects tab in the Library window I dragged two text fields onto the View window. For the field at the top (the input field) I set the Placeholder text in the Inspector window’s Attributes tab to be “Enter your driving speed here”. I also set the keyboard associated with both fields to be a Number Pad.
- Building the interface: buttons Next I dragged two Round Rect buttons into the view. In the View Size tab of the Inspector window I set the size of the buttons to 120 X 120 (the same size as my graphics). In the Attributes tab of the Inspector window I set the Background of each button to the respective road sign graphic I wanted using the dropdown menu. I didn’t give the buttons titles.
- Building the interface: labels I dragged a Label for each button from the Objects tab of the Library window onto the View window, and set their Font to 30 points in the Attributes tab of the Inspector window. I deleted the default text in each Label. I dragged one more Label into the view for a message below the output field. I set it’s Font size to 24 point, and gave it the text, “Drive safely.” The text for all fields and labels was set to be centered.
- Building the interface: connections In the Document window I selected File’s Owner. In the View Controller Connections tab of the Inspector window I saw the four outlets and two actions I created in the ViewController.h file in Xcode. I dragged a connection from each of the actions, toMiles and toKilos, to each of their respective buttons. I dragged a connection for the input and output outlets to their respective fields (top and bottom). I dragged a connection for the kph and mph outlets to their respective labels. Then I saved the file.
- Implementing methods - design I wanted the app to display the user’s driving speed on the appropriate road sign (i.e. if they wanted to convert their mph to kph, I wanted their speed to appear over the mph button). However, I didn’t want the input text to persist or the previous conversion text to persist either. I wanted the button therefore to clear all fields each time it was pressed. I wanted to confirm for the user the unit of measurement in the output field, so I wanted to display the result of the calculation concatenated with the appropriate units (i.e. 65 Miles Per Hour). Finally, I wanted to dismiss the keyboard each time the button was pressed so the message behind it would be displayed.
- Implementing methods - code The first line of the button code dismisses the keyboard by releasing the “first responder” status of the input field that called the keyboard in the first place, by a user clicking on it to enter some text. The second line performs the conversion calculation either by multiplying or dividing the value in the input field by 1.61. The third line takes the value of the variable (k or m), concatenates it with the appropriate unit of measurement, and displays it in the output field. The fourth line creates a string from the input field and the fifth line displays it in the button label. The sixth and seventh lines of code clear the input field and the other button’s label by setting their text to nil. The code was written right above the @end statement and the project was saved and built. The code for each button follows on the next two slides.
- The toMiles button (IBAction) convertToMiles{ //dismiss the keyboard [_innputresignFirstResponder]; //Calculate kilos to miles and put that value into the output field floatk=([input.textfloatValue] /1.61); [_outputsetText:[NSStringstringWithFormat:@"%1.0f Miles Per Hour",k]]; //Put the input value into the label on the kph button NSString *confirmKPH=[[NSStringalloc] initWithFormat:@"%@", _input.text]; [_kphsetText:confirmKPH]; //Clear the input and mph fields [_mphsetText:nil]; [_inputsetText:nil]; }
- The toKilos button (IBAction) toKilos{ //dismiss the keyboard [_inputresignFirstResponder]; //Calculate miles to kilos and put that value into the output field float m=([_input.textfloatValue] *1.61); [_outputsetText:[NSStringstringWithFormat:@"%1.0f Kilometers Per Hour",m]]; //Put the input value into the label on the mph button NSString *confirmMPH=[[NSStringalloc] initWithFormat:@"%@", _input.text]; [_mphsetText:confirmMPH]; //Clear the input and kph fields [_kphsetText:nil]; [_inputsetText:nil]; }
- Success!
- What’s next? So what else would be useful to convert? Gallons to liters? Fahrenheit to Celsius? Feet and inches to meters and centimeters? Here’s a link to give you some ideas: http://vulcan.wr.usgs.gov/Miscellaneous/ConversionTables/conversion_table.html Currency would be cool, but the relative values of currencies fluctuate, so the conversion formula would have to be regularly updated from data on the Internet – a lesson for another time. What about the message field in my example? Could it be more useful? Could its contents be dynamically determined as the result of a conditional statement? You’ve already shown me you can do a lot with these simple examples. So be creative and have fun!


More Related
Audio
Live Player