Download
1 / 3
40 likes | 357 Views
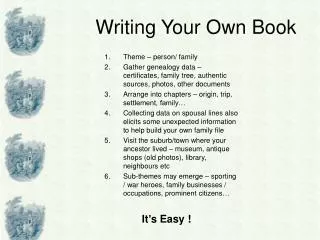
Make Your Own Mini-Book Instructions. Step 1: Have students type their text on each page. (Note: You may want them to write their “mini-book” in Word first.)

E N D
Make Your Own Mini-Book Instructions • Step 1: Have students type their text on each page. (Note: You may want them to write their “mini-book” in Word first.) • Step 2: Next, have them format the text by changing the font, type size, style of text, or color. They may also want to add pictures or graphics. • Step 3: After they have written their mini-book, have them print out Slide 1. Then reinsert that page into the printer face up with the Title page facing right. Print the second page of the mini-book. They now have one sheet of paper printed front and back. • Step 4: Tell students to fold the top half of this page away from them. Next, fold the left side behind the right side. • Step 5: Finally, cut the tops of the pages so the book can be opened. (Have an adult help with this part). Students now have an 8-page mini-book.
Page 5 Page 4 Enter text here, and then format it the way you like. IMPORTANT: You will need to rotate this text box upside down before printing by dragging from the green circle at the top of this box. Tip: It is easier to rotate if you hold the [SHIFT] key while dragging. Enter text here, and then format it the way you like. IMPORTANT: You will need to rotate this text box upside down before printing by dragging from the green circle at the top of this box. Tip: It is easier to rotate if you hold the [SHIFT] key while dragging. Enter text here. Format the text whatever way you like. Add a picture or graphic. TITLE HERE BY YOUR NAME HERE Insert Picture or Graphic Page 8 Page 1
Page 6 Page 3` Enter text here, and then format it the way you like. IMPORTANT: You will need to rotate this text box upside down before printing by dragging from the green circle at the top of this box. Tip: It is easier to rotate if you hold the [SHIFT] key while dragging. Enter text here, and then format it the way you like. IMPORTANT: You will need to rotate this text box upside down before printing by dragging from the green circle at the top of this box. Tip: It is easier to rotate if you hold the [SHIFT] key while dragging. Enter text here. Format the text whatever way you like. Add a picture or graphic. Enter text here. Format the text whatever way you like. Add a picture or graphic. Page 2 Page 7