PowerPoint Basics Tutorial: How to Create Your First Presentation
Learn step-by-step guidelines to create a PowerPoint presentation. From choosing templates to inserting pictures and applying transitions, this tutorial covers essential features. Get insights on printing options and additional tips for an impactful presentation.

PowerPoint Basics Tutorial: How to Create Your First Presentation
E N D
Presentation Transcript
How to Do PowerPoint by Mrs. Kantar Bow Memorial School
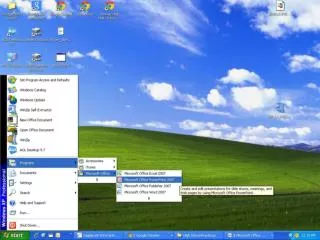
How to start • Go to the Start Menu and choose Programs. Highlight Microsoft PowerPoint & click twice to open it. • When the next screen opens, pick the second choice that says “Pick a Look Wizard”
Step 1 of 9 • This is just an “intro” window....so • just press “Next”
Step 2 of 9 • This says “On-Screen Presentation” • Just click on “Next”
Step 3 of 9 • Says “Which template...” etc • Click on “More”. • This will show a list of templates (backgrounds) you can choose • If the list does not come up, see next slide
finding “template” list: 6 steps! How to locate the list of background styles • Go to Desktop • Click twice on Mac HD • Click twice on Microsoft Office • Click twice on Microsoft PowerPoint • Click twice on Templates • Click twice on “On screen & 35 mm Slides” • FINALLY....You see the list!!!! Bow Memorial School: re-do for PC’s
Step 4 of 9 • If you ignore everything on this screen, and just click on “Finish”, • ......you can skip right to the end! • Now your first slide, the title slide, appears; so click on the top box and start typing! • Good Luck! • P.S. See next slide for special effects
HOW TO INSERT PICTURES • Go to INSERT, choose “object” .....(or click on the”redheaded man” icon to get “clip art” from Microsoft’s ClipArt Gallery • OR, go to INSERT, choose “picture” (to use those from another disk, CD, or Print Shop)
TRANSITIONS • To make special effects when you go from slide to slide, or topic to topic • Click on 3rd icon at bottom left of screen (the “slide sorter view”) • Click on your 1st slide. Go to left box above where it says “No transition.” Click and drag to choose an EFFECT. • Go to right box above and do the same. • Continue to do this for all your slides
Watching the finished product • Go back to your 1st slide (2 ways) • click on Slide Sorter View at bottom and click on Slide 1 • OR click on the black double UP arrows at the right hand corner of this big slide. It will take you back, one slide at a time to the beginning. (the black double DOWN arrows will go the other way) • Click on the 5th icon at bottom left, called “Slide Show”, of course! • Isn’t your show great?
HOW TO PRINT • When the Print Window comes up, click on the rectangle that says “Slides” and change it to “Handouts(6 slides per page)..........or “Outline view” (has no pic’s)
Also click on “Black & White”! Very important - or else the printer will try to color the slides and use up all the printer ink!
OTHER HINTS • 1. When in Slide Show View (small slides) double-click on any slide to see it large • 2. Press ESC to stop the “running” slide show at any time