Preparing and Documenting Your LID Design
Preparing and Documenting Your LID Design. F or Stormwater Treatment and Flow Control. Dan Cloak Environmental Consulting December 14, 2010. Contra Costa Clean Water Program. Topics. Principles for LID Site Design Drainage Management Areas Delineation Definition

Preparing and Documenting Your LID Design
E N D
Presentation Transcript
Preparing and Documenting Your LID Design For Stormwater Treatment and Flow Control Dan Cloak Environmental ConsultingDecember 14, 2010 Contra Costa Clean Water Program
Topics • Principles for LID Site Design • Drainage Management Areas • Delineation • Definition • Self-treating and Self-retaining DMAs • DMAs draining to Integrated Management Practices • IMP Selection and Design • Setting up Calculations • Using the IMP Calculator
LID Site Design Principles Paved or Roof Area
LID Site Design Principles • Mimic natural hydrology • Disperse runoff • Keep drainage areas small • Don’t concentrate runoff • Don’t allow run-on from landscaped or natural areas
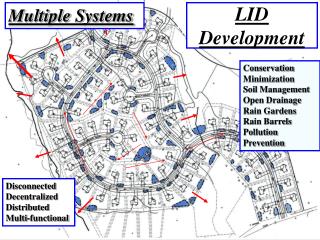
Drainage Management Areas DMA 1 DMA 4 DMA 3 DMA 2
Drainage Management Areas Natural DMA-8 DMA-5 Paved DMA-6 DMA-7 Landscaped
Drainage Management Areas Natural DMA-8 DMA-5 PossibleIMPLocations Paved DMA-6 DMA-7 Landscaped Municipal Storm Drain
Options – Pervious DMAs • DMA-8 • Self-treating? • Self-retaining? • Drain to IMP?
DMA 8 • Self-Treating • Drain directly to storm drain system • Self-Retaining • Retain first inch of rainfall without producing runoff • Drain to IMP • Use runoff factor to account for contribution Best choice may depend on slope and relative elevation
Details Use a curb to avoid run-onfrom self-treating areas To storm drain Grade self-retaining areas to drain inward. Set any area drains to pond 3"-4" Consider that adjacent roofs or paved areas could drain to self-retaining areas (not to exceed 1:1)
Options – Combining DMAs Option to combine DMAs if they have identical runoff factors (for example, roofs and paving) and drainage is routed to the same location. Carefully follow grade breaks and roof ridges to delineate DMAs
Plan-checking DMAs • Consistency with grading, paving, and architectural plans • Some municipalities require the stormwater compliance exhibit be drawn over a screen of the grading plan • Sufficient head to ensure drainage across the DMA and from the DMA to the receiving IMP • Follow-through in final design and during construction
IMPs • Integrated Management Practices • Bioretention facilities • Applicable to most sites • Flow-through planters • Bioretention without infiltration • Use on elevated plazas and near foundations • Dry wells and infiltration basins • Good solution where soils are highly permeable • Cisterns and vaults • Used in combination with bioretention
Sizing Bioretention • Treatment only • Sized to 4% of equivalent impervious area • Design to ensure entire treatment area is flooded prior to overflow • Class 2 perm layer provides some storage • Underdrain discharges directly to storm drain A 18"
Sizing Bioretention Page 50 • Treatment + Flow Control • A, V1 and V2 • 12" surface depth and 18" deep gravel layer • Design flexibility if same volumes are achieved • Orifice limits maximum underdrain discharge
Page 76 Bioretention FacilityCross-section Not to Scale Overflow structure24" min x 36" min. concrete drop inletor manhole with frame and atrium or beehive grate, ¼ “ openings Curb cut (or curbinlet if neededto ensure runoff capture) 4" min. dia. SDR 35 or equiv. sweep bend and cleanoutmin. 2" above overflow level Walls as needed to establish constant rim elevation around perimeter of facility Adjacent pavement Cobbles or splash block Min. 6" or asneeded to achieve V1 Top of Soil Layer TSL Install all plantings to maintainTSL at or below specifiedelevation 3" max. mulch if specified in landscape plans Male threaded pipe end with cap center-drilled to specified orifice dia. (Omit cap for treatment-only facilities.) Schedule 80 (no perforations)seal penetration with grout Specified soil mix Min. 18“ Top of Gravel Layer TGL 4 " min. dia. SDR 35 or equiv., perforations facing down Min. 12“ or as needed toachieve V2 24" 6" Class 2 perm(Assume 40% porosity for calculation of V2) To storm drain or approved discharge point Bottom of Gravel Layer BGL Large diameter closed perforated pipesor arches may augment storage to achieve V2 Moisture barrier ifneeded to protectpavement or structures Native soil, no compaction. Rip to loosen. • Notes: • No liner, no filter fabric, no landscape cloth. • Maintain BGL. TGL, TSL throughout facility area at elevations to be specified in plan. • Class 2 perm layer may extend below and underneath drop inlet. • Preferred elevation of perforated pipe underdrain is near top of gravel layer. • See Appendix B for soil mix specification, planting and irrigation guidance. • See Chapter 4 for factors and equations used to calculate V1, V2 ,and orifice diameter.
Sizing Dry Wells Page 85 • Treatment + Flow Control • A and V
Bioretention + Vault Page 92
Cistern + Bioretention Page 89 V A V A
Example Site Natural DMA-8 DMA-5 PossibleIMPLocations Paved DMA-6 DMA-7 Landscaped Municipal Storm Drain
Example Site Natural DMA-8 9350 SF 1300 SF DMA-4 5570 SF PossibleIMPLocations 4000 SF 1050 SF 1050 SF Paved DMA-6 1300 SF 7025 SF DMA-5 Landscaped Municipal Storm Drain
Example Site Natural DMA-8 9350 SF 1300 SF DMA-5 5570 SF PossibleIMPLocations 4000 SF 1050 SF 1050 SF Paved DMA-6 1300 SF 7025 SF DMA-7 Landscaped Municipal Storm Drain
Setting Up Calculations • Self-retaining Area • Area Draining to Self-retaining Area
Setting Up Calculations • Areas Draining to IMPs
Setting Up Calculations • Areas Draining to IMPs
Example Site Natural DMA-8 9350 SF 1300 SF DMA-5 5570 SF 4000 SF 1050 SF 1050 SF Paved DMA-6 1300 SF 7025 SF DMA-7 IMP-1 1400 SF Municipal Storm Drain
Setting Up Calculations • Areas Draining to IMPs
Sizing Bioretention V1 = 400 CF 3.4 in A = 1400 SF V2 = 475 CF 10.2 in 475/0.4 = 1188 CF Gravel