Web Site Design
160 likes | 307 Views
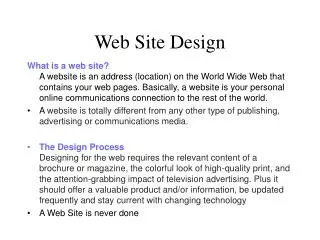
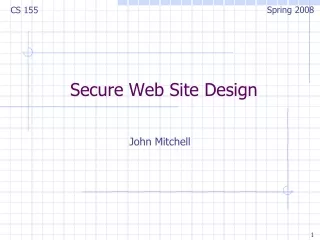
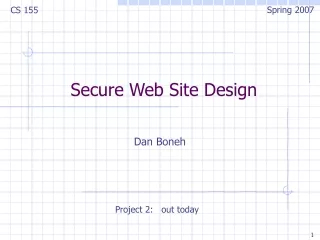
Web Site Design. Marion Setton www.cookiesetton.com. F. CS Live G. Tag selector H. Property inspector I. Files panel. A. Application bar B. Document toolbar C. Document window D. Workspace switcher E. Panel groups.

Web Site Design
E N D
Presentation Transcript
Web Site Design Marion Setton www.cookiesetton.com
F. CS LiveG. Tag selectorH. Property inspectorI. Files panel A. Application barB. Document toolbarC. Document windowD. Workspace switcherE. Panel groups
Workspace elements overviewThe workspace includes the following elements.Note: Dreamweaver provides many other panels, inspectors, and windows. To open the panels, inspectors, and windows, use the Window menu • The Welcome screen • Lets you open a recent document or create a new document. From the Welcome screen, you can also learn more about Dreamweaver by taking a product tour or a tutorial. • The Application bar • Across the top of the application window contains a workspace switcher, menus (Windows only), and other application controls. • The Document toolbar • Contains buttons that provide options for different views of the Document window (such as Design view and Code view), various viewing options, and some common operations such as previewing in a browser. • The Standard toolbar • (Not displayed in the default workspace layout.) Contains buttons for common operations from the File and Edit menus: New, Open, Browse in Bridge, Save, Save All, Print Code, Cut, Copy, Paste, Undo, and Redo. To display the Standard toolbar, select View > Toolbars > Standard. • The Coding toolbar • (Displayed in Code view only.) Contains buttons that let you perform many standard coding operations. • The Style Rendering toolbar • (Hidden by default.) Contains buttons that let you see how your design would look in different media types if you use media-dependent style sheets. It also contains a button that lets you enable or disable Cascading Style Sheets (CSS) styles. • The Document window • Displays the current document as you create and edit it. • The Property inspector • Lets you view and change a variety of properties for the selected object or text. Each object has different properties. The Property inspector is not expanded by default in the Coder workspace layout. • The Tag selector • Located in the Status bar at the bottom of the Document window. Shows the hierarchy of tags surrounding the current selection. Click any tag in the hierarchy to select that tag and all its contents. • Panels • Help you monitor and modify your work. Examples include the Insert panel, the CSS Styles panel, and the Files panel. To expand a panel, double-click its tab. • The Insert panel • Contains buttons for inserting various types of objects, such as images, tables, and media elements, into a document. Each object is a piece of HTML code that lets you set various attributes as you insert it. For example, you can insert a table by clicking the Table button in the Insert panel. If you prefer, you can insert objects using the Insert menu instead of the Insert panel. • The Files panel • Lets you manage your files and folders, whether they are part of a Dreamweaver site or on a remote server. The Files panel also lets you access all the files on your local disk, much like Windows Explorer (Windows) or the Finder (Macintosh)
Document window overviewThe Document window shows the current document. You can select any of the following views: • Design viewA design environment for visual page layout, visual editing, and rapid application development. In this view, Dreamweaver displays a fully editable, visual representation of the document, similar to what you would see when viewing the page in a browser. • Code view • A hand-coding environment for writing and editing HTML, JavaScript, server‑language code—such PHP or ColdFusion Markup Language (CFML)—and any other kind of code. • Split Code view • A split version of Code view that lets you scroll to work on different sections of the document at the same time. • Code and Design view • Lets you see both Code view and Design view for the same document in a single window. • Live view • Similar to Design view, Live view displays a more realistic representation of what your document will look like in a browser, and lets you interact with the document exactly as you would in a browser. Live view is not editable. However, you can edit in Code view and refresh Live view to see your changes. • Live Code view • Only available when viewing a document in Live view. Live Code view displays the actual code that a browser uses to execute the page, and can dynamically change as you interact with the page in Live view. Live Code view is not editable. • When a Document window is maximized (the default), tabs appear at the top of the Document window showing the filenames of all open documents. Dreamweaver displays an asterisk after the filename if you’ve made changes that you haven’t saved yet. • To switch to a document, click its tab. • Dreamweaver also displays the Related Files toolbar below the document’s tab (or below the document’s title bar if you’re viewing documents in separate windows). Related documents are documents associated with the current file, such as CSS files or JavaScript files. To open one of these related files in the Document window, click its filename in the Related Files toolbar.
Status bar overview The Status bar at the bottom of the Document window provides additional information about the document you are creating. Tag selector Shows the hierarchy of tags surrounding the current selection. Click any tag in the hierarchy to select that tag and all its contents. Click<body> to select the entire body of the document. To set the class or ID attributes for a tag in the tag selector, right-click (Windows) or Control-click (Macintosh) the tag and select a class or ID from the context menu. Select tool Enables and disables the Hand tool. Hand tool Lets you click the document and drag it in the Document window. Zoom tool and Set Magnification pop-up menu Let you set a magnification level for your document. Window size pop-up menu (Not available in Code view.) Lets you resize the Document window to predetermined or custom dimensions. Document size and download time Shows the estimated document size and estimated download time for the page, including all dependent files such as images and other media files. Encoding indicator Shows the text encoding for the current document.
View the interface • Menus and tools • Common view button • Common stuff we use all the time, especially tables • Layout for tables • Forms buttons • Workspace – Tabs of open files, (* = unsaved) • Code (doc type, head, body tags) - Split - Design • Title tag –important for ranking in Google, Validation, Preview, make sure the html code is clean. • Right panel • Files - site • Assets images, swatches, colors • Tag inspector • Attributes (backgrounds), Behaviors, roll over images • CSS – cascading style sheets • Open or close > panels • Bottom area - Properties panel, formatting, links, sizes, styles • Rulers, can be inches, px, or cm.
For this class, save on your flash drive or save under My Documents and make sure to email document to yourself before the class ends.
We will begin a simple web site • I have prepared the images that you will be using for this site. • Create a folder on your flash drive: Beaver Cheese. Inside the folder, create a subfolder titled images. • Open the zip file and unzip the images. • Save the files in the folder you created and the images in the image folder. • Start a new document. File, new, blank page, HTML, create. • Save file as index • We are working in design mode. Change to Split, change to code. Create a table • Insert menu, table, Rows – 2 , Columns – 1, border 2, table width - 200, cell padding & spacing, later. • Split the 1st row – click into the 1st cell & in the properties panel, click split into 2 rows. • Split the last row into columns – click into cell & split into 3 columns.
Change the size of the table • Modify menu, table, select table • In the properties panel, select 1005 pixels, enter • Enter 178 in the W box. – left. Repeat on the right side – 178 • Make the center W 664 • View the code
View page in Internet Explorer • Save your work • Click F12 • You should be able to see the table. • Remove the border by changing border in the property inspector to 0 Insert a graphic Banner • Click into the 1st cell, Insert, image • Navigate to the images folder, click the beaver cheese banner. • View the code.
Adding text • Open index page text . Double click it from the files menu • Select all the contents and copy • Select the 3rd row, middle column & paste • Preview on the Internet.
Formatting Text • Select all the text & change the font to Verdana. • Change the size to 14. Insert the title name before the paragraph: Our Family font size 16, Bold, dark red, then press enter. If asked for CSS name – type .style 1 and save it as it to the entire site.
Adding Styles to Text • Select text, “Behold the mysterious healing power of Beavercheese.” • Change the targeted rule (CS4) or style (CS3) to style 1. it should change to red to match the title. • Use bullets to highlight certain text • Select from toothache to common cold. Add bullets. If the font style changed, select again and change to style1. • Highlight the paragraph, BeaverCheese will cure….. And indent the text. • Highlight the bulleted section and indent it. • Preview in the browser.