Download
1 / 3
30 likes | 46 Views
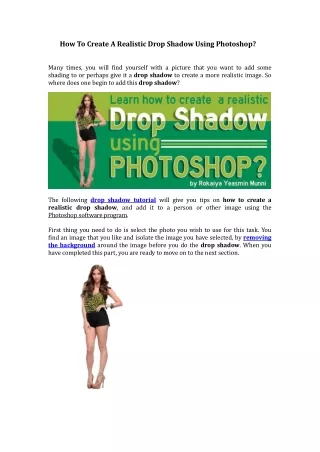
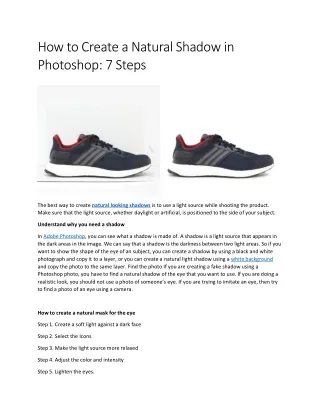
We can say that a shadow is the darkness between two light areas. So if you want to show the shape of the eye of an subject, you can create a shadow by using a black and white photograph and copy it to a layer, or you can create a natural light shadow

E N D
How to Create a Natural Shadow in Photoshop: 7 Steps The best way to create natural looking shadows is to use a light source while shooting the product. Make sure that the light source, whether daylight or artificial, is positioned to the side of your subject. Understand why you need a shadow In Adobe Photoshop, you can see what a shadow is made of. A shadow is a light source that appears in the dark areas in the image. We can say that a shadow is the darkness between two light areas. So if you want to show the shape of the eye of an subject, you can create a shadow by using a black and white photograph and copy it to a layer, or you can create a natural light shadow using a white background and copy the photo to the same layer. Find the photo If you are creating a fake shadow using a Photoshop photo, you have to find a natural shadow of the eye that you want to use. If you are doing a realistic look, you should not use a photo of someone’s eye. If you are trying to imitate an eye, then try to find a photo of an eye using a camera. How to create a natural mask for the eye Step 1. Create a soft light against a dark face Step 2. Select the Icons Step 3. Make the light source more relaxed Step 4. Adjust the color and intensity Step 5. Lighten the eyes.
Step 6. Make the shadow darker Step 7. Make the shadow brighter. Step 8. Make the shadow smaller. Step 9. Adjust the shape of the eyes. Step 10. Adjust the shape of the eyebrows. Step 11. Add shadow to the eyelashes Step 12. Use a highlight brush to make the hair more vibrant. How to create a subtle curve at the top of the forehead Step 1. Select the Icons Step 2. Adjust the color and the opacity Step 3. Lighten the shadows. Step 4. Make the eyes look bigger How to create a natural shadow in Photoshop Step 1. Select the Icons Step 2. Adjust the color and the opacity Step 3. How to make a natural shadow Starting from our previous tutorial on how to create a cheek shadow, we move to the next step, to make a natural shadow and a perfect fake shadow. To do this we are going to use the Gradient Map feature and the Bleed filter to create a natural shadow and to bleed the shadow. Step 1 Open the project, the new layer is named ‘Natural Shadow’, just copy its color. Open the Preferences dialog, and the settings are adjusted as follows: Red: 16 Blue: 100 Green: 300 Brightness: 10 Darkness: 30 Step 2 We want a good sharp image, as well as a better image in the shadow. We want the shadow to look sharp, but without loosing it’s contours. To achieve this we are going to change the Blending mode of the shadow to Contour Blending. How to add a natural shadow to the eyes Step 1 Open your image, select the face and open a new document on Photoshop CS3 or above. Choose the “Active” layer mask to keep the shape of the subject face for now.
Step 2 When we select the new document as a whole, we can use the magic wand tool to change the layer mask, also to alter the color of the layers by using the Color Range tool and the color picker. Use the red color for the brightness of the layer mask. Step 3 Go to the layer mask tool and a new layer mask for the subject face. Set the active layer layer to the face as a whole, mask the whole face and select the area in the middle of the forehead. Step 4 Go to the Color Range tool and select the black color to have the selected area darker. Now use the Ctrl + L and select the check box, which indicates a new layer. Conclusion In this tutorial you learned how to create natural shadows in Photoshop, and the 7 step method that you can apply to achieve the most natural and stunning portrait with the right bokeh effect. I hope you liked my tutorial and I will see you again next week.