Google Maps API
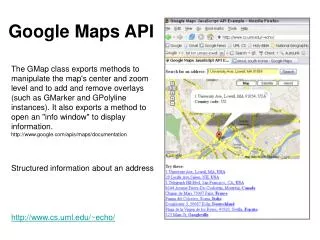
Google Maps API. Google Maps on Android. A nice API for mapping applications. Pre- reqs. Need to have the Google API added in Eclipse’s Android Manager Make sure your build target and Android Virtual Device (AVD, or the simulator) support the maps More info:

Google Maps API
E N D
Presentation Transcript
Google Maps on Android • A nice API for mapping applications
Pre-reqs • Need to have the Google API added in Eclipse’s Android Manager • Make sure your build target and Android Virtual Device (AVD, or the simulator) support the maps • More info: http://developer.android.com/resources/tutorials/views/hello-mapview.html
Add the MapView • In the res/layout/main.xml file: • Add your MapView • Details in the Tutorial http://developer.android.com/resources/tutorials/views/hello-mapview.html
A Key • You will need a Google Maps API Key • It’s free - you can register with the SDK debug certificate. • When deploying your app for real, you’ll need a real certificate • http://code.google.com/android/add-ons/google-apis/mapkey.html
Using the Map Controller • Using the Map is easy… • MapControllermyMC = myMapView.getController(); • myMC.setZoom(17); // set the zoom level • myMapView.setSatellite(); // sets sat view
Map Control • You can zoom, set points, routes, etc. • Adding overlays allows you to note all places of interest from a list • Overlays are discussed in the tutorial • http://developer.android.com/resources/tutorials/views/hello-mapview.html
Intents • Intents allow you to pass a message • Within your app • To existing resources on the phone, such as the dialer
Uses • To launch the dialer… • To load another activity in your app… • You can also create custom intents…
Launch another Activity Intent intent = new Intent(FirstActivity.this, AnotherActivity.class); startActivity(intent); This will launch another activity (screen) without destroying the first
Example Intent I = new Intent (Intent.ACTION_DIAL, Uri.parse(“tel:647-722-3888”)); startActivity(i);
Launch Google Maps String uri = “geo:37.523156,-121.084917” Intent myIntent= New Intent(android.content.Intent.ACTION_VIEW, Uri.parse(uri)); startActivity(myIntent);
Intents can • Return a result. • startActivityForResult(); • Be filtered by your app so that you can respond to certain intents. • Create your own and respond to them
Android Intent Docs • http://developer.android.com/guide/topics/intents/intents-filters.html
Storage • Four basic ways • Shared Preferences • Database • Files on the Device • The “cloud” • http://developer.android.com/guide/topics/data/data-storage.html
Shared Preferences • Easy, built in way to save preferences to the device • App settings, • Similar to the Windows registry • SharedPreferences class in the API
SharedPreferences Example • SharedPreferences settings = getSharedPreferences(PREFS_NAME, default_value); • boolean value = settings.getBoolean(“prefName", default_value);
Database • Local database on the device • SQLite • For heavier-duty data requirements / queries db.execSQL(“SELECT * …”);
Files • Can store data to a file • Useful for saving media files, save games, etc. • Just like writing files in Java FileOutputStreamfos = openFileOutput(FILENAME, Context.MODE_PRIVATE); fos.write(string.getBytes()); fos.close();
Saving to the Network • Persistent storage, but… • A network connection may not always be available • May have to create your own server • android.net libraries stream to a network connection
Amazon AWS • Allows you to save data to Amazon servers • An API for Android • http://aws.amazon.com/
OpenFeint & Scoreloop • A nice resource for games • Allows you to easily save high scores and achievements • Creates leaderboards, friend lists, etc. • www.OpenFeint.com • www.ScoreLoop.com
Broadcast Receivers • These allow you to ‘intercept’ messages • That you create, or… • That the system sends
The coolest part • The user doesn’t need to start your app • If your receiver listens for the specific Intent that fired, that code will run • Or you can decide when a receiver is active through registering / deregistering
2 ways to create • In xml • <receiver> tag in AndroidManifest.xml • In Code • Context.registerReceiver(); • Gives more control, but not active until your app has run
Then… • Just fill in the onReceive() method. • This is the code that “handles” the event
Some System Intents • ACTION_TIME_TICK • A minute has passed • ACTION_BATTERY_LOW • Need to plug it in! • SMS_RECEIVED • You got a text!
Android BR Docs • http://developer.android.com/reference/android/content/BroadcastReceiver.html
Databases • Android uses the SQLite Database • A lightweight database server • Returns the Android ‘Cursor’ instead of rows – for efficiency.
Basics • It’s useful to create a “Helper” class to simplify database interactions • Methods will include: • getRecord(long rowIndex) to return a specific record • getAllRecords() to return a Cursor
SQLiteOpenHelper • Your helper class can also extend the SQLiteOpenHelper abstract class • To simplify creating and opening databases
Cursors • Instead of returning rows, you get a Cursor to manage the results of a query • Cursor myResult = myDB.query (…); • myResult.getString(columnIndex);
Notepad Tutorial • Great tutorial for database concepts • Includes: • Integrating the ListView with a DB -> • http://developer.android.com/resources/tutorials/notepad/index.html
Signing • This is required to release your application • Several Steps… • The tutorial • http://developer.android.com/guide/publishing/app-signing.html
Apps • The device will only run signed apps • You can issue your own certificate, or use the developer certificate for testing • To release, you must have a certificate with a 20+ year expiration date
Eclipse • Right-click on the project • Android Tools -> Export Signed Application • This creates the .apk • You can then load it to a web server
Device • Make sure your device allows apps that are not from the app store • In configuration menu
Testing… • Very important! • Test on several devices • Screen resolutions • No network connectivity • Orientation • Interruption from calls • GPS if applicable • The simulator is usually a best-case scenario!
Simulator • Test on all available AVD versions • Specify the <uses-sdk> parameter in the manifest, and test on all devices after that version
Simulator • In Eclipse’s Run->Run Configuration • Specify Network speed and latency to test under varying conditions • Test on a real device also
Once fully tested • Submit to the Android Marketplace • Should obfuscate source code • Harder to reverse engineer • Proguard does the trick • Enabled in eclipse – your app will have a proguard.cfg file
Submission • Google charges $25 to register • You may then submit as many apps as you like • Activation in the Google marketplace is almost instantaneous • Amazon AppStore takes 2-3 weeks for approval
Proguard Documentation • http://developer.android.com/guide/developing/tools/proguard.html • Shrinks, optimizes, and obfuscates the code