Download

1 / 5
50 likes | 55 Views
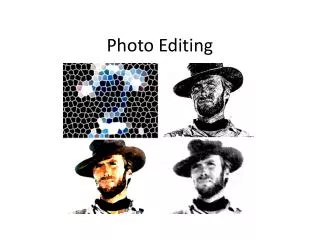
I'm a professional photographer.This is my new tutorial, If like this tutorial you can share it.<br>

E N D
Online Photo Editing Service Company In USA |ORBIT GRAPHICS https://www.orbitgraphics.com/
Best Photo Editing Services Photo Editing is the best service provider in our company (ORBIT GRAPHIS). Our photo editing team always ready for this service.The post-processing stage is an essential component of digital photography. Even once you've taken a picture that essentially looks perfect to you, there's always room for a little picture editing magical to take it to another level. So what exactly are you missing? The solution is really simple: you want to your game up in the Photoshop department and find out how to edit pictures like a pro. Now create a gentle S-curve in the Green and Blue stations. Select Green from the station drop-down list. In the graph, click the green diagonal line to the left of the middle and pull down marginally. It is possible to alter the preferences to the adjustment layer in the Properties window which automatically opens. The attractiveness of using adjustment layers rather than altering Brightness/Contrast through the Image > Adjustments menu, is that you can preserve the original picture when you save as a .pad or a different file type that saves layers. This feature applies to each adjustment layer mode. To get a fast and easy vignette, hit Command + Shift + N (consult with our free download for more Adobe keyboard shortcuts) and hit on enter/return to add a fresh layer. As you can see here, I decreased the brightness by -16 and raised comparison to 65, making a much richer image. By producing a vignette, you delineate the boundaries of the picture from its surroundings, increasing focus on the subject matter. You might even use a vignette in tandem using the Curves adjustments above to further the nostalgic look.
Tip: During the alterations procedure, the picture will start to look funky. Don't judge the results before you complete these steps. You can return to each station to adjust if necessary. I'll use Curves with this image to shift the individual RGB channels, which will attain a washed-out, old picture appearance, while simultaneously increasing contrast. This may impart a cooler tone into the image. Hit the drop-down channel menu again, then repeat this for the Blue channel. You are likely to end up with a more conducive, outdated picture that communicates a more romantic or nostalgic tone. Proceed into Edit from the main menu and then choose Fill. Now, add a layer mask by clicking on the Add layer mask button at the bottom of the Layers window. It should be full of White. If it's not, choose the layer mask by clicking on it and apply the Load steps from above, choosing White. One of the simplest yet most effective ways to raise dynamics or enhance the total definition of an image is to use a Brightness/Contrast Adjustment Layer. Use it to lighten or darken the image (brightness) and decrease or increase the gap between lights and darks (comparison). Hit B in your keyboard, or select the Brush tool from the Tools menu. Right click to bring up the brush choices window. Select Curves from the adjustment layers menu, as above, and consult with the Properties window. Locate the drop-down menu which says RGB near the top of the Properties window. Click on it and Pick the Red channel. Move the dark slider at the bottom left of the graph to the right a bit. This reduces the number of reds from the dark regions of the image. In regards to developing your craft as a photographer, you've done everything right.
You have learned all the fundamentals. You have experimented with all kinds of makeup tricks and lighting techniques. And first and foremost, you've finally mastered your camera. But, despite all your efforts, some of your photographs still do not turn out how you want them to. And for some reason, they're never quite as stunning as the photographs you have seen from a number of the more seasoned photographers on the market. Here are the settings to the layer mask I used and also the outcomes. Using multiply works for some graphics better than many others -- it is not mandatory. There are lots of photo editing tools on the market, but many photographers typically start out with Adobe Photoshop for basic editing. It's a powerful yet intuitive tool which can help you bring out the best in your pictures, so if you are a serious photographer, it is very important that you learn how to edit pictures with Photoshop. The best way to edit photographs using Photoshop: With the layer mask selected, make brownish the foreground color to your brush. Subsequently, simply click in the center of the image to show the original below. You might want to click a couple of times to correct the coverage. If you mess this up, simply re-Fill it using black. Adjust the Size slider so the brush becomes huge, about as big as the picture, or slightly bigger or smaller. Slide the Hardness all of the way down. This will give the soft gradual edges we must paint a vignette into the mask.
When you create adjustments layers, Photoshop automatically joins a mask to the layer -- the white box next to the icon in the coating. You can select an area you need to change, add the Adjustment Layer, and the changes you make from the controls will only affect that pre-selected location. You might even use the paintbrush in black to conceal areas, leaving the affected regions to be adjusted by the adjustment layer. Fixing the Curves within a picture can change the overall tone or separately alter the worth of each color channel. To learn more or refresh your skills, refer to the introductory guide to Curves. Relevant Topics ============ photo processing service photo retouching photo editing business hire a photo editor image editing price list image editing cost best photoshop services professionally edit photos photo editor packages