Download
1 / 14
140 likes | 271 Views
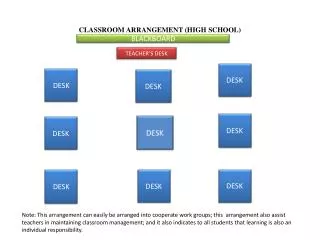
This high school (9th grade) mathematics special education classroom is designed to maximize student engagement and learning through technology. Featuring eight desks arranged in two collaborative rows, this setup encourages group work and fosters communication. The classroom incorporates a Smart Board for interactive teaching, multiple whiteboards for instruction and collaboration, and various technology stations, including computers and iPads. Assistive technologies are integrated to support diverse learning needs, enabling students to reach their highest potential in mathematics.

E N D
High School Mathematics Special Education Classroom By Mark Valentino
Classroom Description This is the classroom design for a High School (9th Grade) Mathematics Special Education classroom. The classroom uses many forms of technology which are geared towards the subject of Mathematics. The classroom uses a set-up of eight desks with multiple “stations” that can be used for group collaboration (regular work station, iPad work station, computer station). There are many different routes that can be taken to teach a lesson in this classroom, which makes it an effective setting for learning the subject of Mathematics. The possibilities are virtually endless, as so many subjects can be taught in this highly integrated classroom for special education. Special education students will be able to achieve their maximum potential with the help of the many assistive technologies.
Files White Board Smart Board Computer Desk Desk Teacher Desk Computer Desk Desk Desk Desk Computer Table Cabinet Desk Desk Computer Table Door White Board Cabinet White Board
Desks • There are eight desks in the classroom. The desks are lined up in two rows, with four desks in each row. The desks face the Smart Board for easy viewing, along with easy view of the White Board. The desks are also perfect to form four groups of two by simply pushing side-by-side desks together. They are close together which can result in easy communication and collaboration. Additionally, the desks are placed so the instructor has enough room to walk around and be involved.
Smart Board • The Smart Board is a great educational tool. It is placed in front of the eight classroom desks for easy viewing and close enough for student interaction. Students have the ability to get up and get involved with this powerful learning tool. The Smart Board acts as a giant interactive computer, with a myriad of additional educational functionalities. • Next to the Smart Board is a teacher laptop which is needed to run the Smart Board programs and documents.
White Board • The White Board is placed next to the Smart Board, which extends the spectrum of student viewing up at the front wall. It is a great tool for instruction and can also be utilized for student interaction. While students may be viewing a document on the Smart Board, the instructor can be writing notes or creating problems on the White Board. • Another White Board has been placed at the back of the classroom for use of students participating in group work. • The last White Board in the bottom right corner of the room is used for the teacher to write down homework assignments and other important information .
File Cabinet • The file cabinet is placed in the corner of the room by the teacher’s desk and will be used by the teacher only. It is used so the instructor can store important documents including work/tests/assignments that students have handed in.
Storage Cabinets • These storage cabinets will be in the classroom to store multiple functional tools that will be used amongst the students. • Smart Board Clickers will be in one storage cabinet: these clickers are used along with the Smart Board and are great for interactive learning. Quizzes can be created with Smart Board software with multiple choice answers that can be answered on each students clicker. Answers can be viewed on the Smart Board in real time. • Calculators will be stored in another storage cabinet: Calculators will often be used in the Mathematics classroom. There will be many calculators and the students will have easy access to them.
Working Table • This Working Table is a place where one student (or even multiple students) can come sit down to get some work done. It can also be used for group collaboration. Additionally, the table can be used for teacher/student or teacher assistant/student one-on-one interaction. It is a location that does not have the most technological capabilities involved, since the table will focus on work that can be done on handouts. • The circular aspect of the table promotes easy group interaction and makes sure that everyone is closely involved.
iPad Table • In the back of the classroom there will be a Table with multiple iPads. These iPads will have multiple educational applications downloaded on them which will be ready for the lesson/topic that is being taught on the current day. While at this table, students can collaborate and work together to complete certain tasks on these innovative learning tools. • Here is a link to a review of the iPad in the educational environment: http://www.youtube.com/watch?v=hfyNxYGqxRY&feature=plcp
Projector • The projector will be placed on the ceiling above the desks. The projector will be used to display information up on the Smart Board. A teacher can prepare worksheets to be displayed, or even show a video/movie. In addition to teacher capabilities, students can create projects on their own personal laptops (or even the class iPads), which can be hooked up to the projector for easy class presentation.
Computer Station • The Computer Station consists of four desktop computers on the right side of the classroom. These four computers are strategically placed together to promote interaction amongst students working on the computers. There are enough computers in the room to utilize station movement since not every student will be at a computer (they can by occupied at the Group Table or iPad Table). Computers are a source of an unlimited amount of information and a grand amount of educational software. • Clicker 6 is one example of a phenomenal special education resource. Here is a link to a review of Clicker 6 and its educational functionalities: http://www.youtube.com/watch?v=2e2gYPODSvI&feature=plcp
Work Shelf • The work shelf in the back of the classroom is a place where students can hand in work. It will have multiple shelves that can be made for different submissions: homework, tests, late work, and much more. The shelves will be clearly labeled so students are not confused where to place what they are handing in at that time.
Sources • Image Sources: • Smart Board Technologies Website • PowerPoint Clip Art • Small Business Trends iPad image